Read and Write Files with the FileAccess Tool
This page explains how to configure and use the FileAccess tool to read and write text files and Office files.
What Is the FileAccess Tool?
The FileAccess tool is a tool for accessing files on a local machine or server. AI agents and workflows can read from and write to files and folders under a specified base directory.
What You Can Mainly Do
- Read and write text files
- Read Office files such as Word and Excel
- Create folders and retrieve folder lists
Goal of This Guide
Configure the basic settings of the FileAccess tool so that AI agents and workflows can perform file operations.
Process Flow
- Configure the basic settings of the FileAccess tool (specify the base directory)
- Configure the FileAccess tool for an AI agent
- Use the FileAccess tool in a workflow
1. Basic Settings
-
Add the tool.
From the Tools tab, select [Create New] - [FileAccess].
-
Set the base directory.
Set the base directory from the [Settings] tab.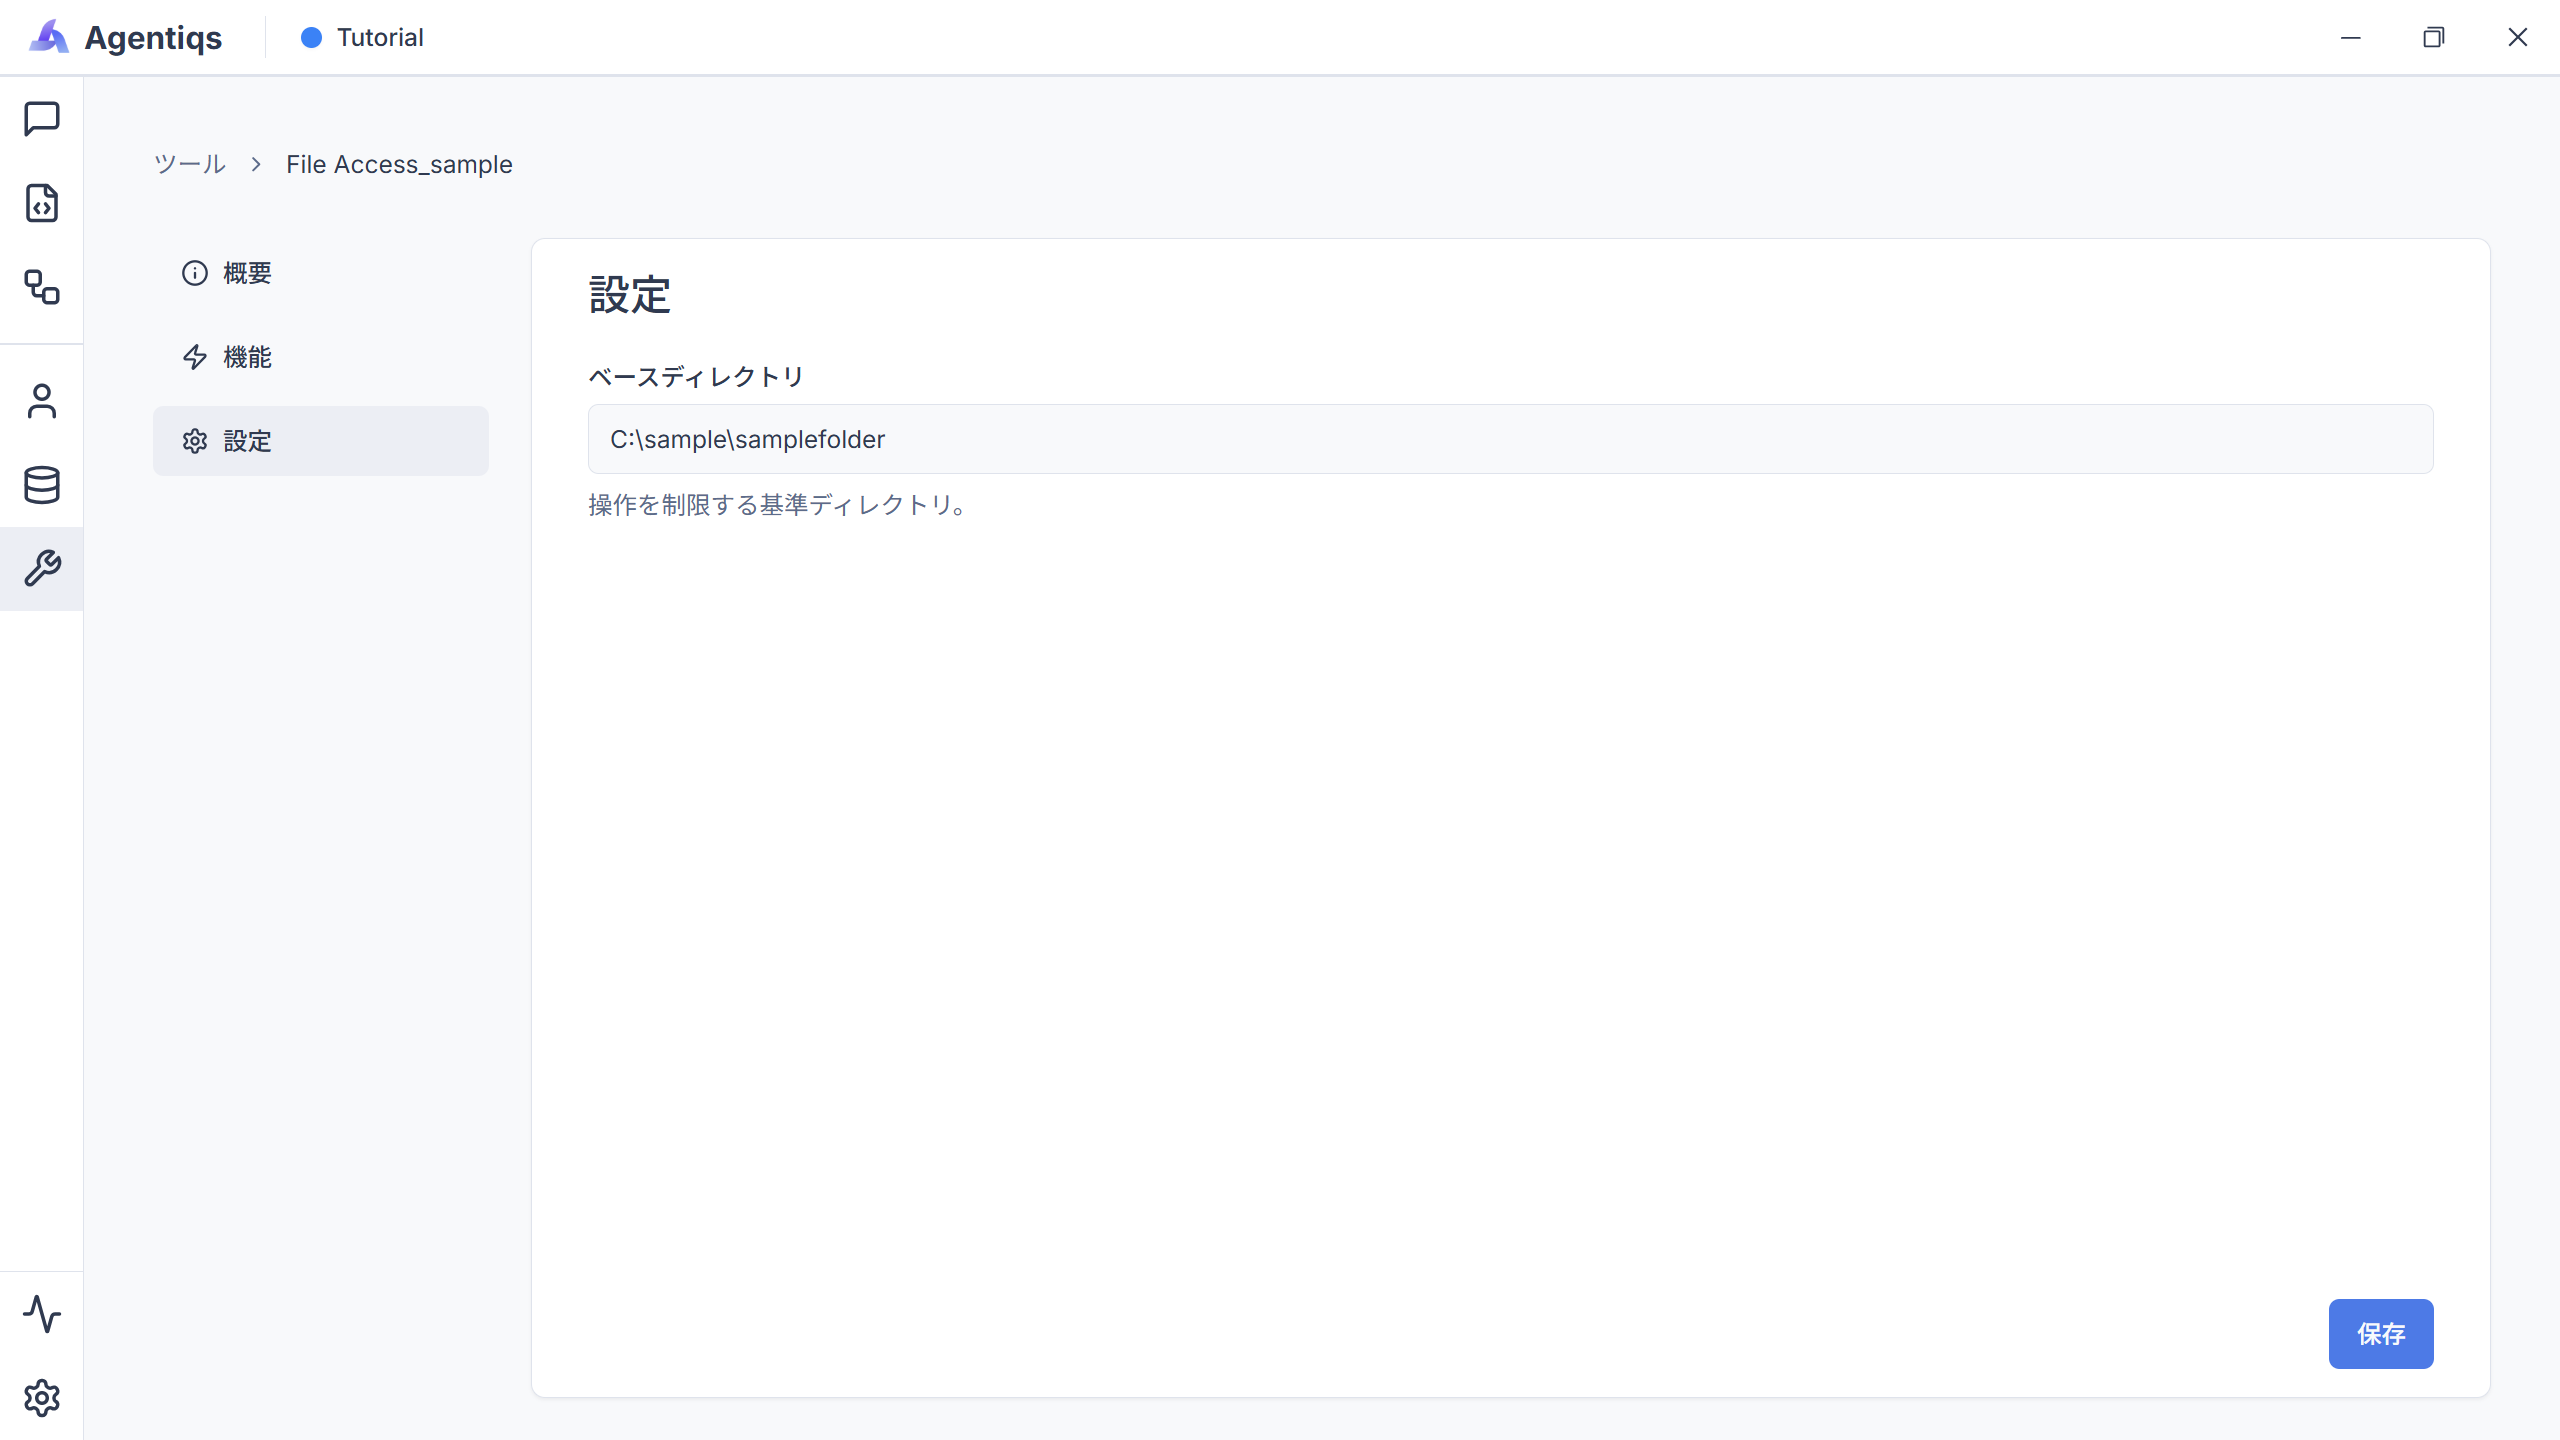
The base directory is the parent folder that serves as the starting point for file operations.
The FileAccess tool can operate only on items under this directory.
Set the scope with the minimum required permissions according to your use case, for example:
- If you use it for a specific project: the folder for that project.
- If you want to use it more generally: a path close to the root such as
C:/.
2. Configure It for an AI Agent
By configuring the FileAccess tool for an AI agent, the AI agent can freely operate on folders and files under the base directory.
-
From the [Agents] tab - [Create New], select [Empty Agent].
-
In the tool settings, select and enable the FileAccess tool.
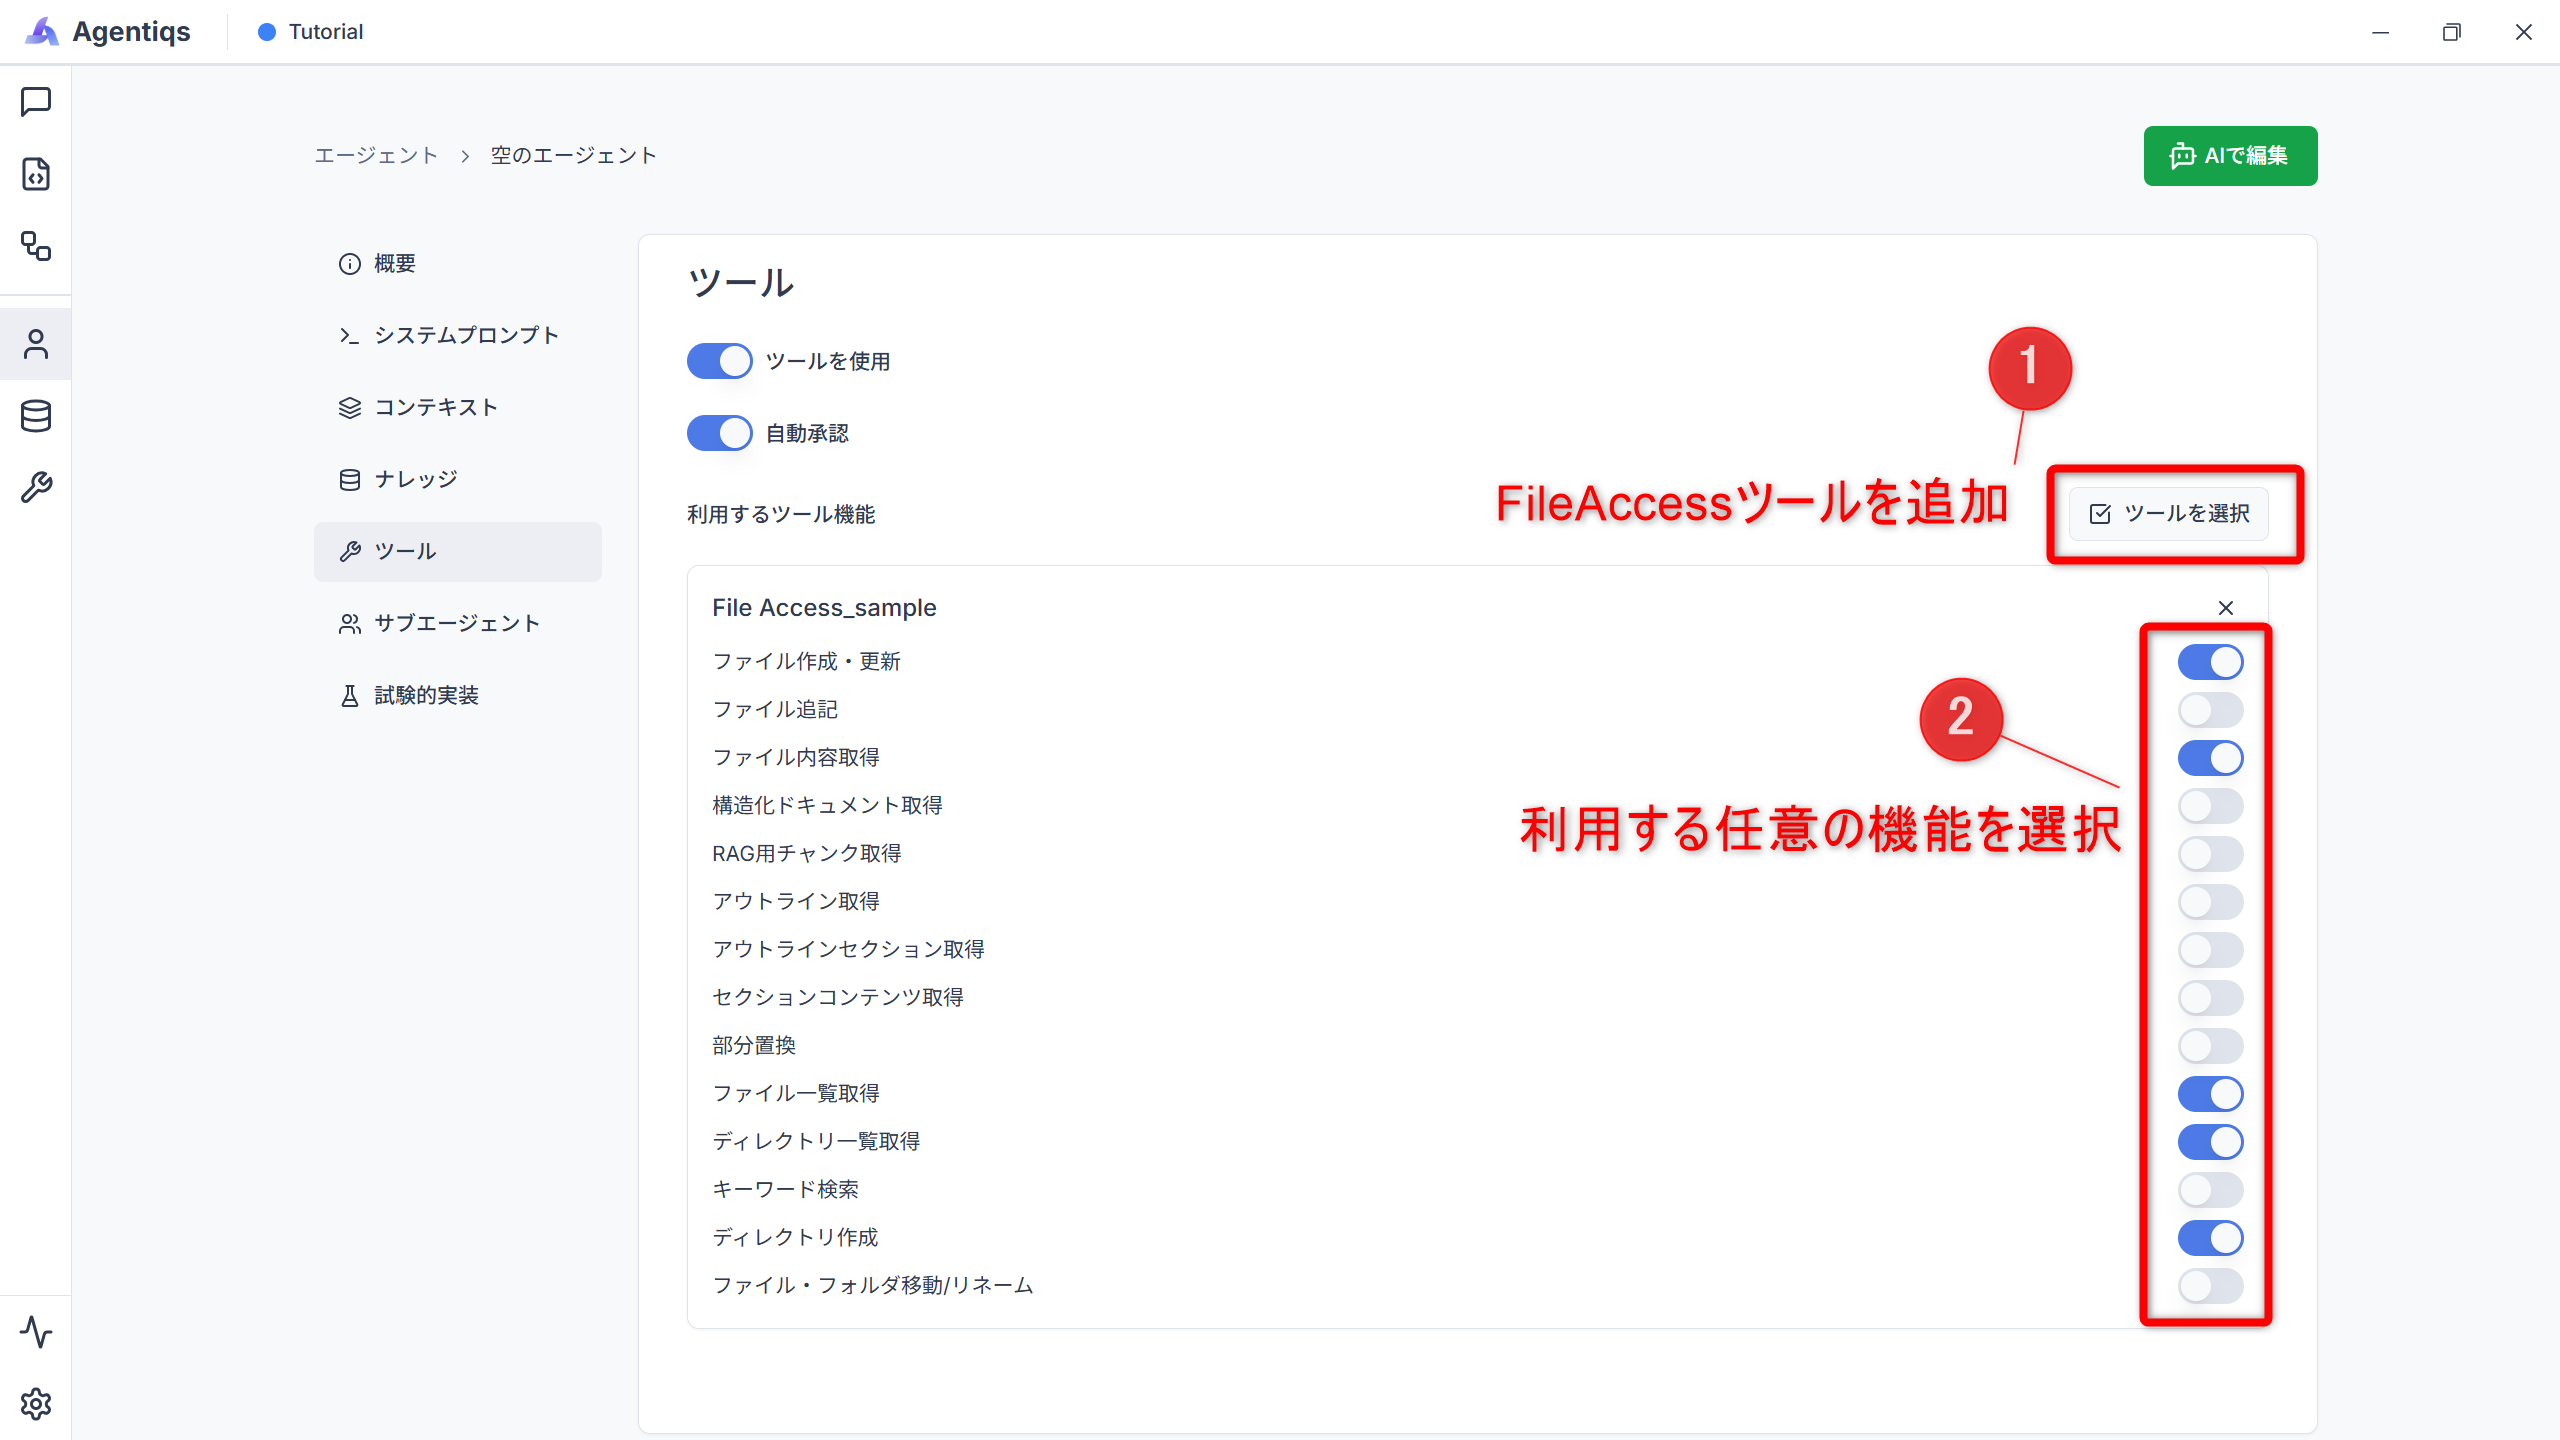 Optimize Token Consumption
Each enabled function of the FileAccess tool, such as reading and writing, consumes tokens.
Leave any unused functions turned off.
After the configuration is complete, you can ask the AI agent to perform file operations.
For example, even without a system prompt, it can work from a request like the following alone.
Research the latest AI trends, summarize the findings, and output them as a Markdown file to
{output folder path}
The AI agent will automatically handle the research, summarization, and file output.
3. Use It in a Workflow
The FileAccess tool can also be used within workflow steps.
Here, this guide uses a workflow that retrieves the contents of all files under a specified folder as an example.
Workflow Process Flow
- Retrieve the list of files under the specified folder
- Loop through the file list
- Retrieve the content of each file
Create a Workflow
-
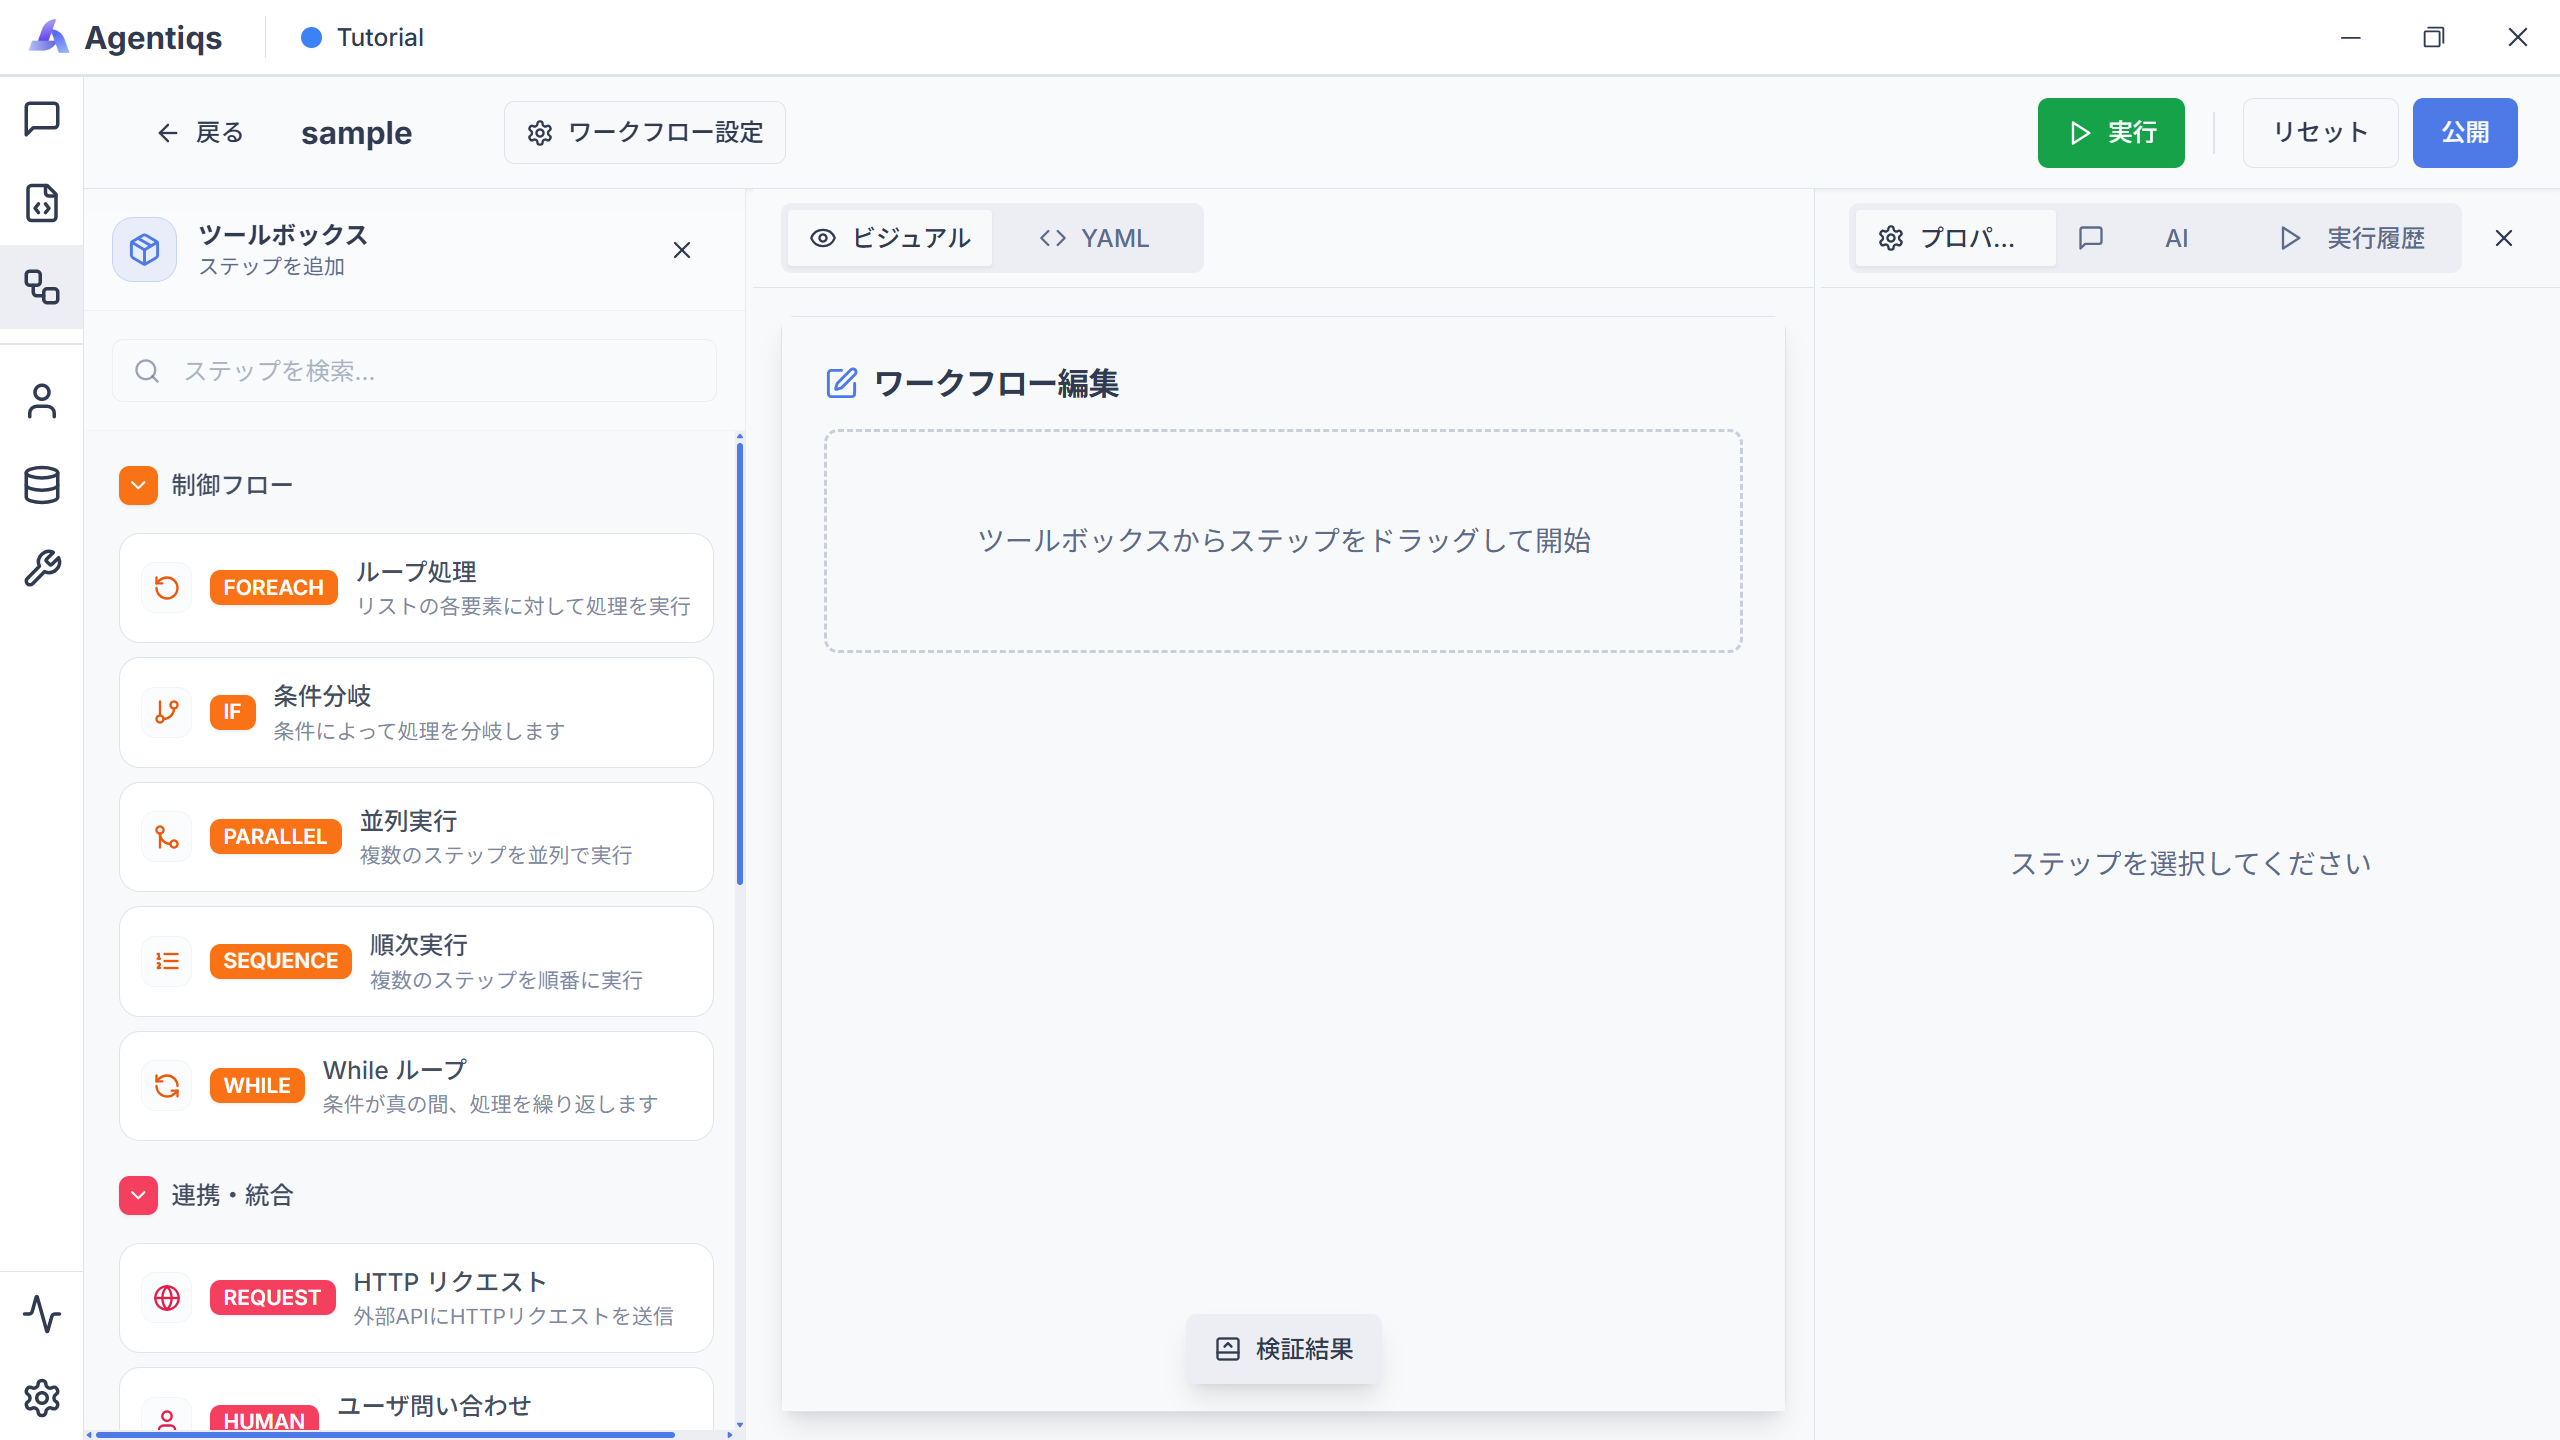
Open the workflow editor screen.
-
Retrieve the list of directories under the specified folder.
Drag and drop "Execute Tool" from the toolbox on the left and place it as the first step, then configure its properties.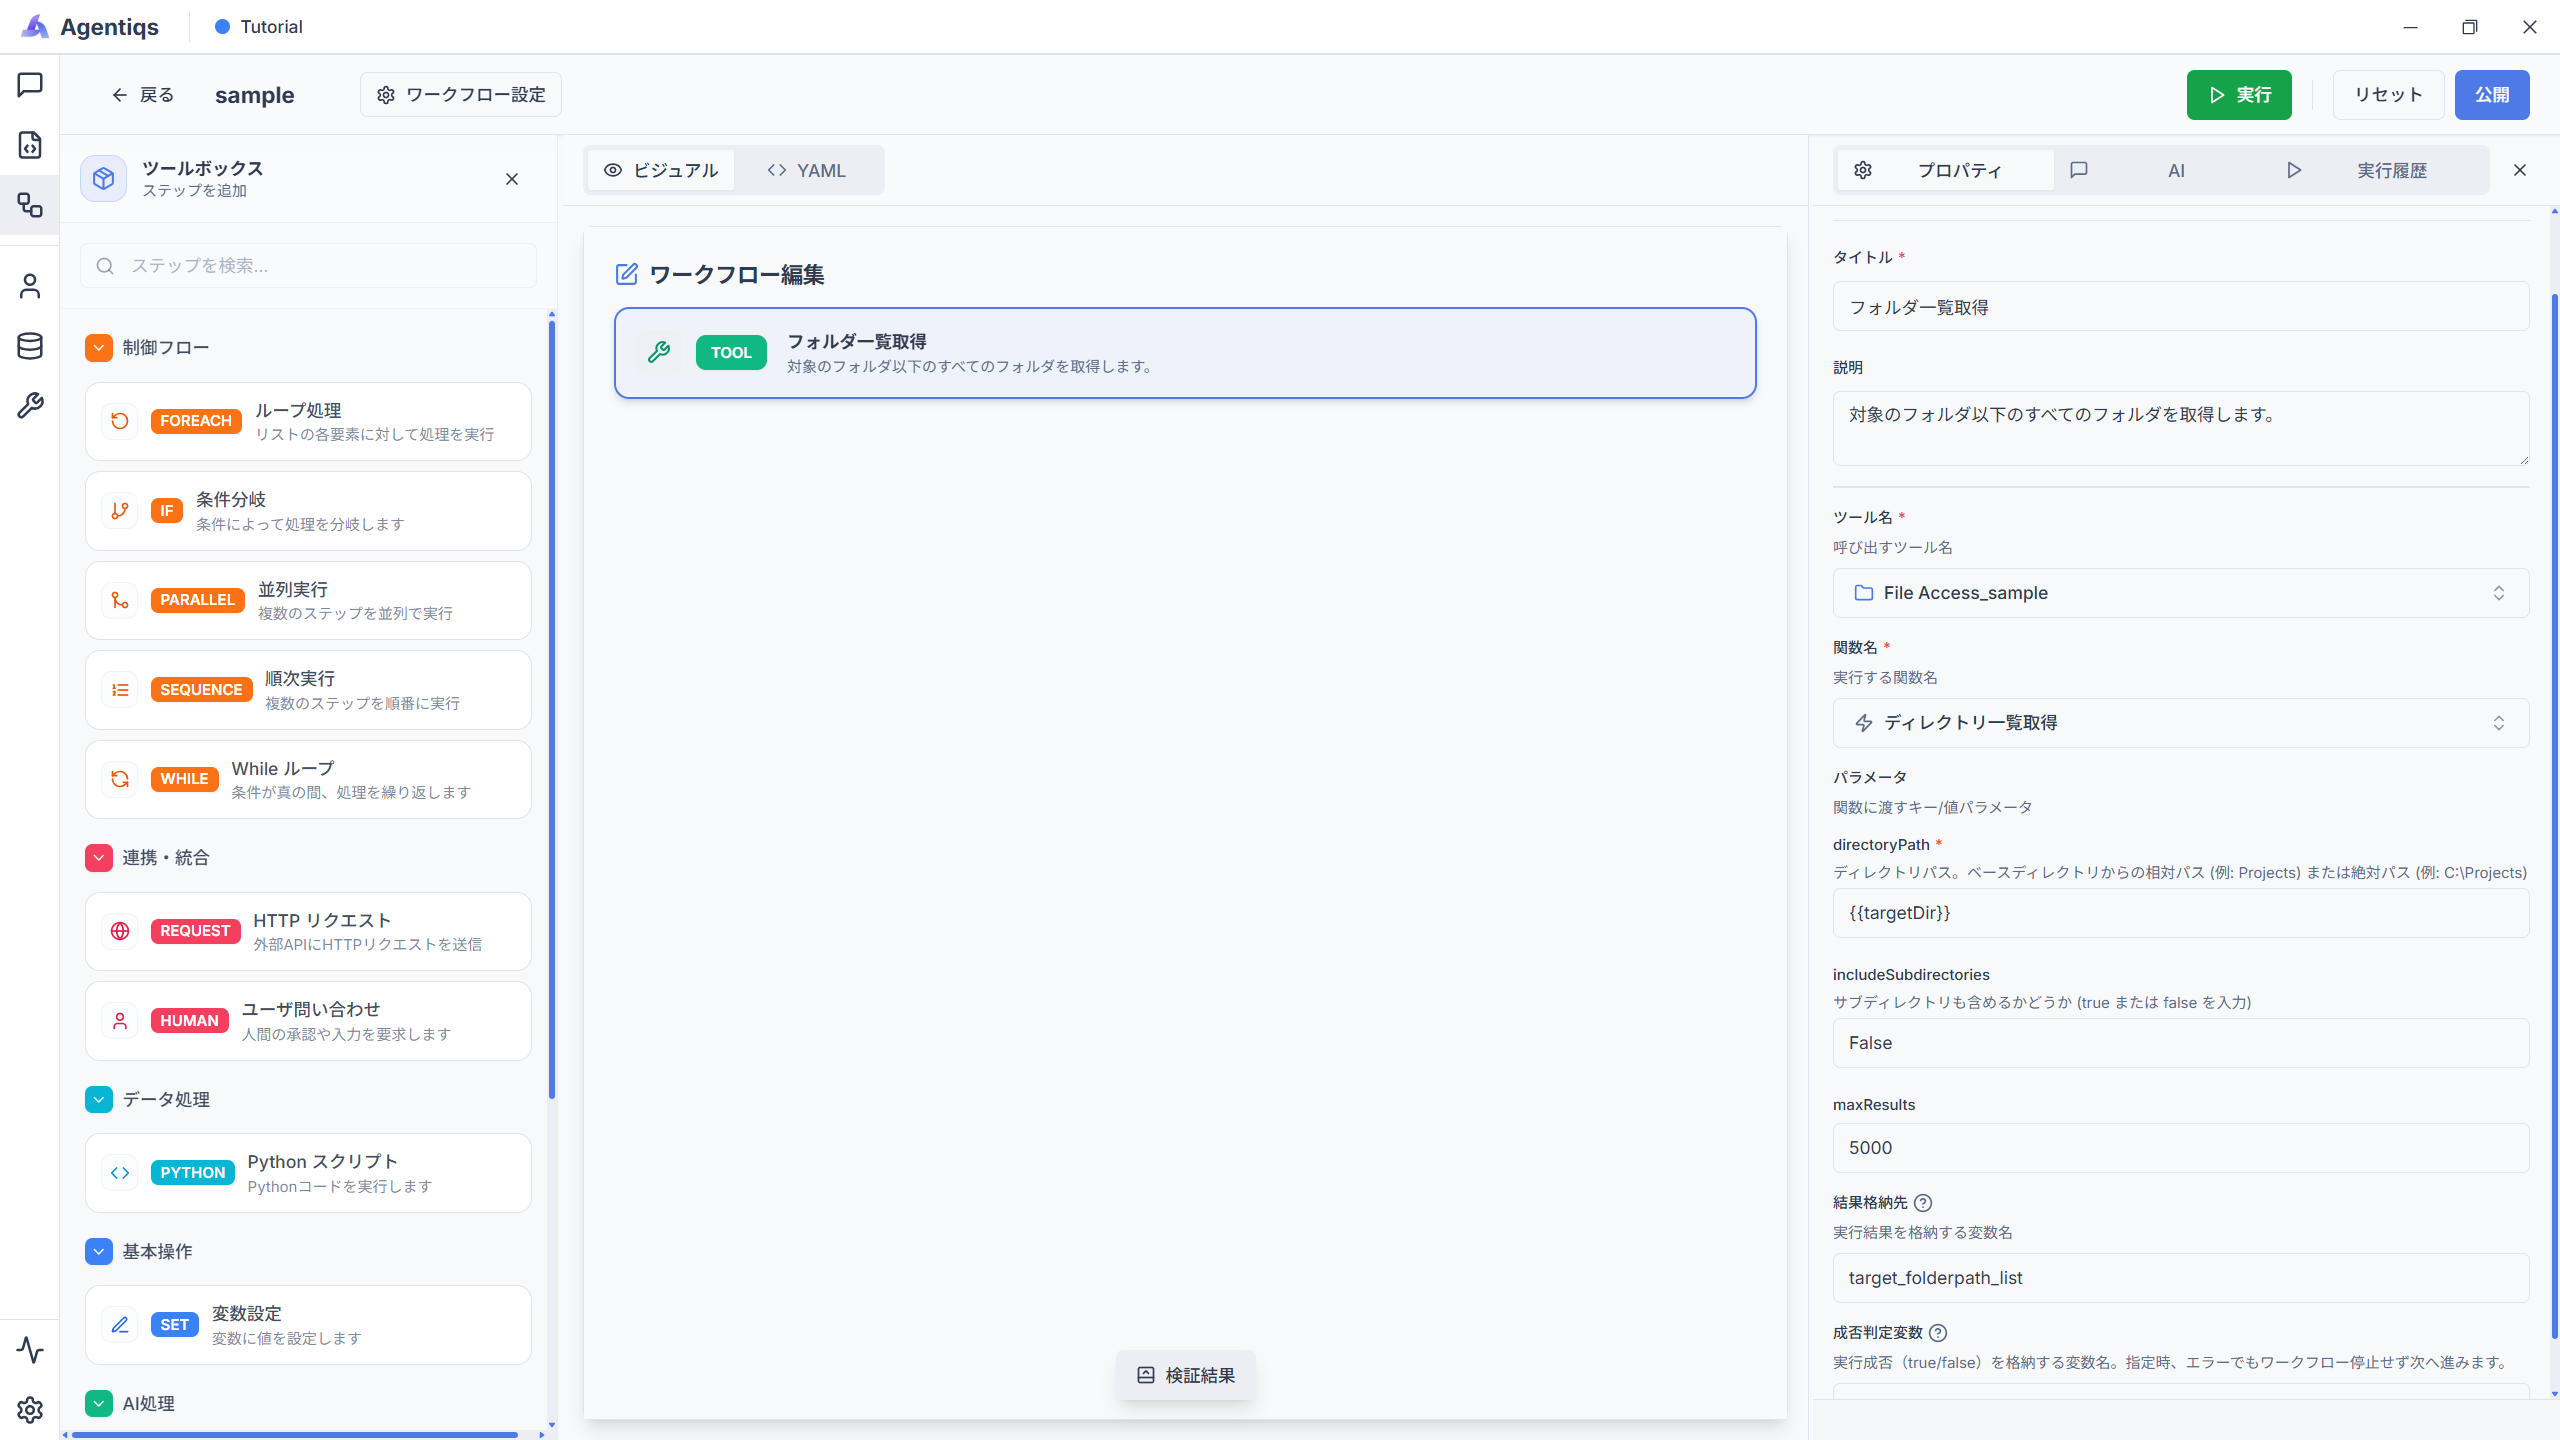
Property Settings
Retrieve the list of directories under the specified folder and store it in
target_folderpath_list.Property Required Setting Item Details Title Title Use an easy-to-understand name so you can identify it later. Description What the step does Tool Name 〇 The FileAccess tool you created Function Name 〇 "Get Directory List" This node retrieves the directory list. directoryPath 〇 Example: {{targetDir}}Specify the folder path to retrieve. includeSubdirectories 〇 False Specify whether to include subfolders. They are not included in this example. maxResults Example: 5000The maximum number of directories to retrieve. Result Storage 〇 Example: target_folderpath_listStore the execution result in any variable. -
Configure loop processing to retrieve the folders stored in each directory.
Drag and drop "Loop" and configure its properties.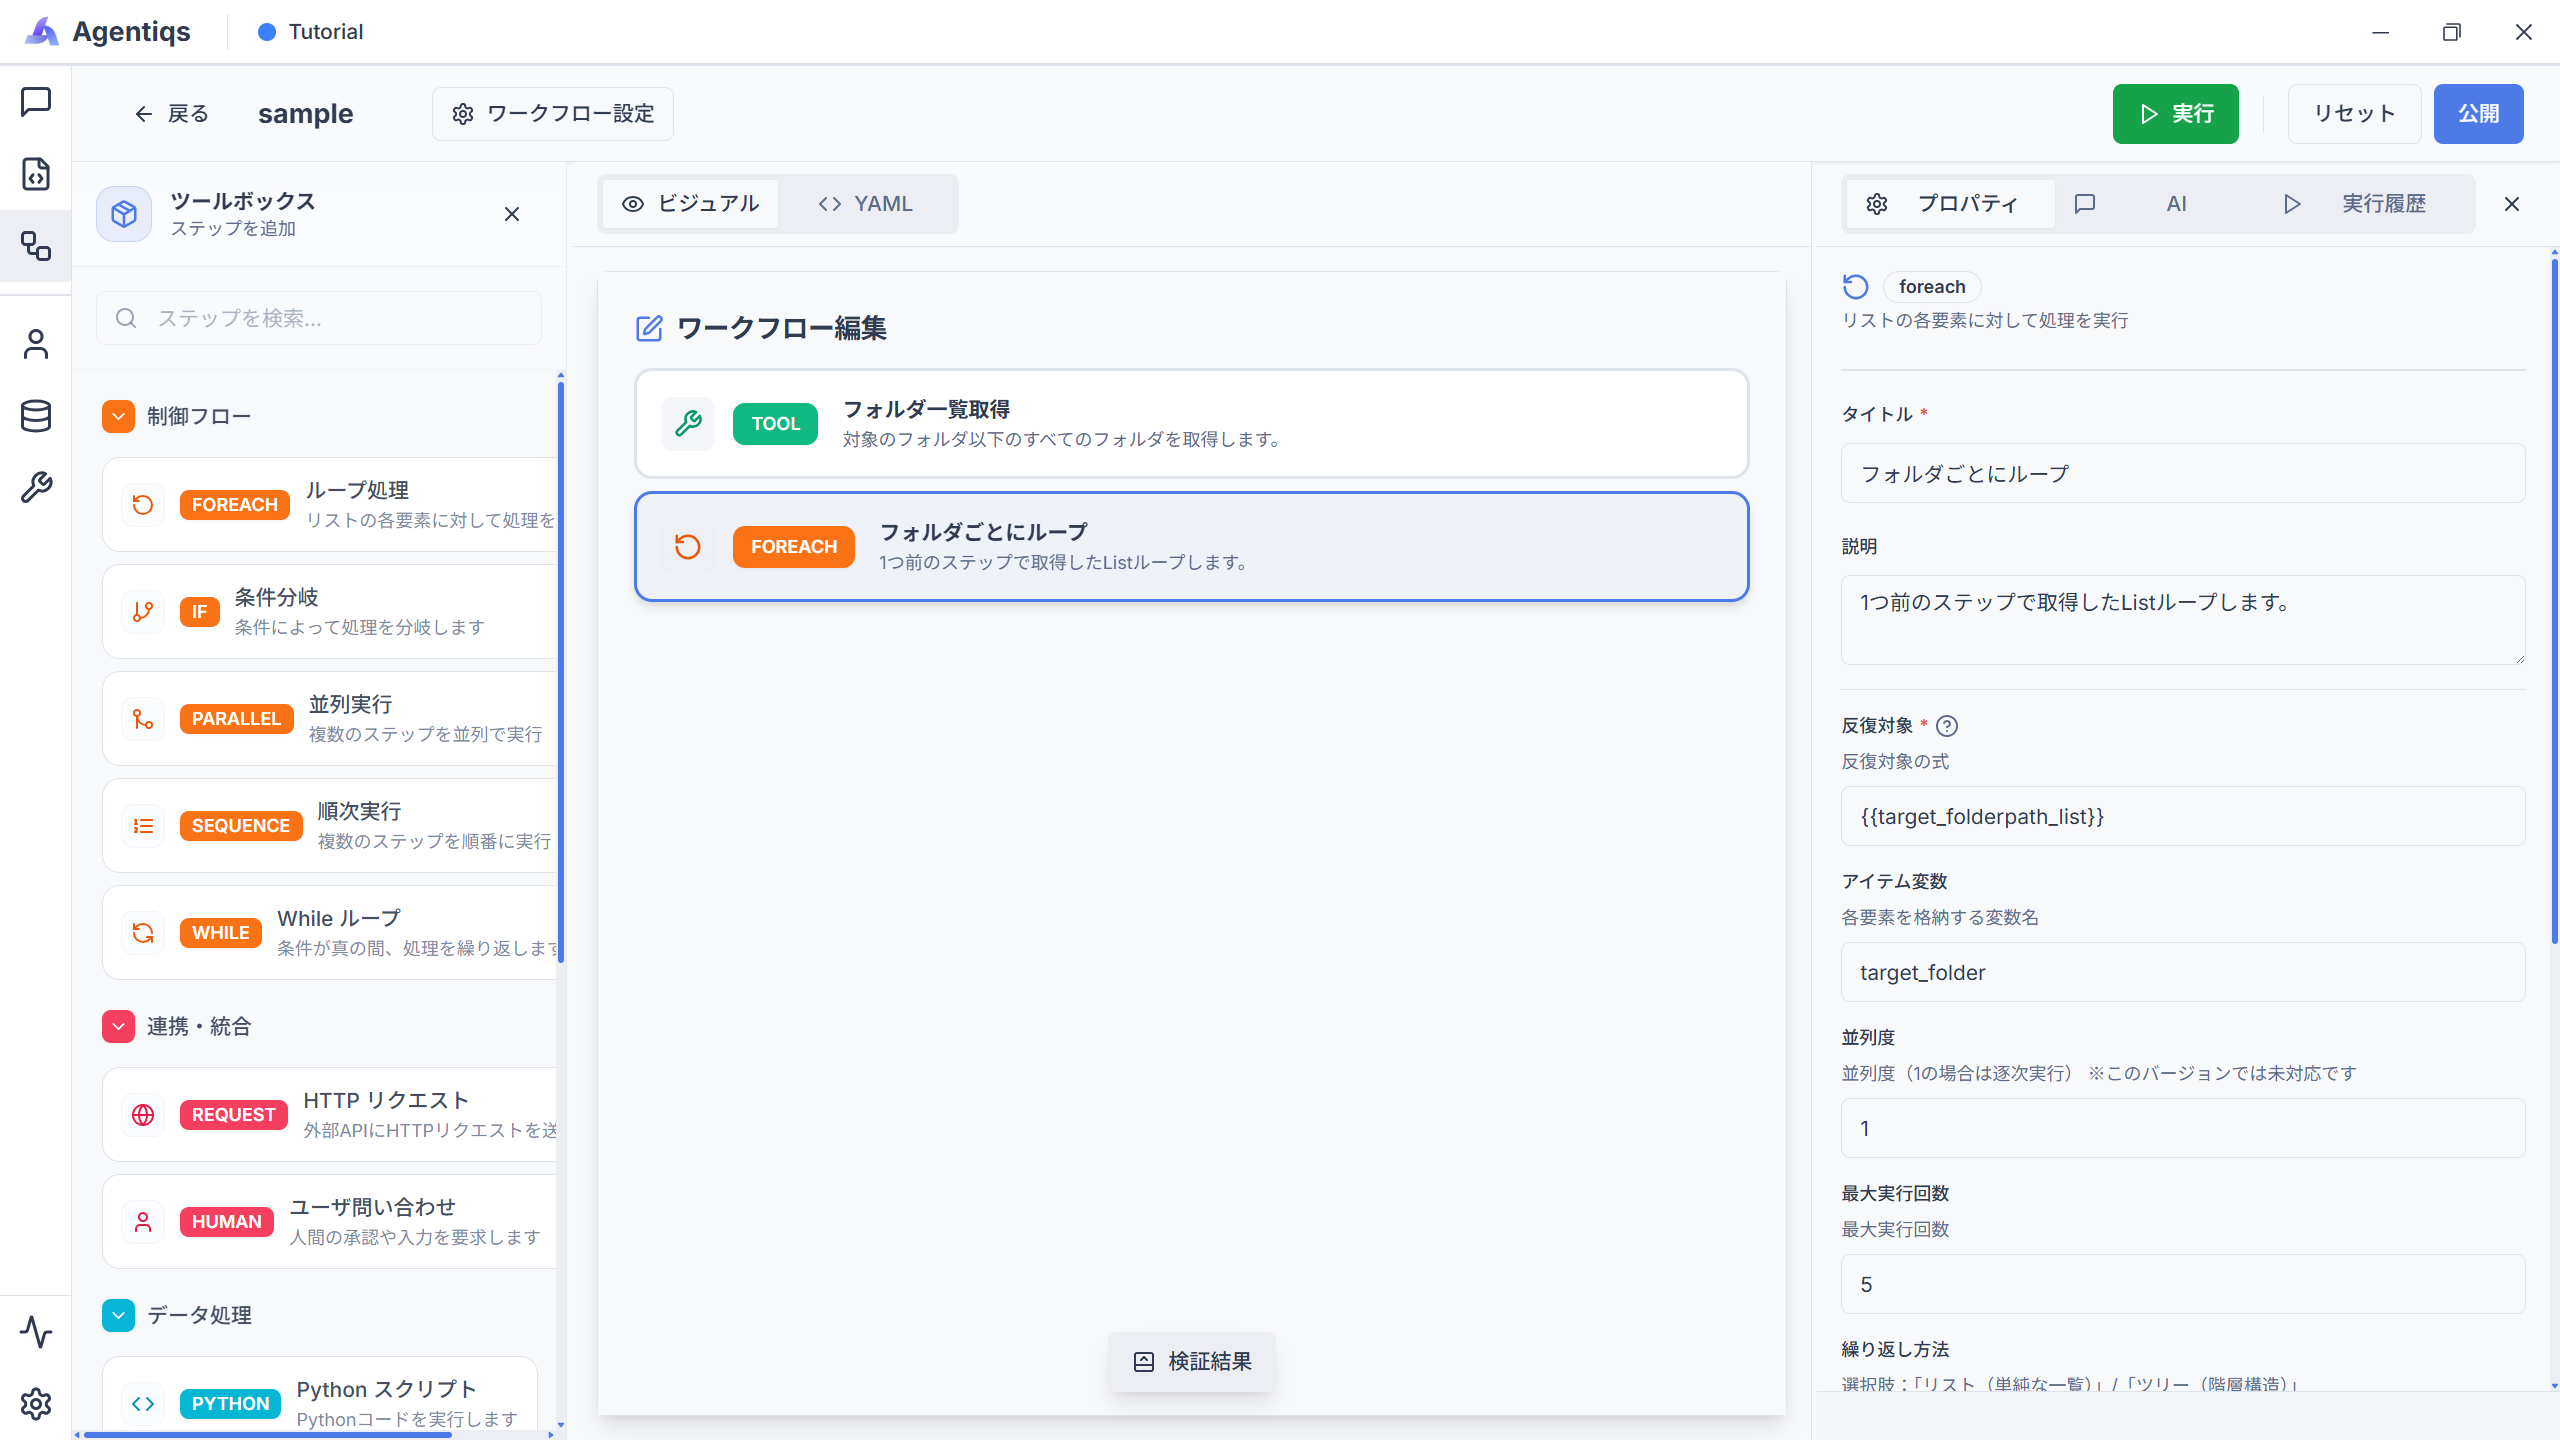
Property Settings
Retrieve each folder one by one from the directory list (
target_folderpath_list) obtained in the previous step.
(The process in the following steps is repeated for each folder.)Property Required Setting Item Details Title Title Use an easy-to-understand name so you can identify it later. Description What the step does Iteration Target 〇 {{target_folderpath_list}}Pass the list data to be looped over. (Output of step 2) Item Variable 〇 target_folderThe name used in the looped process. (Used in the next step) Maximum Runs 〇 Example: 5 If the count is large, it takes time. During debugging, specify 2 to 5 runs. -
Retrieve the list of files in the folder.
Drag and drop "Execute Tool" into the child element of the loop and configure its properties.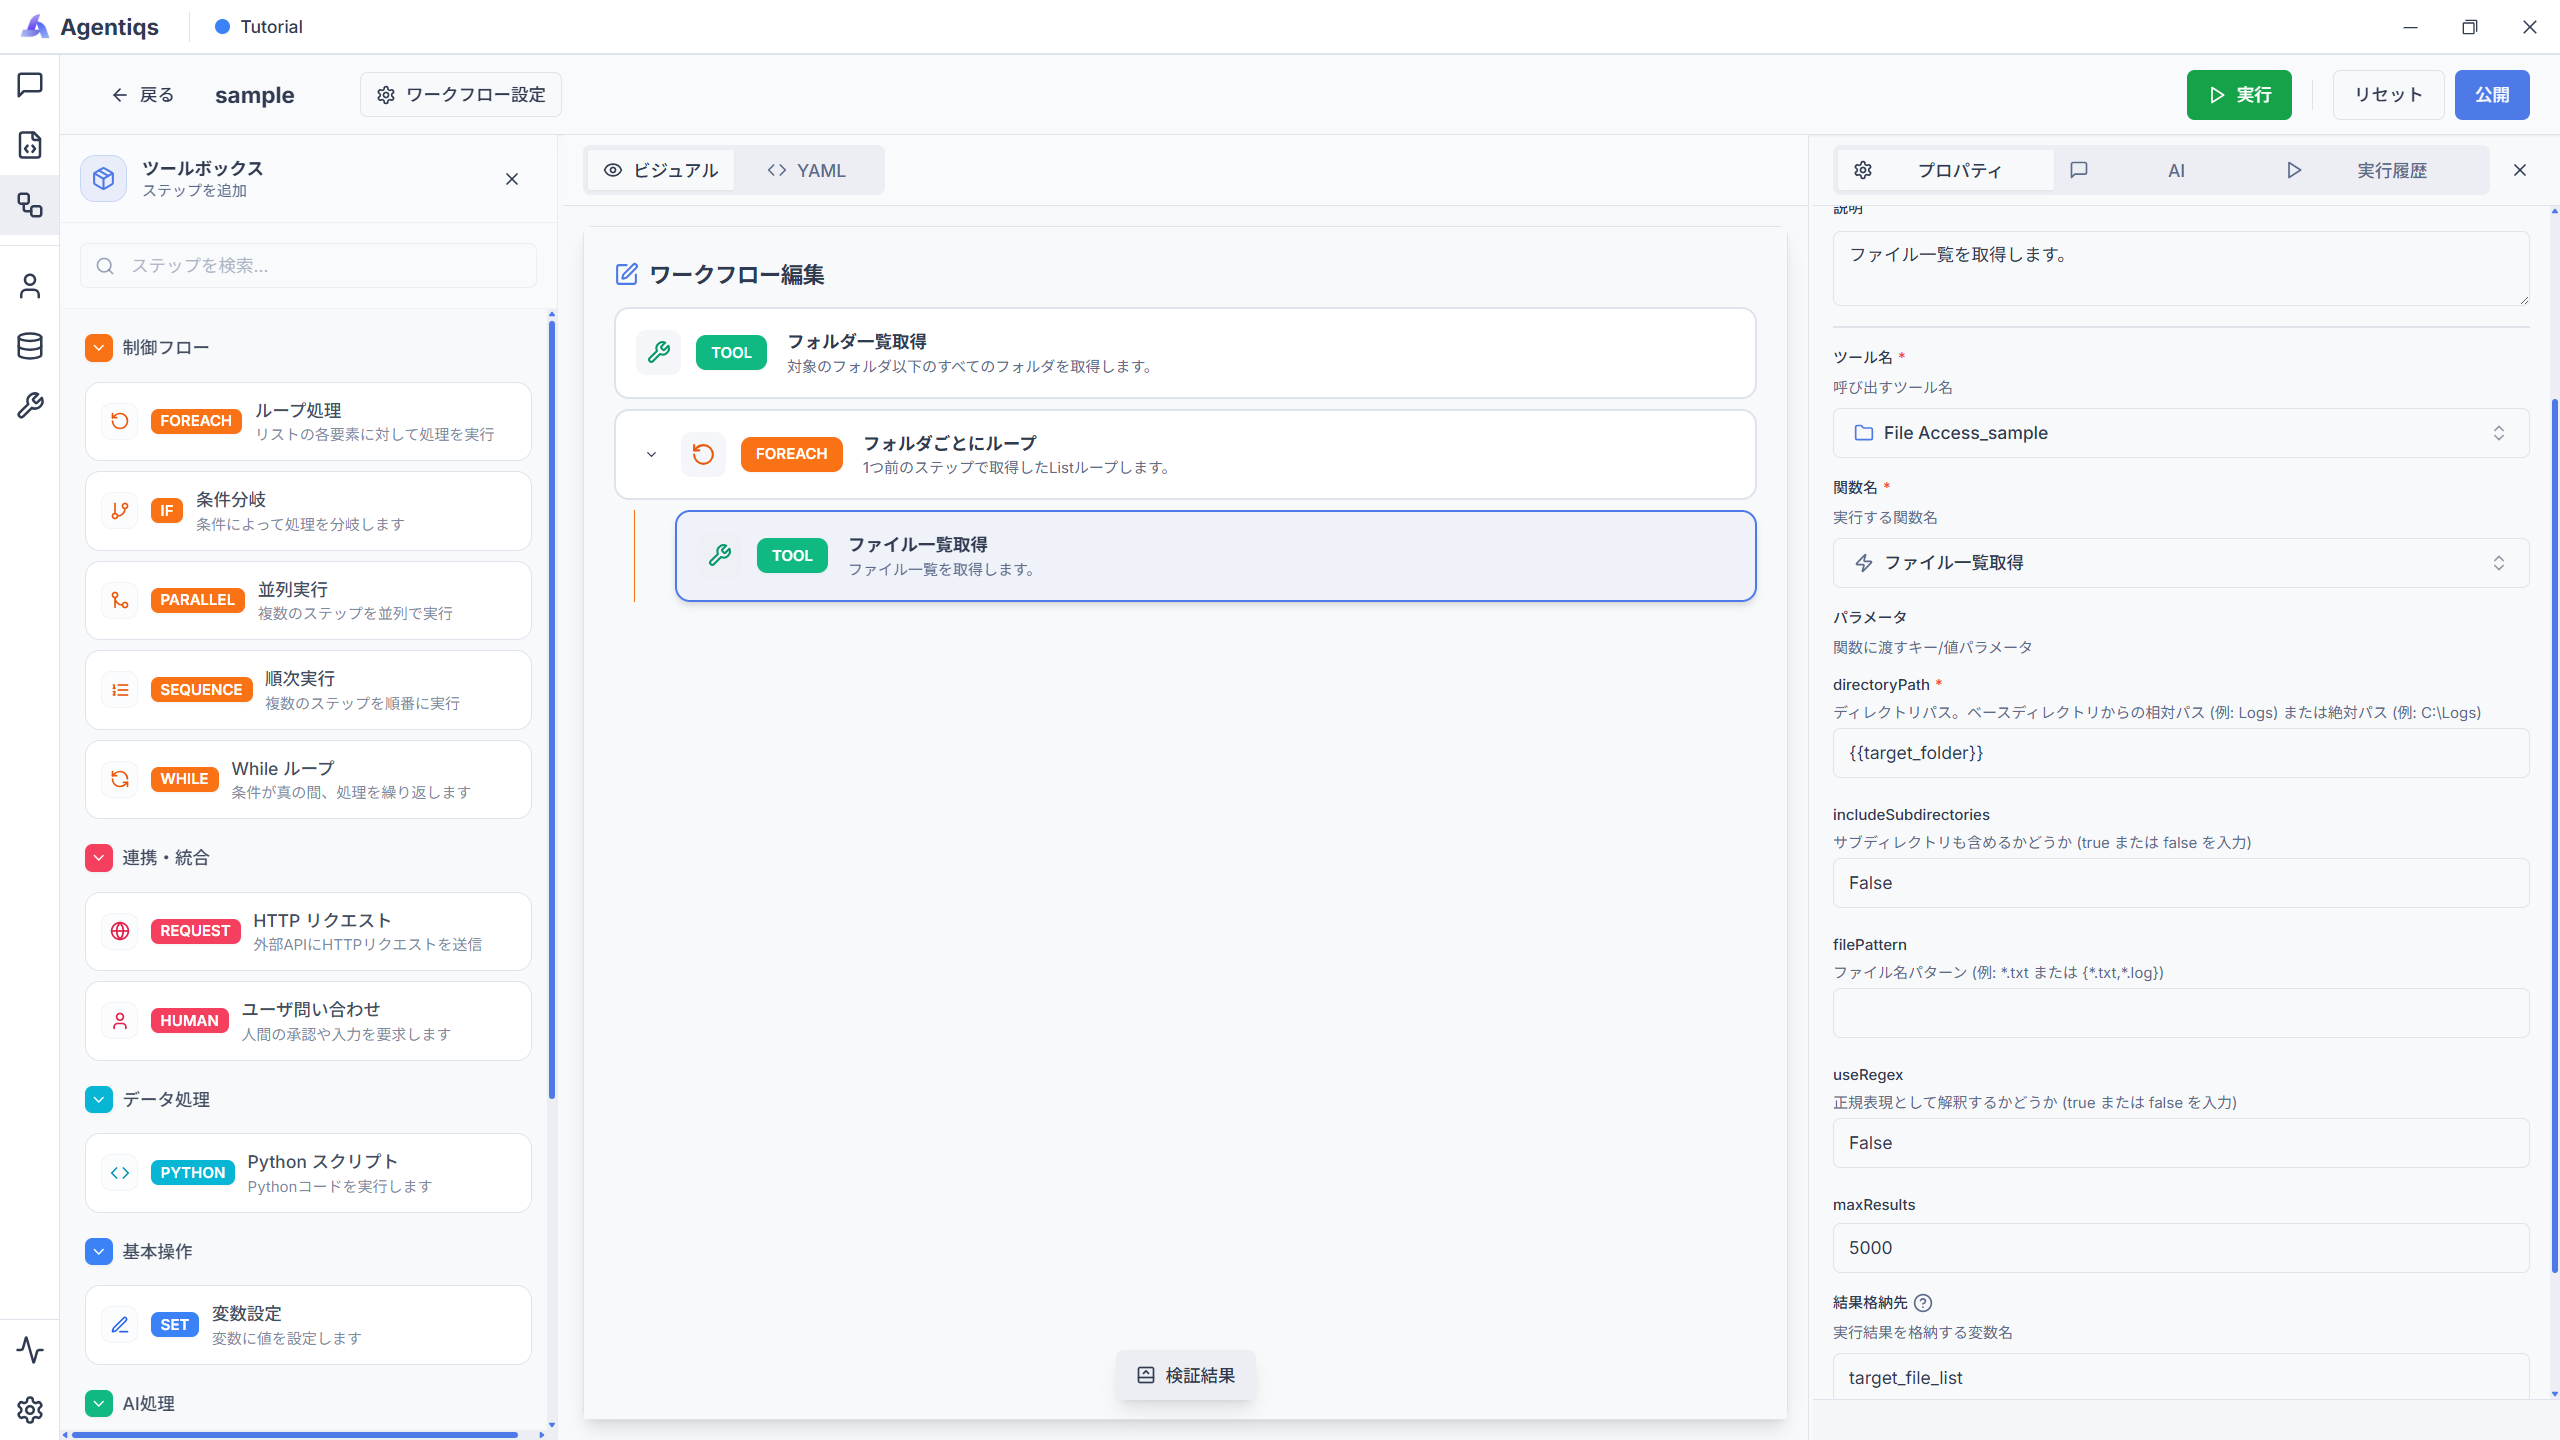
Property Settings
Retrieve the list of files.
Property Required Setting Item Details Title Title Use an easy-to-understand name so you can identify it later. Description What the step does Tool Name 〇 The FileAccess tool you created Function Name 〇 "Get File List" This node retrieves the file list. directoryPath 〇 Example: {{target_folder}}Specify the folder path to retrieve. includeSubdirectories 〇 False Specify whether to include subfolders. They are not included in this example. filePattern Example: *.txtor blankSpecify the extension pattern of the files to retrieve. Result Storage 〇 Example: target_file_listStore the execution result in a variable. -
Configure loop processing to retrieve file contents.
Drag and drop "Execute Tool" into the child element of the loop and configure its properties.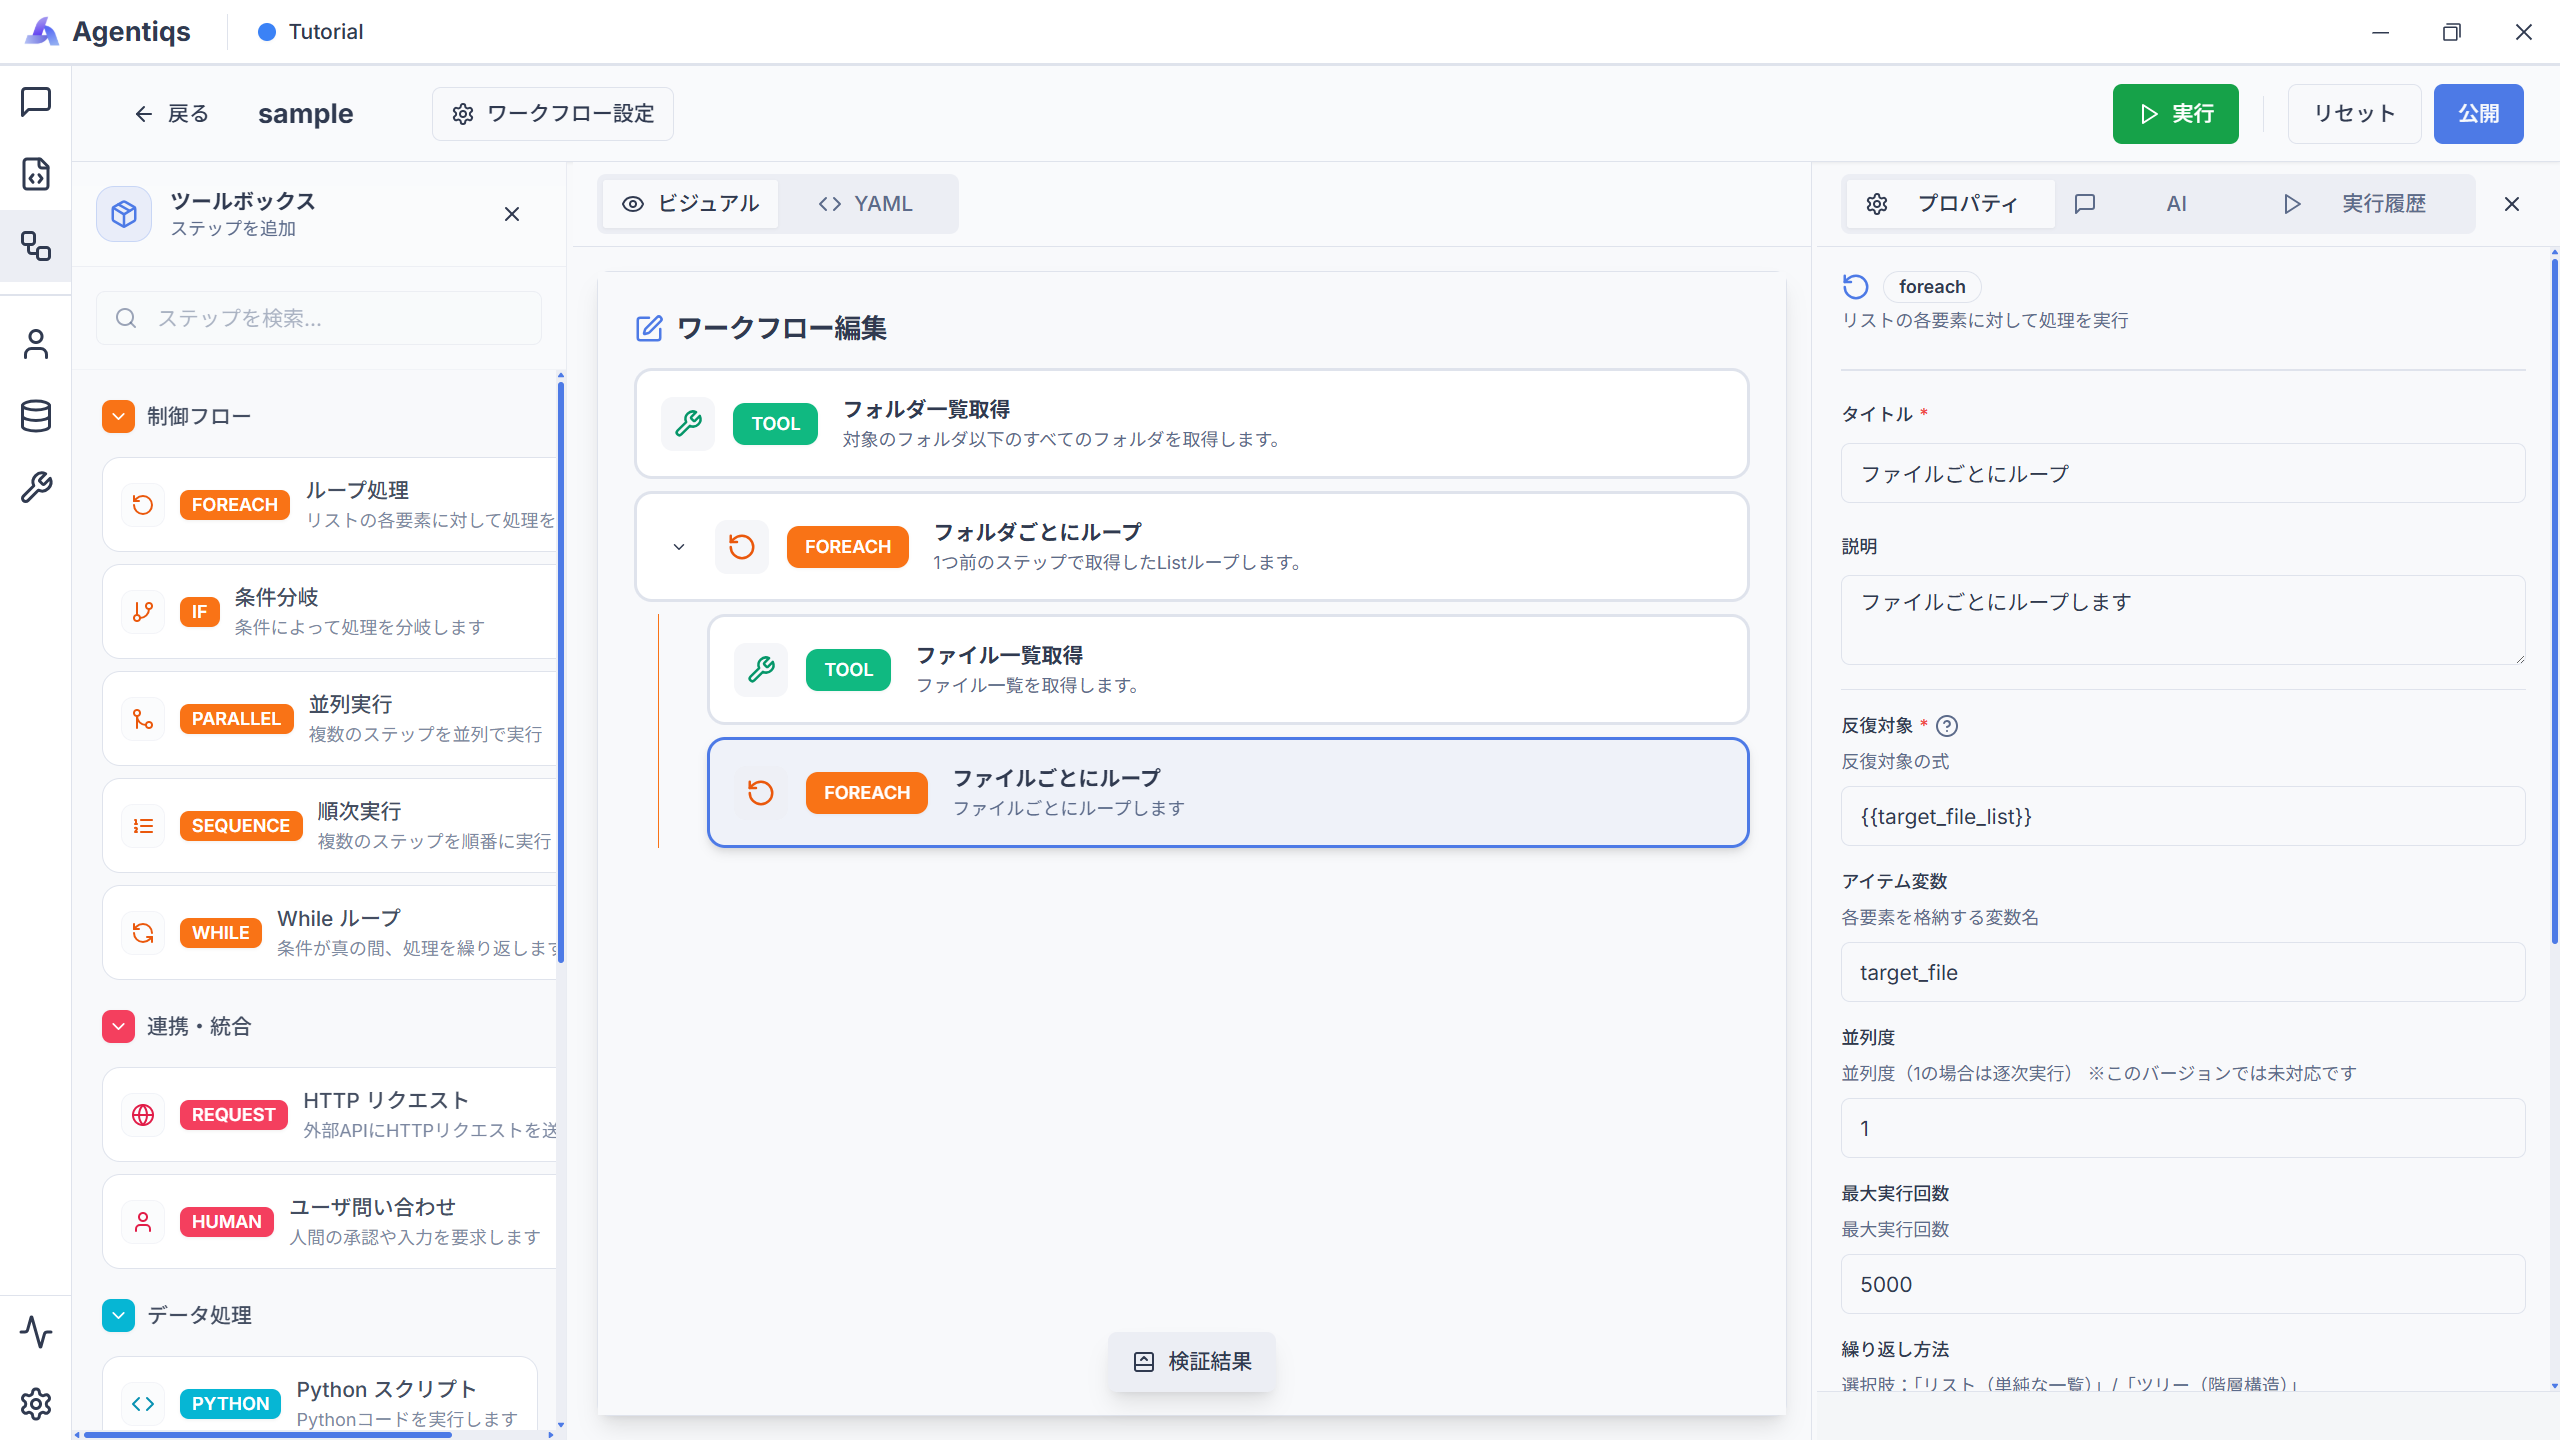
Property Settings
Retrieve each file one by one from the file list (
target_file_list) obtained in the previous step.
(The process in the following steps is repeated for each file.)Property Required Setting Item Details Title Title Use an easy-to-understand name so you can identify it later. Description What the step does Iteration Target 〇 Example: {{target_file_list}}Pass the list data to be looped over. (Output of step 4) Item Variable 〇 Example: target_fileThe name used in the looped process. (Used in the next step) Maximum Runs 〇 Example: 5000 If the count is large, it takes time. During debugging, specify 2 to 5 runs. -
Retrieve the file content.
Drag and drop "Execute Tool" as a child element of the loop and configure its properties.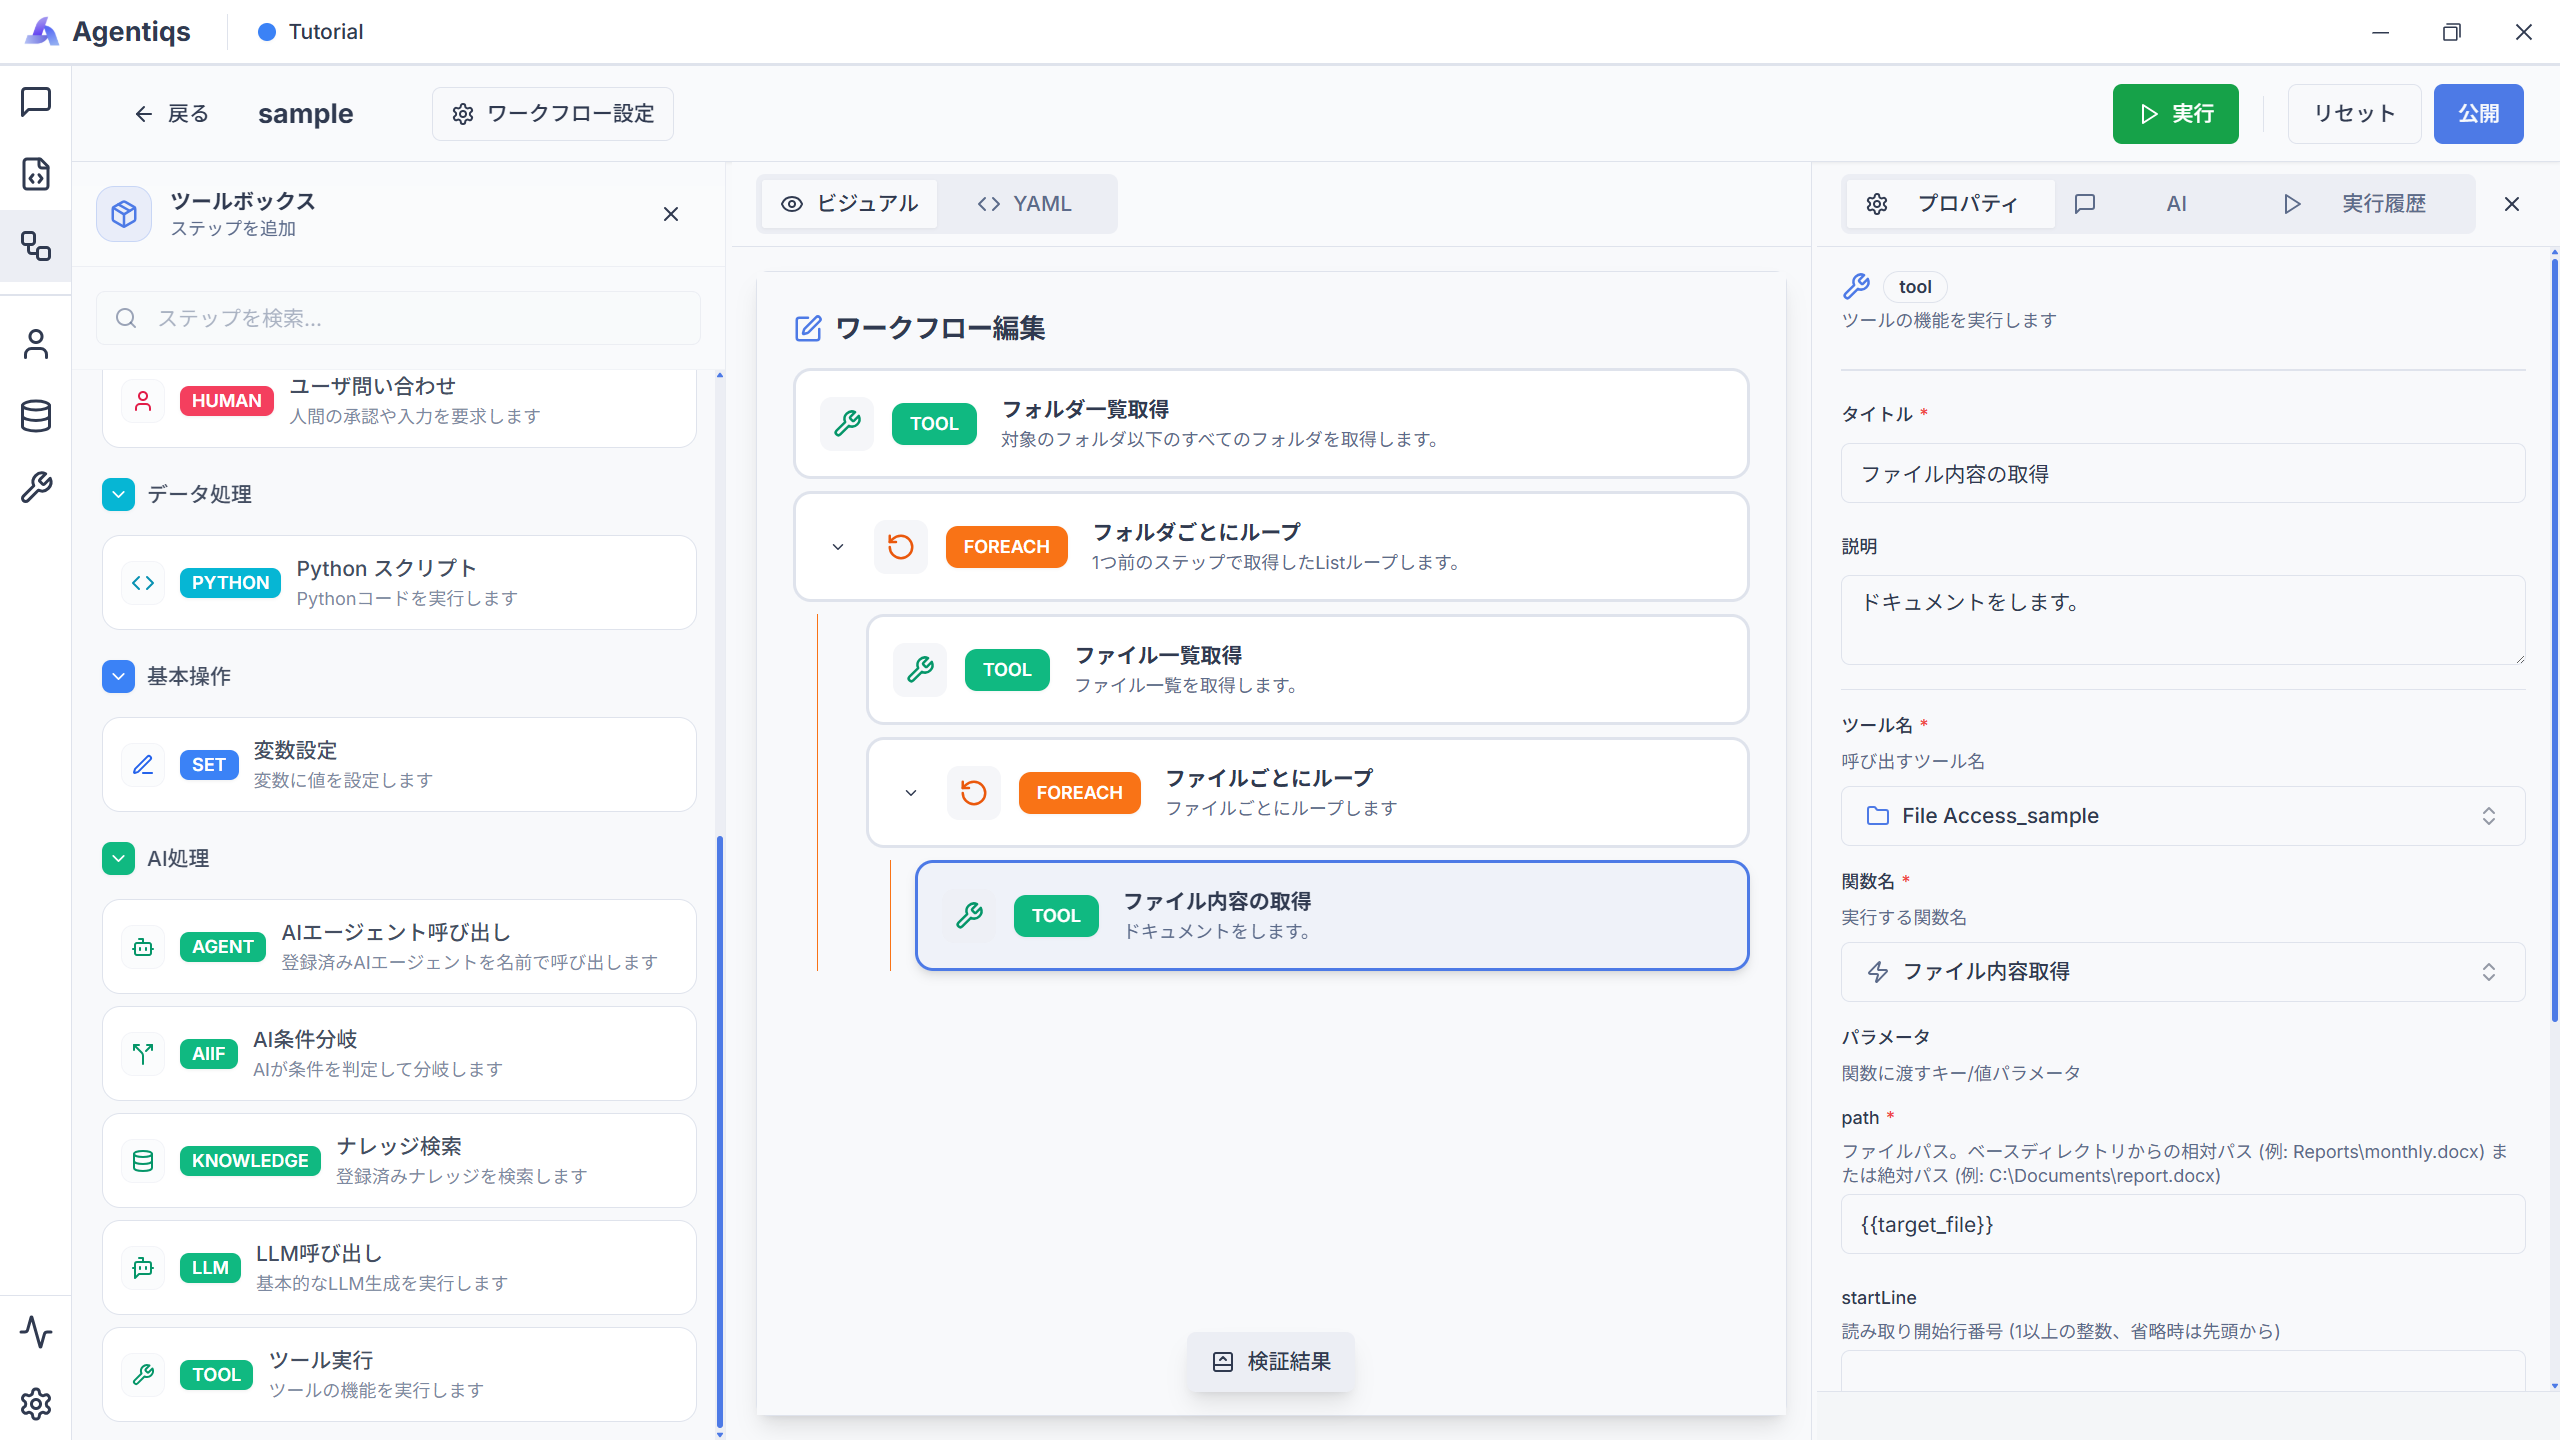
Property Settings
Retrieve the content of the target file.
Property Required Setting Item Details Title Title Use an easy-to-understand name so you can identify it later. Description What the step does Tool Name 〇 The FileAccess tool you created Function Name 〇 "Get File Content" This node retrieves the content of the file. Path 〇 Example: {{target_file}}Select the item variable set in step 5. Result Storage 〇 Example: contentStore the execution result in a variable.
You have now retrieved the contents of the files under the specified folder.
If you set includeSubdirectories in step 2 to true, you can retrieve all directories including subdirectories at once.
In that case, the loops in steps 3 to 5 are no longer necessary.
However, if there are many folders, be careful about processing time and the maxResults limit.
Check the Execution Results
After the workflow execution is complete, check the result of each step from the execution history.
- Output of step 4: Confirm that the list of file paths has been retrieved correctly.
- Output of step 6: Confirm that the content of each file has been retrieved correctly.
For examples of how to use them in workflows, also refer to "Create a Workflow for Comprehensive Review".
Additional Notes
Notes About the Base Directory
The FileAccess tool can operate only on files and folders under the specified base directory.
- An error occurs if you specify a path outside the base directory.
- Make sure in advance that the target files and folders exist under the base directory.
Using Multiple Tools Depending on the Purpose
If the purpose or base directory differs, you can create multiple FileAccess tools and use them separately.
Set each tool name appropriately so its purpose is clear.