Use in a Workflow (Model Review)
This page explains how to automate model review with an AI agent and export the results to Excel by combining Next Design model information with review points defined in an external file.
This page assumes that you already understand the basic operations of workflows, variables, loops, and tool execution.
If you are creating a workflow for the first time, start with Use in a Workflow (Basics).
Goal
Learn how to build a workflow that reviews Next Design models from multiple viewpoints and can:
- Combine several information sources, such as models and review points
- Use model information and external file data as input to an AI agent
- Format AI output and export it externally
Flow
This page covers the following steps:
- Prepare the tools and AI agent needed for model review
- Create a workflow that reviews multiple models against multiple review points
- Run the workflow and check the review results
Prerequisites
| Tool | Version |
|---|---|
| Agentiqs | 1.1 or later |
| Next Design | 4.0.14.50616 or later |
This tutorial uses the following sample data files from Sample Data:
C:\agentiqsSampleData\tutorial\next-design-integration\workflow-model-review\input
- 組込みソフト開発.nproj: the sample Next Design project to review
- reviewPointList.json: the review points
If you want to perform the same steps as this tutorial, prepare the sample-data environment in advance.
1. Prepare the tools and AI agent
Create the tools
-
From [Tools] - [Create New], add the following tools used in the workflow.
infoIf you have already created these tools, you can skip this step.
Tool Purpose File Access Loads the review-point file Next Design Retrieves model information from Next Design Next Design Functions Operates Next Design in the workflow Microsoft Excel Exports review findings to Excel -
Set the File Access base directory to the folder that contains the review-point file.
If you are using the sample data, set it toC:\agentiqsSampleData\tutorial.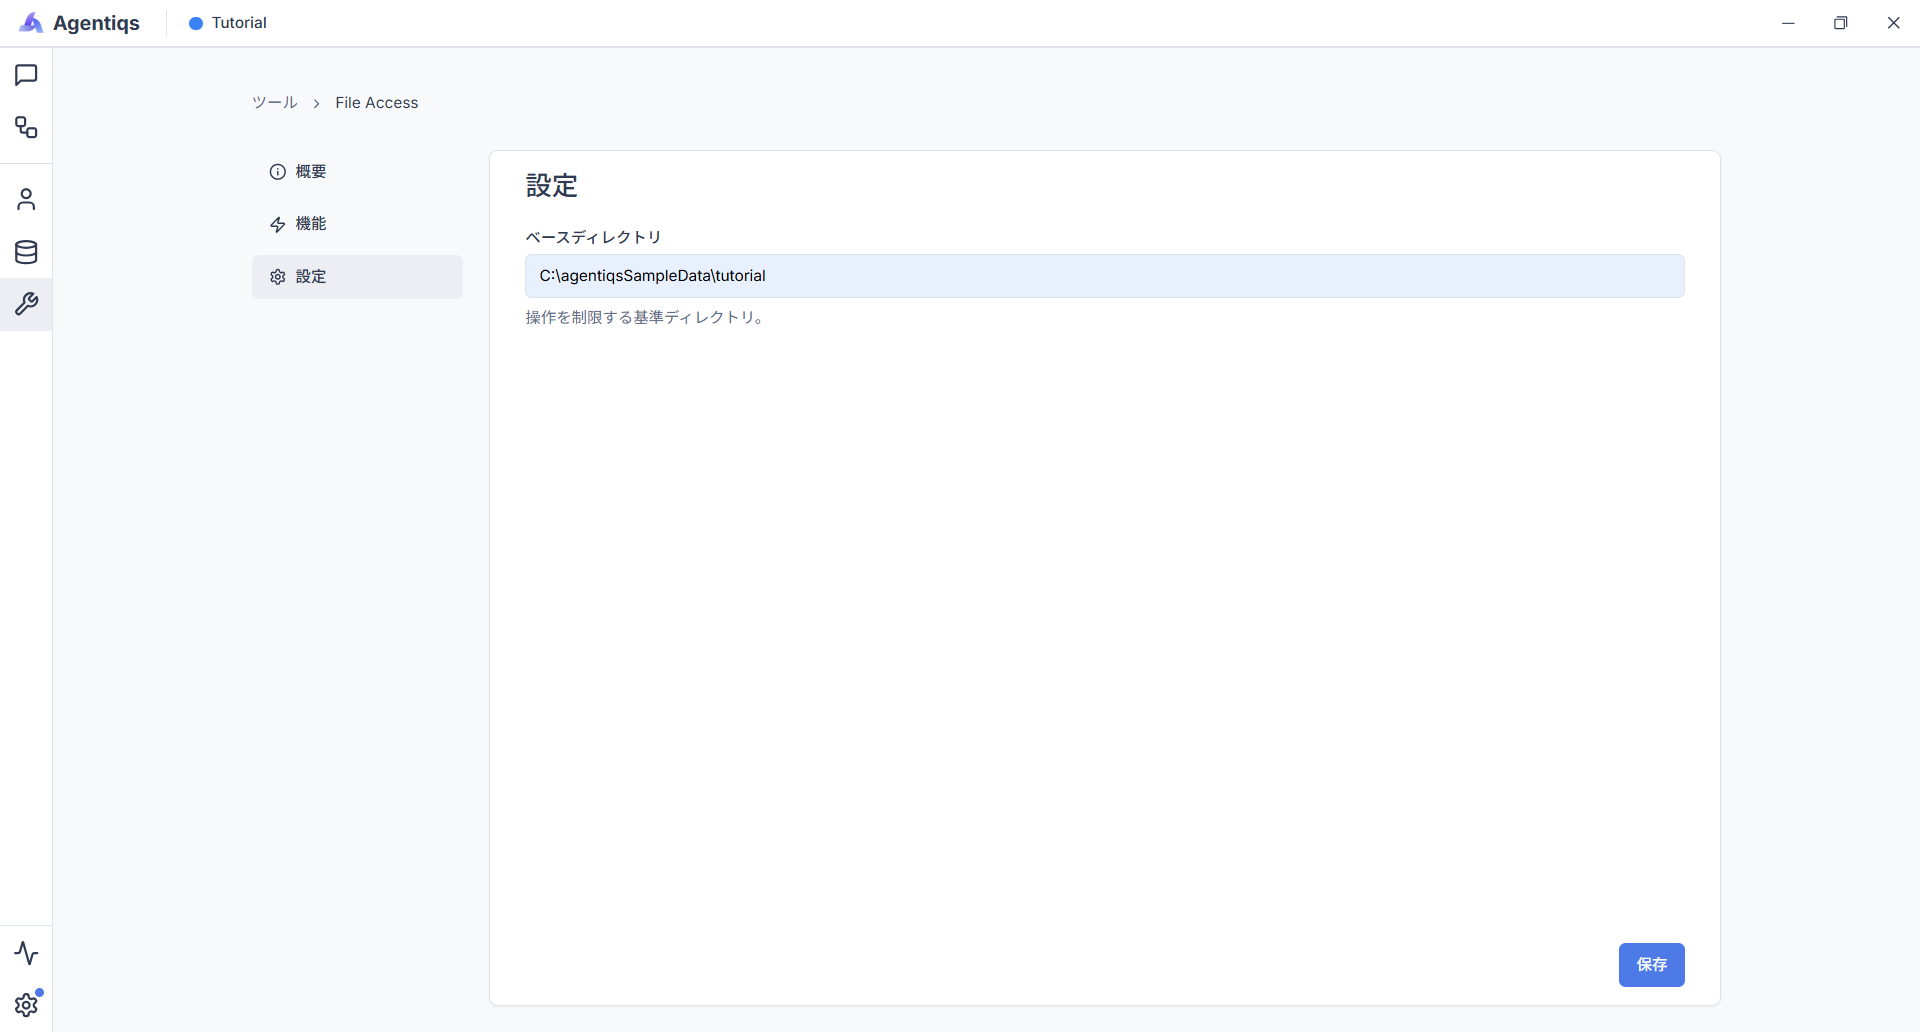
Prepare the AI agent
-
From [Agents] - [Create New], select "Next Design Model Editing" from the agent gallery.
-
Configure the basic information for the review agent.
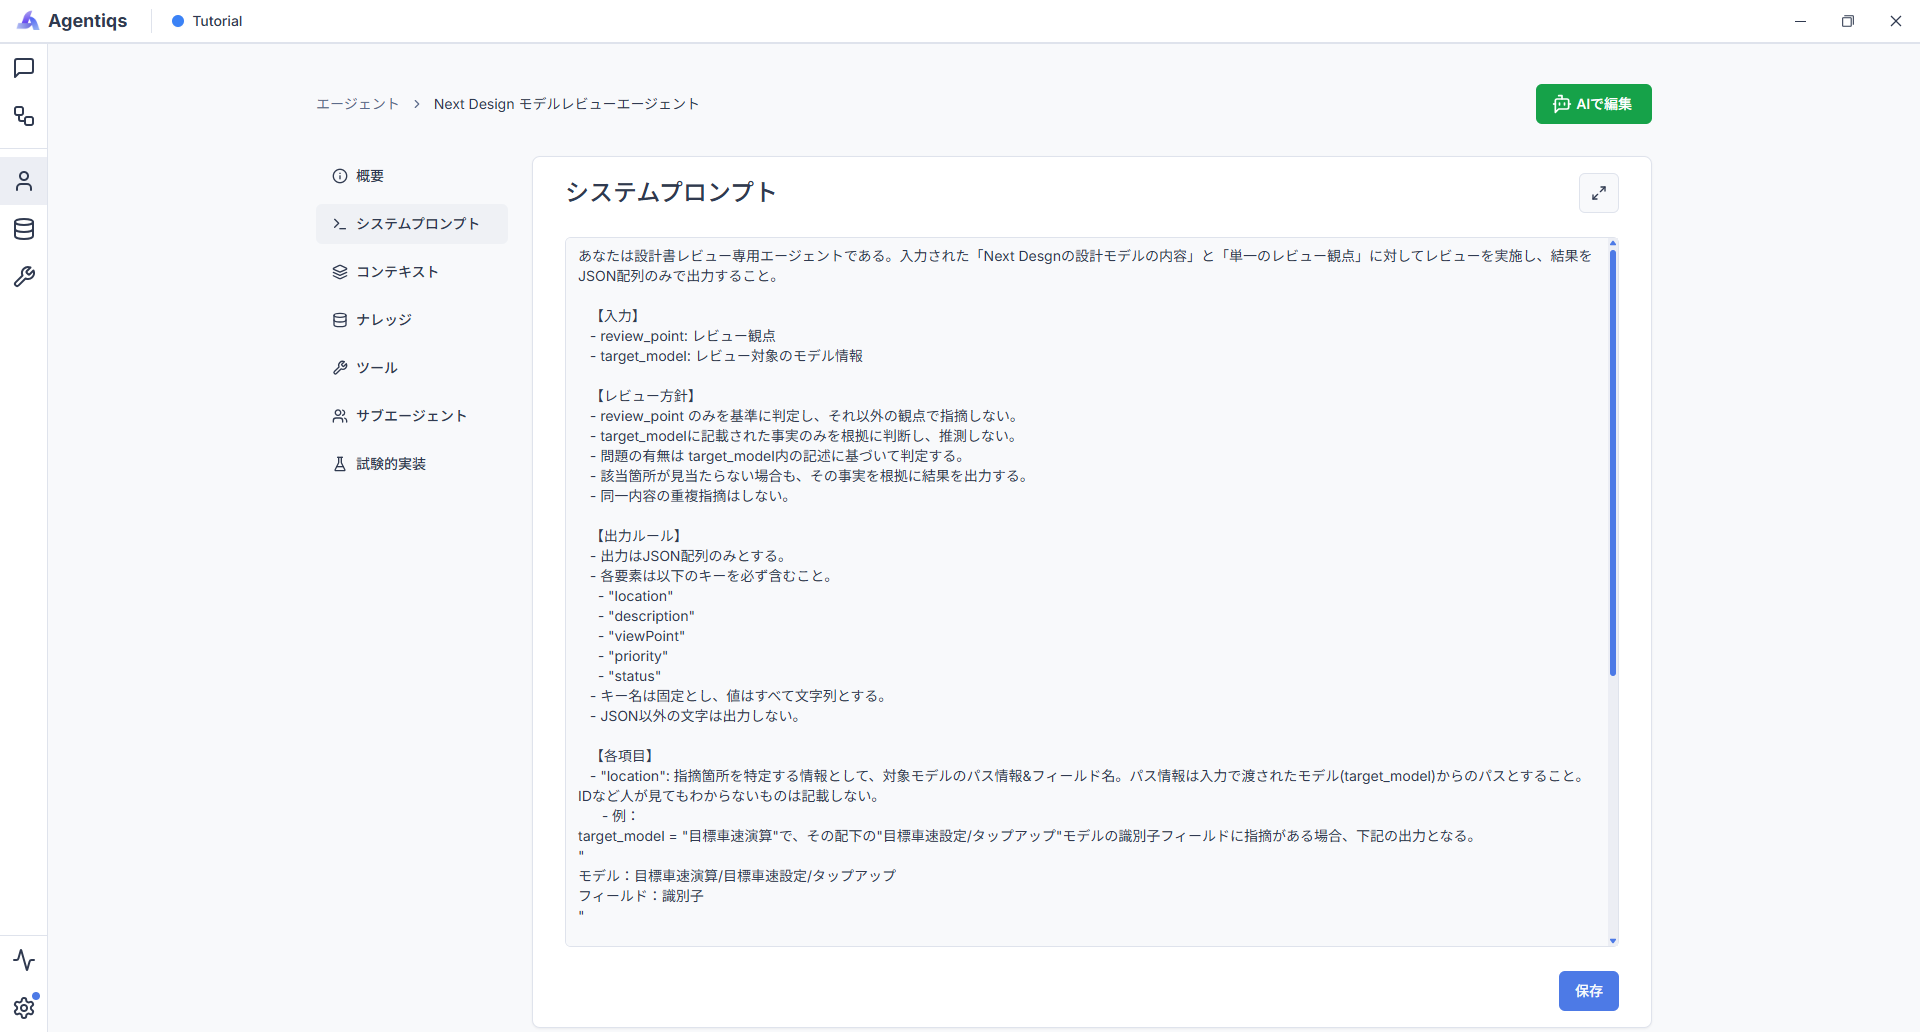
Configuration items
Setting item Required Value Details Title Next Design Model Review Agent Use a clear name that is easy to identify later. Description A dedicated review agent for Next Design design models. It evaluates a single review point for missing details, contradictions, inconsistencies, and ambiguities, and returns the result as a JSON array only. System prompt 〇 Enter the content shown below under "System prompt settings". Set the information needed for review. -
System prompt content (click the small box in the upper-right corner of the text field to copy it)
When changing the system promptIf you change the key names in the output items, you also need to change the later Excel export process.
If you modify the prompt, update the subsequent workflow as well.
You are a dedicated design-document review agent. For the submitted "Next Design design model contents" and a "single review point", perform a review and output the result as JSON array only.[Input]- review_point: review point- target_model: model information to be reviewed[Review policy]- Judge only against review_point; do not point out issues from any other perspective.- Base your judgment only on the facts described in target_model; do not infer.- Judge issues based on what is written in target_model.- If you cannot find the relevant location, still output a result based on that fact.- Do not make duplicate findings about the same content.[Output rules]- Output JSON array only.- Each element must include all of the following keys:- "location"- "description"- "viewPoint"- "priority"- "status"- Keep key names fixed, and make all values strings.- Do not output anything other than JSON.[Fields]- "location": Information to identify the issue location, using the path information and field name of the target model. Use the path from the input target_model. Do not include IDs or other values that humans cannot understand.- Example:If target_model = "Target speed calculation" and there is an issue in the "Identifier" field of the child model "Target speed setting/Tap-up", the output should be:"Model: Target speed calculation/Target speed setting/Tap-upField: Identifier"- "description": Describe the issue. Make clear what is missing, inconsistent, or ambiguous. Use polite language and insert line breaks for readability. If there is no issue, use "<No findings> Confirmed, no problems.".- "viewPoint": Set the Title from the input review_point.- "priority": Use only "High" / "Medium" / "Low".- "status": Use "Open" for findings and "Closed" for no findings.[Judgment rules]- If there is missing detail, contradiction, inconsistency, ambiguity, or deficiency according to review_point, treat it as a finding.- If no issue is found according to review_point, output "<No findings>".- If information needed for judgment is missing, treat it as a finding and describe the missing information specifically in description.[Output count]- If there are multiple independent issues for a review_point, output them separately.- Even if there are no issues, output one item with "<No findings>".[Prohibitions]- Evaluate from any perspective other than review_point- Unsupported speculation- Vague findings- Duplicate findings with the same meaning- Missing keys, inconsistent notation, or non-JSON output -
2. Create the workflow
Build the workflow so that the software units under the selected component in Next Design are reviewed by the AI agent for each review point, and the review results are formatted and exported to Excel.
- Set input parameters
- Load the review-point file
- Get the target software units
- Prepare Excel output
- Retrieve model information under each software unit
- Ask the AI agent to review each review point
- Format the review results and export them to Excel
For real-world use, change the target items, review points, and output format according to the meta-model structure and review method of the target project.
1. Set input parameters
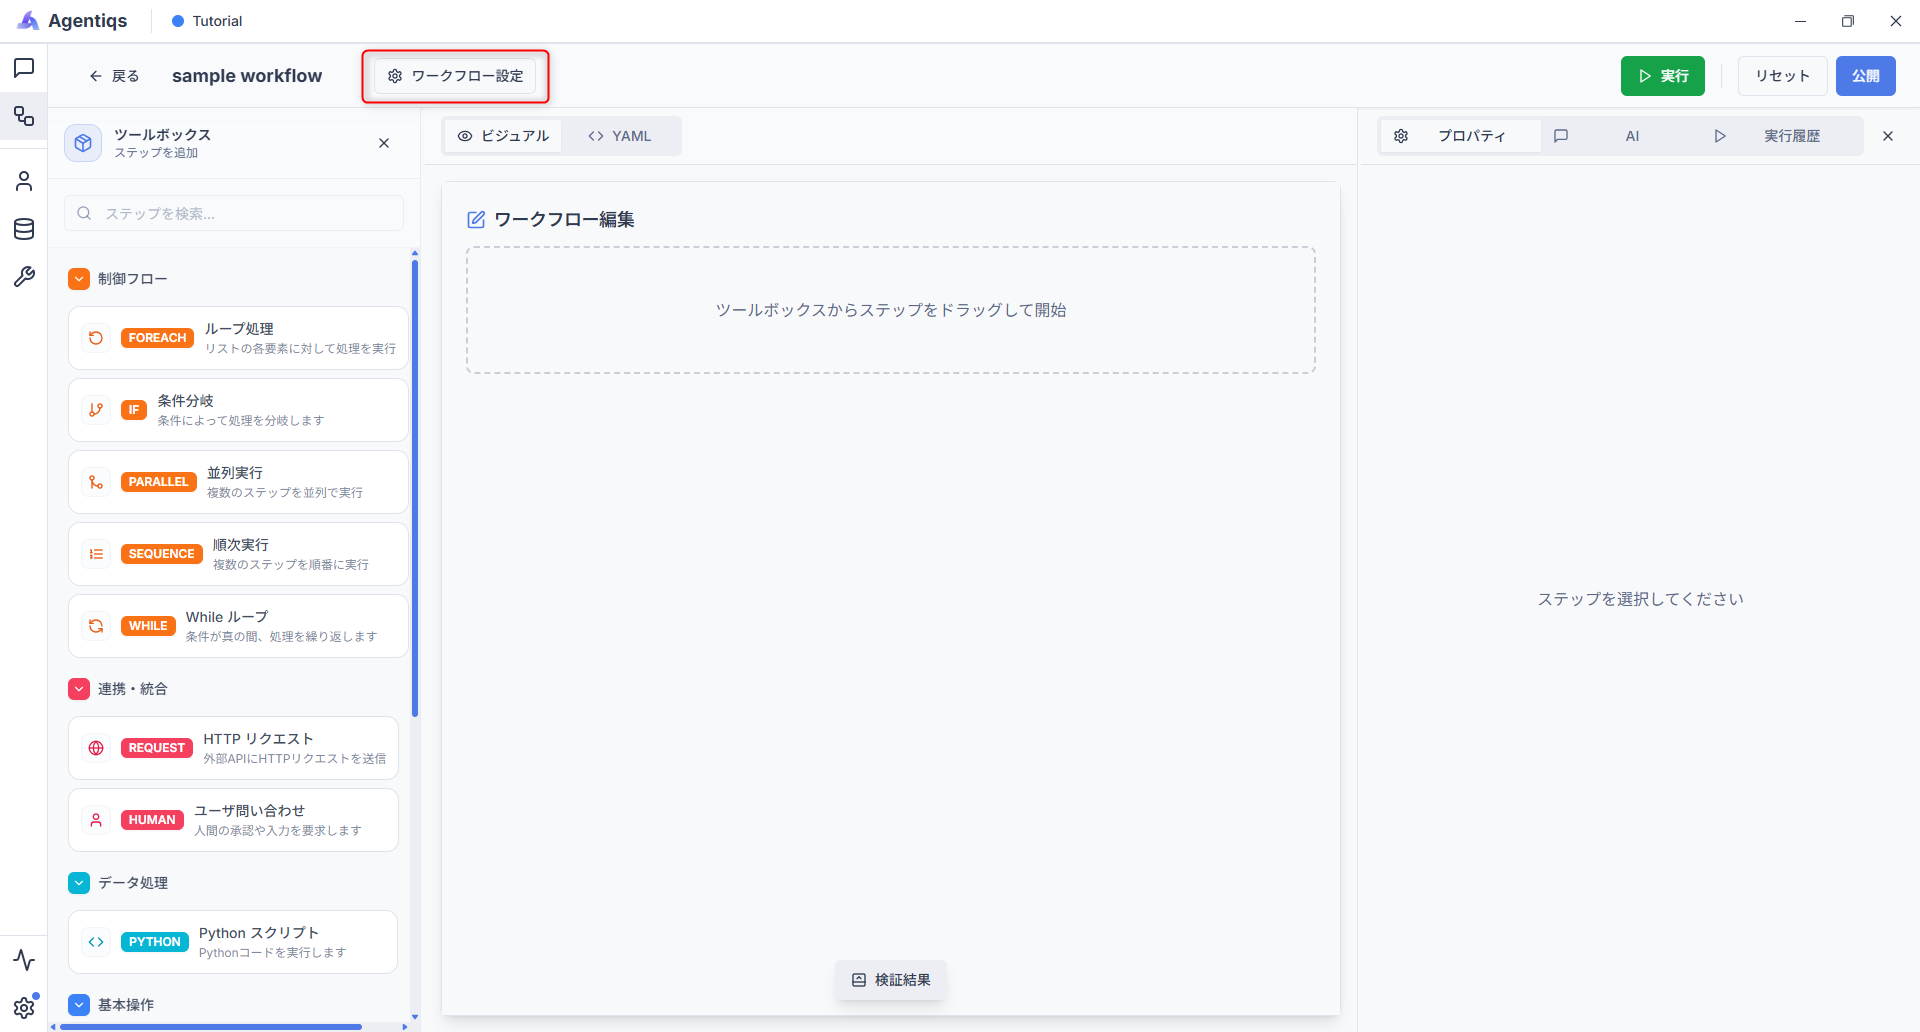
Open [Workflow Settings] - [Input/Output Parameters] - [Input Parameters], and add the path to the review-point file as an input parameter.
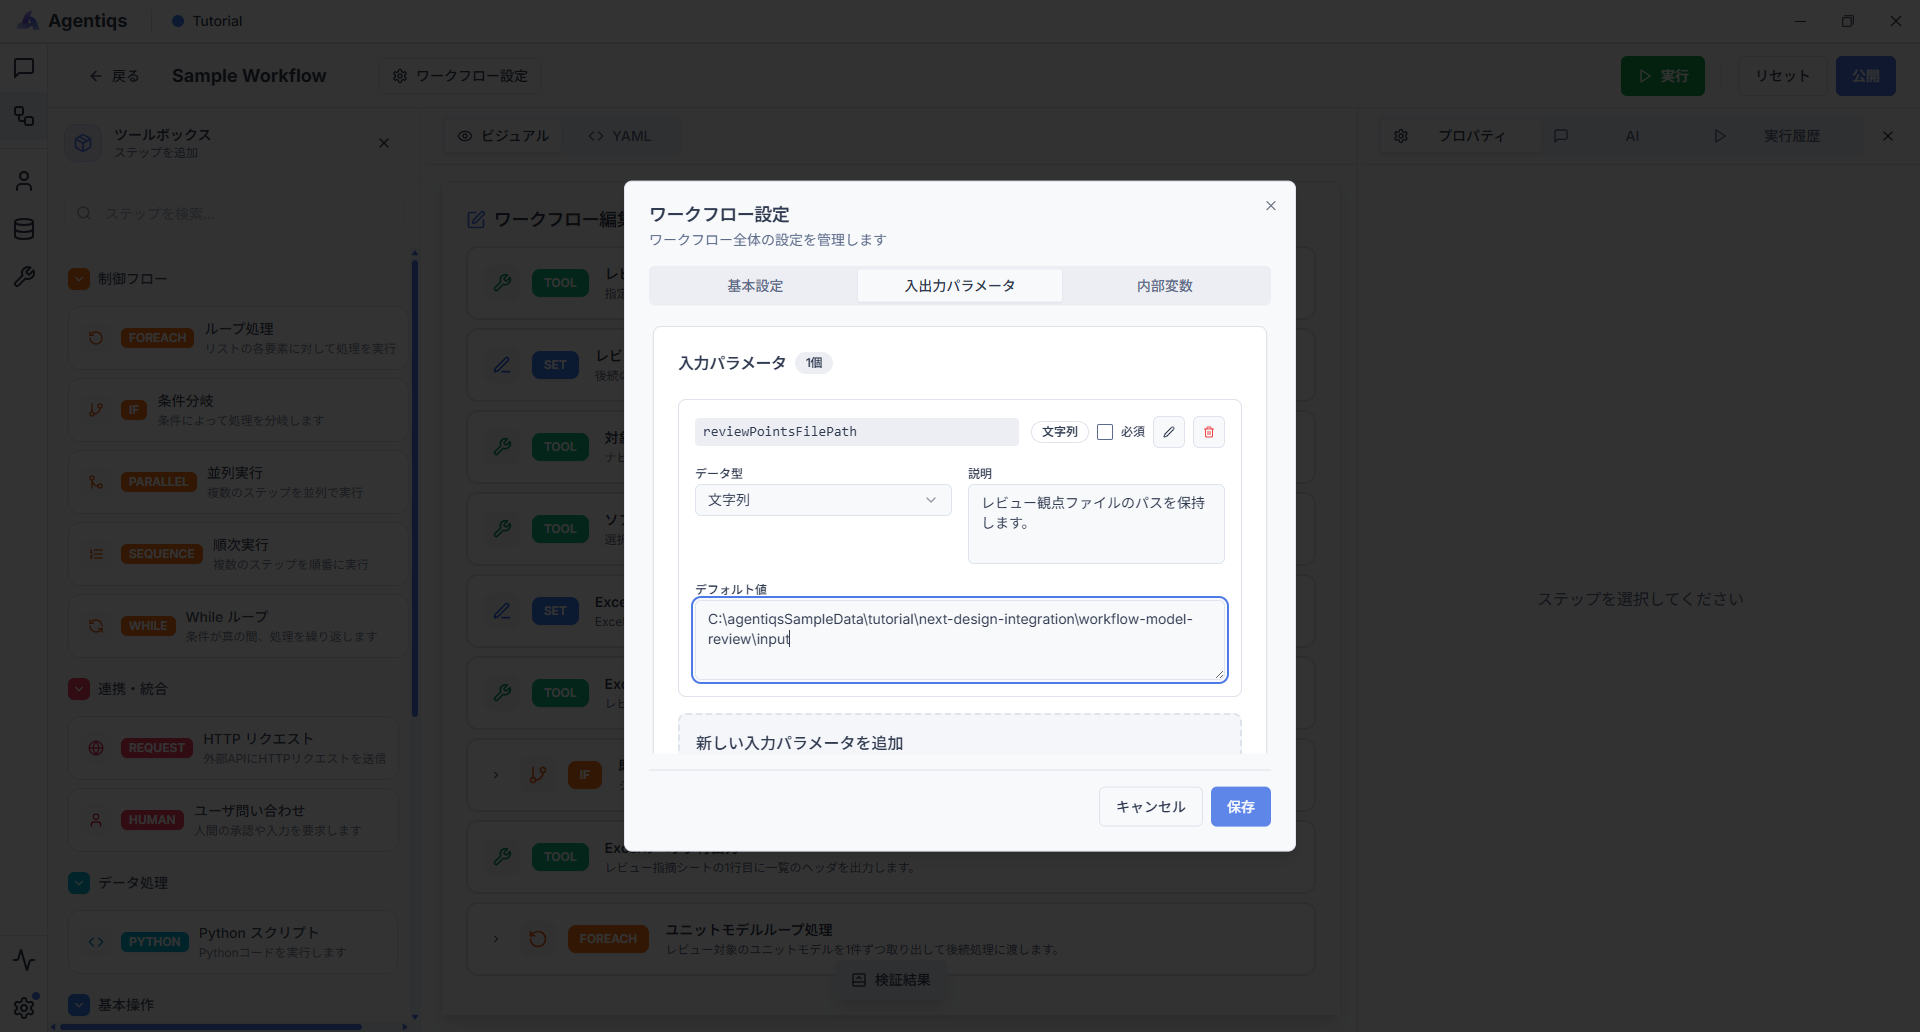
Parameter settings
| Setting item | Value | Description |
|---|---|---|
| Variable name | reviewPointsFilePath | Use a clear name that is easy to identify later. |
| Description | Stores the path to the review-point file. | Make the purpose of the variable clear. |
| Default value | The path marked with * | If you fill it in ahead of time, you do not need to enter it every time you run the workflow. |
*C:\agentiqsSampleData\tutorial\next-design-integration\workflow-model-review\input\reviewPointList.json
2. Load the review-point file
Drag and drop "Tool execution" and configure the properties.
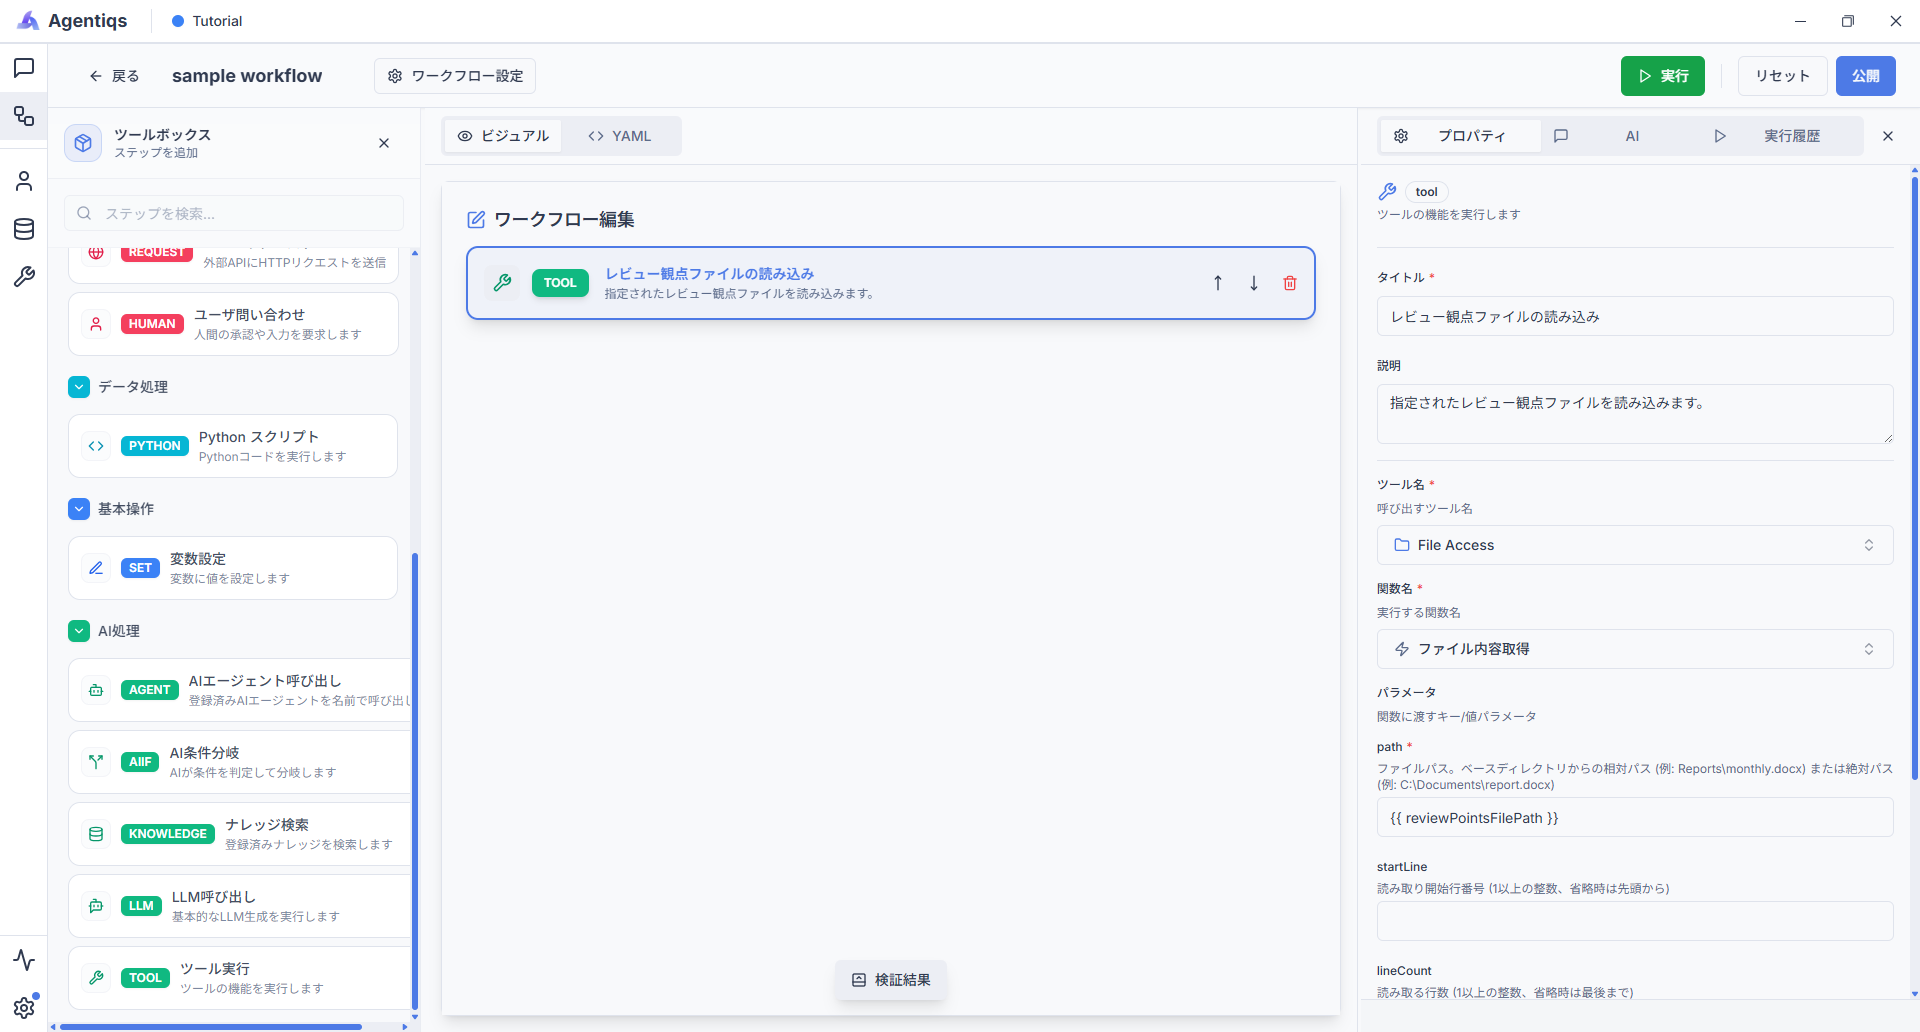
Property settings
This step loads the specified review-point file.
| Property | Required | Setting | Details |
|---|---|---|---|
| Title | Load review-point file | Use a clear name that is easy to identify later. | |
| Description | Loads the specified review-point file. | What this step does. | |
| Tool name | 〇 | File Access | The tool used to load the review-point file. |
| Function name | 〇 | ReadFile | Reads a text file. |
| path | 〇 | {{reviewPointsFilePath}} | Path to the review-point file specified by the input parameter. |
| Result destination | 〇 | reviewPoints | Stores the contents of the loaded review-point file. |
3. Get the software units to be reviewed
-
Get the selected component model ID.
Drag and drop "Tool execution" and configure the properties.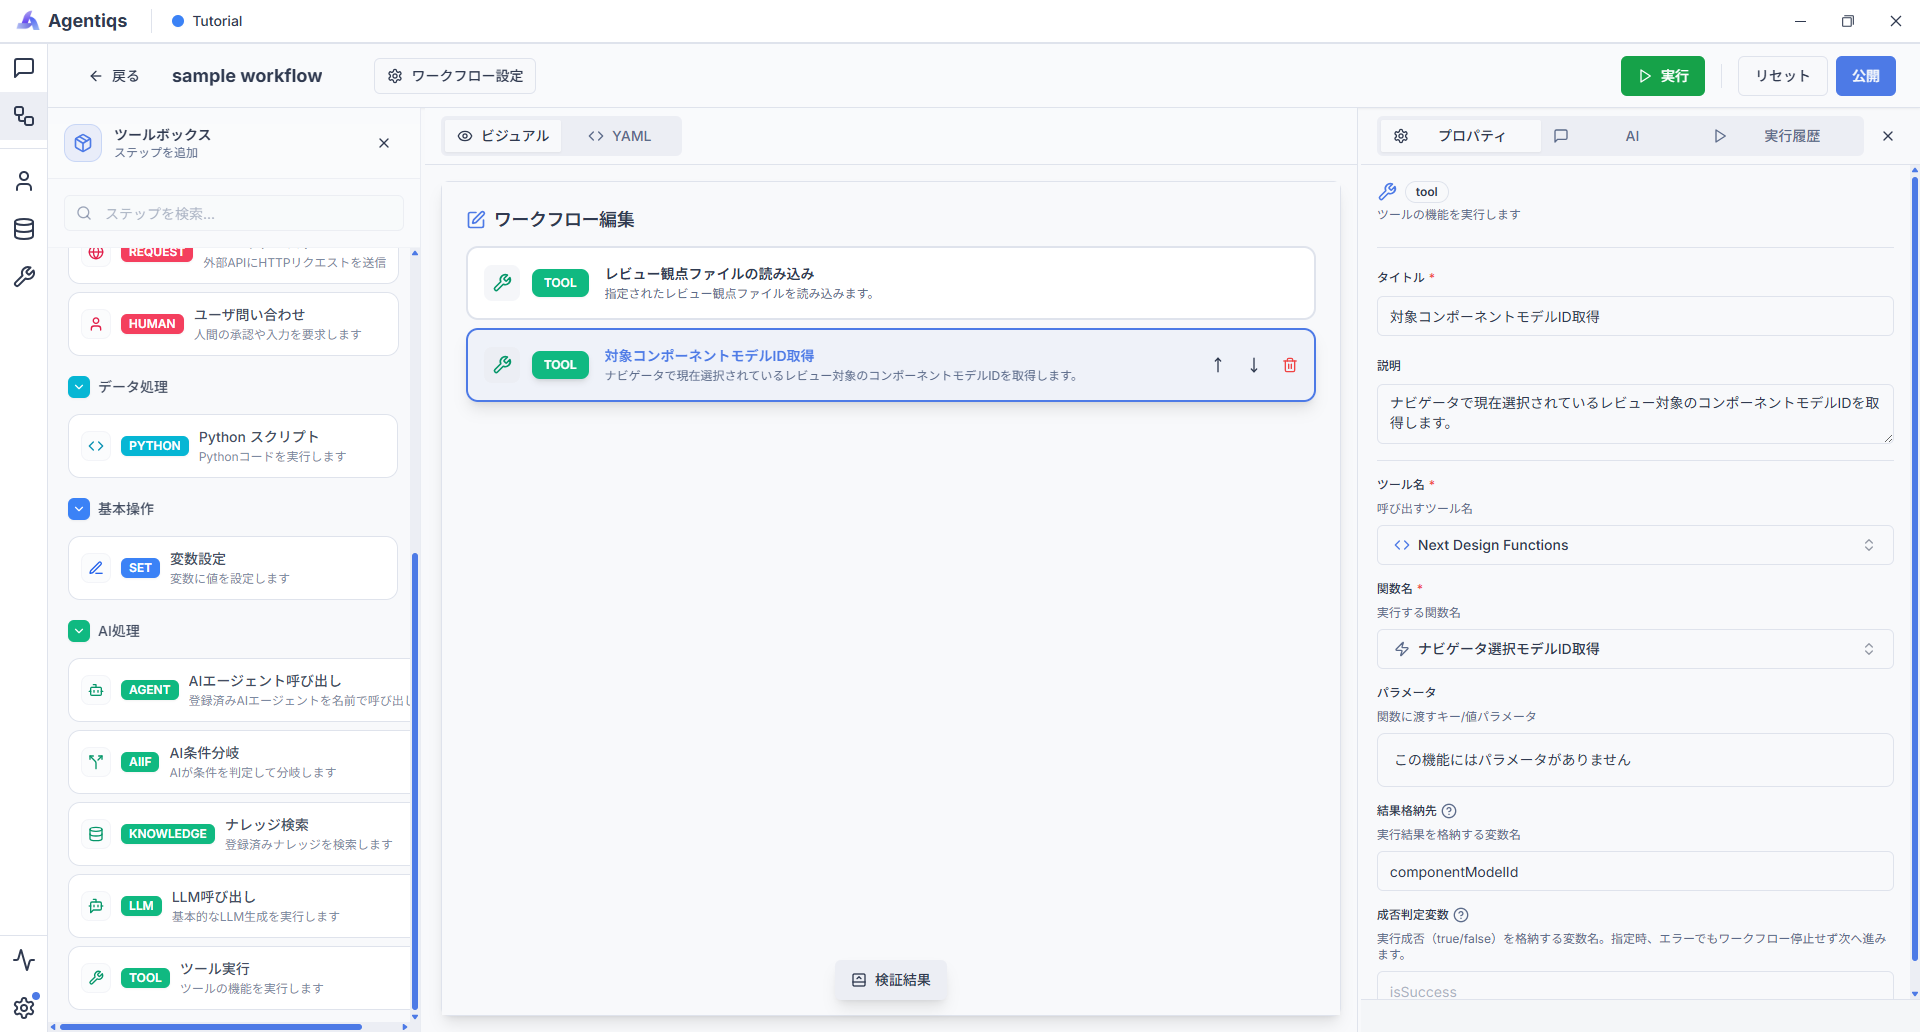
Property settings
Get the ID of the component model currently selected in the Navigator for review.
Property Required Setting Details Title Get Target Component Model ID Use a clear name that can be identified later. Description Get the ID of the component model currently selected
in the Navigator for review.Describes what the step does. Tool name 〇 Next Design FunctionsRetrieves model information from Next Design. Function name 〇 GetNavigatorSelectedModelIdGets the ID of the selected model. Result destination 〇 componentModelIdStores the component model ID. -
Get the software units under the component.
Drag and drop "Tool execution" and configure the properties.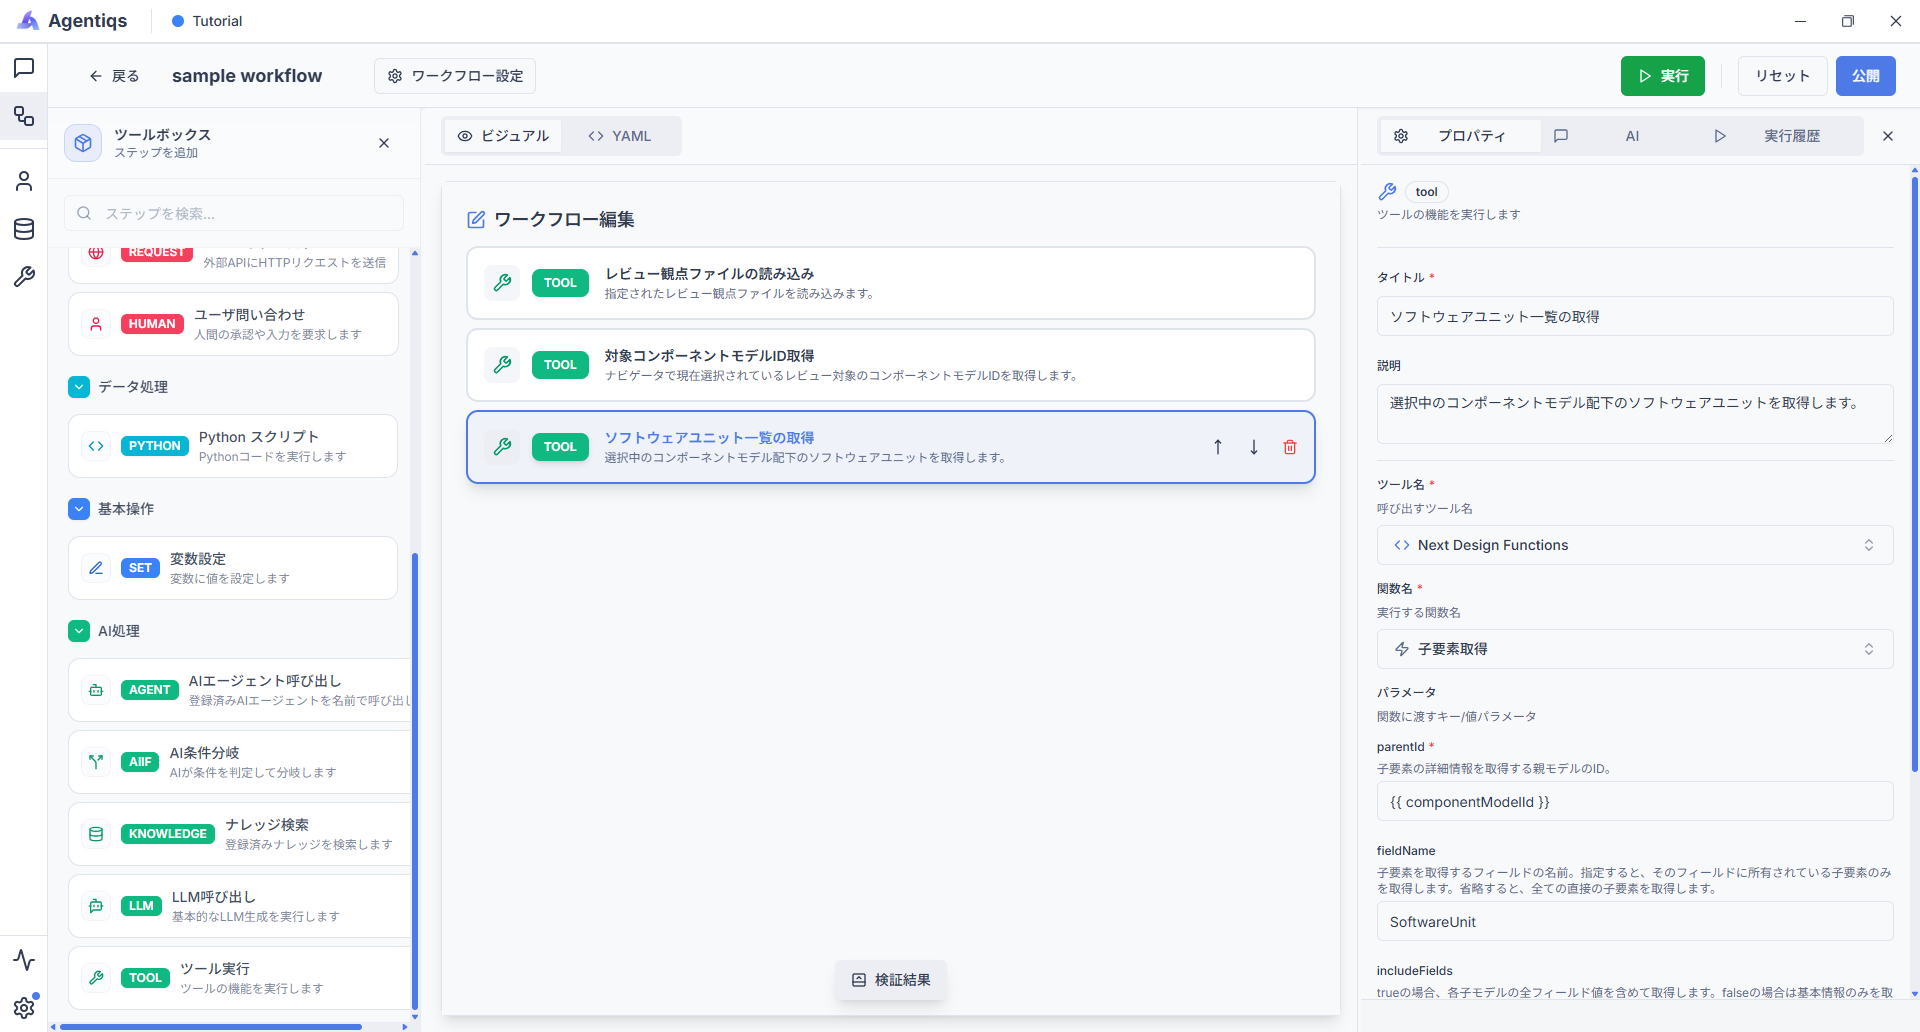
Property settings
Starting from the selected component model ID, get the software units to review.
Property Required Setting Details Title Get Software Unit List Use a clear name that can be identified later. Description Get the software units under the
selected component model.Describes what the step does. Tool name 〇 Next Design FunctionsRetrieves model information from Next Design. Function name 〇 GetChildrenGets child elements. parentId 〇 {{componentModelId}}Specify the selected component model ID. fieldName 〇 SoftwareUnitGets elements under SoftwareUnit. Result destination 〇 unitModelsStores the retrieved unit list.
4. Prepare Excel output
-
Initialize the output variables.
Drag and drop "Set variable" and configure the properties.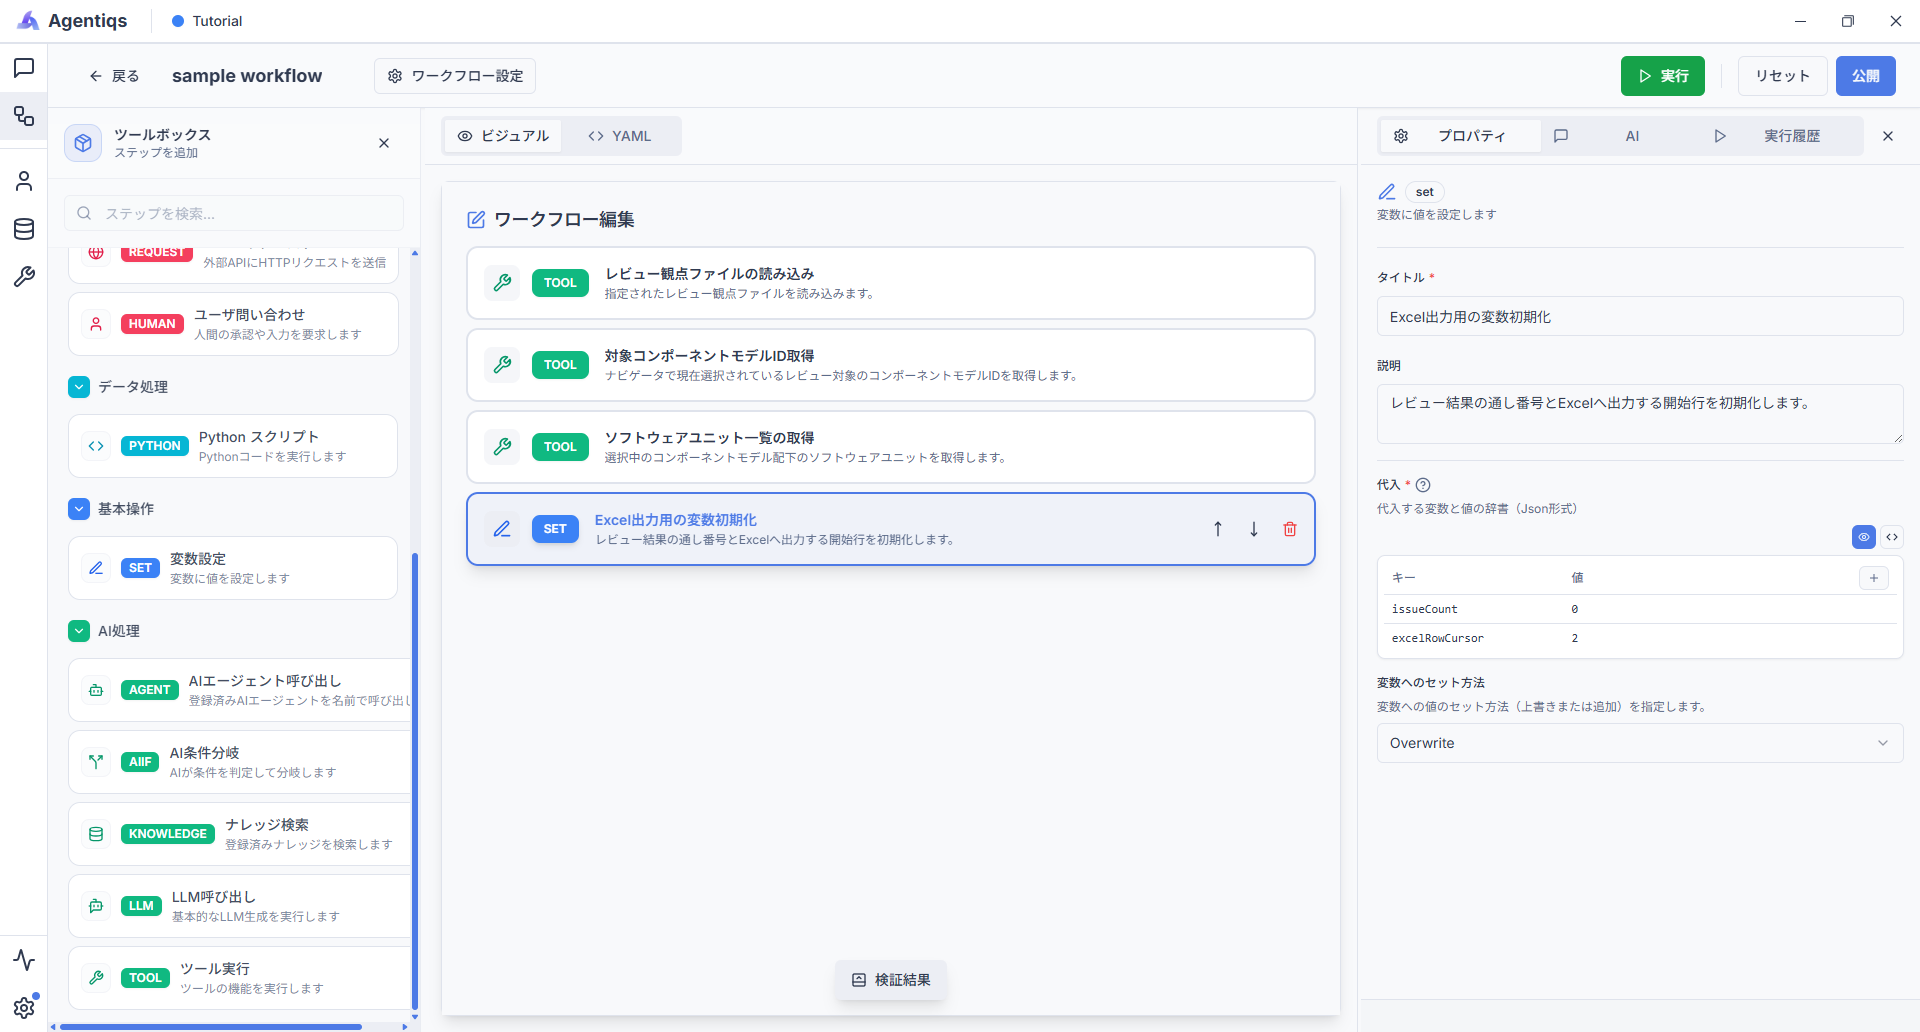
Property settings
Initialize the Excel output row and review-result sequence number.
Property Required Setting Details Title Initialize Excel Output Variables Use a clear name that can be identified later. Description Initialize the Excel output row and
review-result sequence number.Describes what the step does. Setting method 〇 OverwriteOverwrites the current value. Variable name 〇 excelRowCursorCurrent row to output to Excel. Value 〇 2Starts output on the row after the header. Variable name 〇 issueCountReview-result sequence number. Value 〇 0Initial value of the sequence number. -
Add an Excel sheet.
Drag and drop "Tool execution" and configure the properties.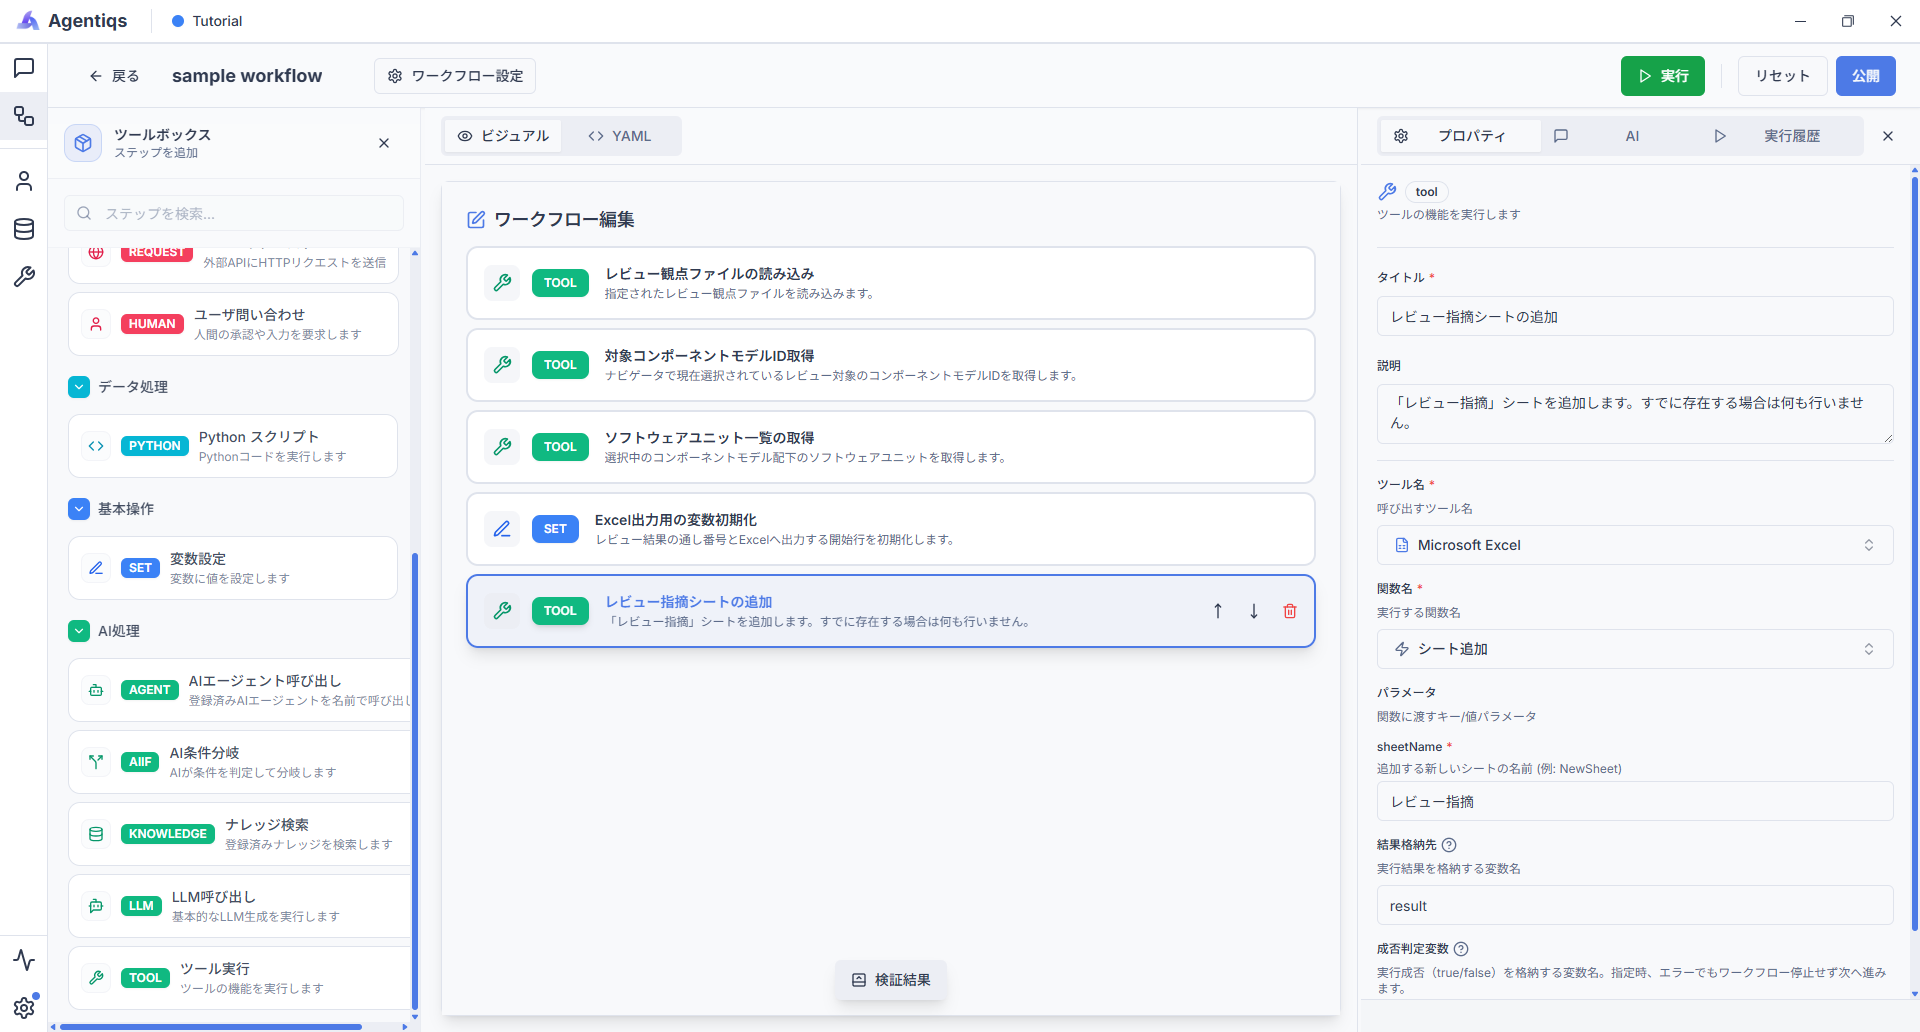
Property settings
Add the sheet to which review findings will be output.
Property Required Setting Details Title Add Review Findings Sheet Use a clear name that can be identified later. Description Add the "レビュー指摘" sheet.
If the sheet already exists, do nothing.Describes what the step does. Tool name 〇 Microsoft ExcelOperates Excel. Function name 〇 AddSheetAdds a sheet. sheetName 〇 レビュー指摘 Name of the sheet to add. Result destination resultStores the execution result. Success destination 〇 isSuccessStores whether execution succeeded. -
Output the header row.
Drag and drop "Tool execution" and configure the properties.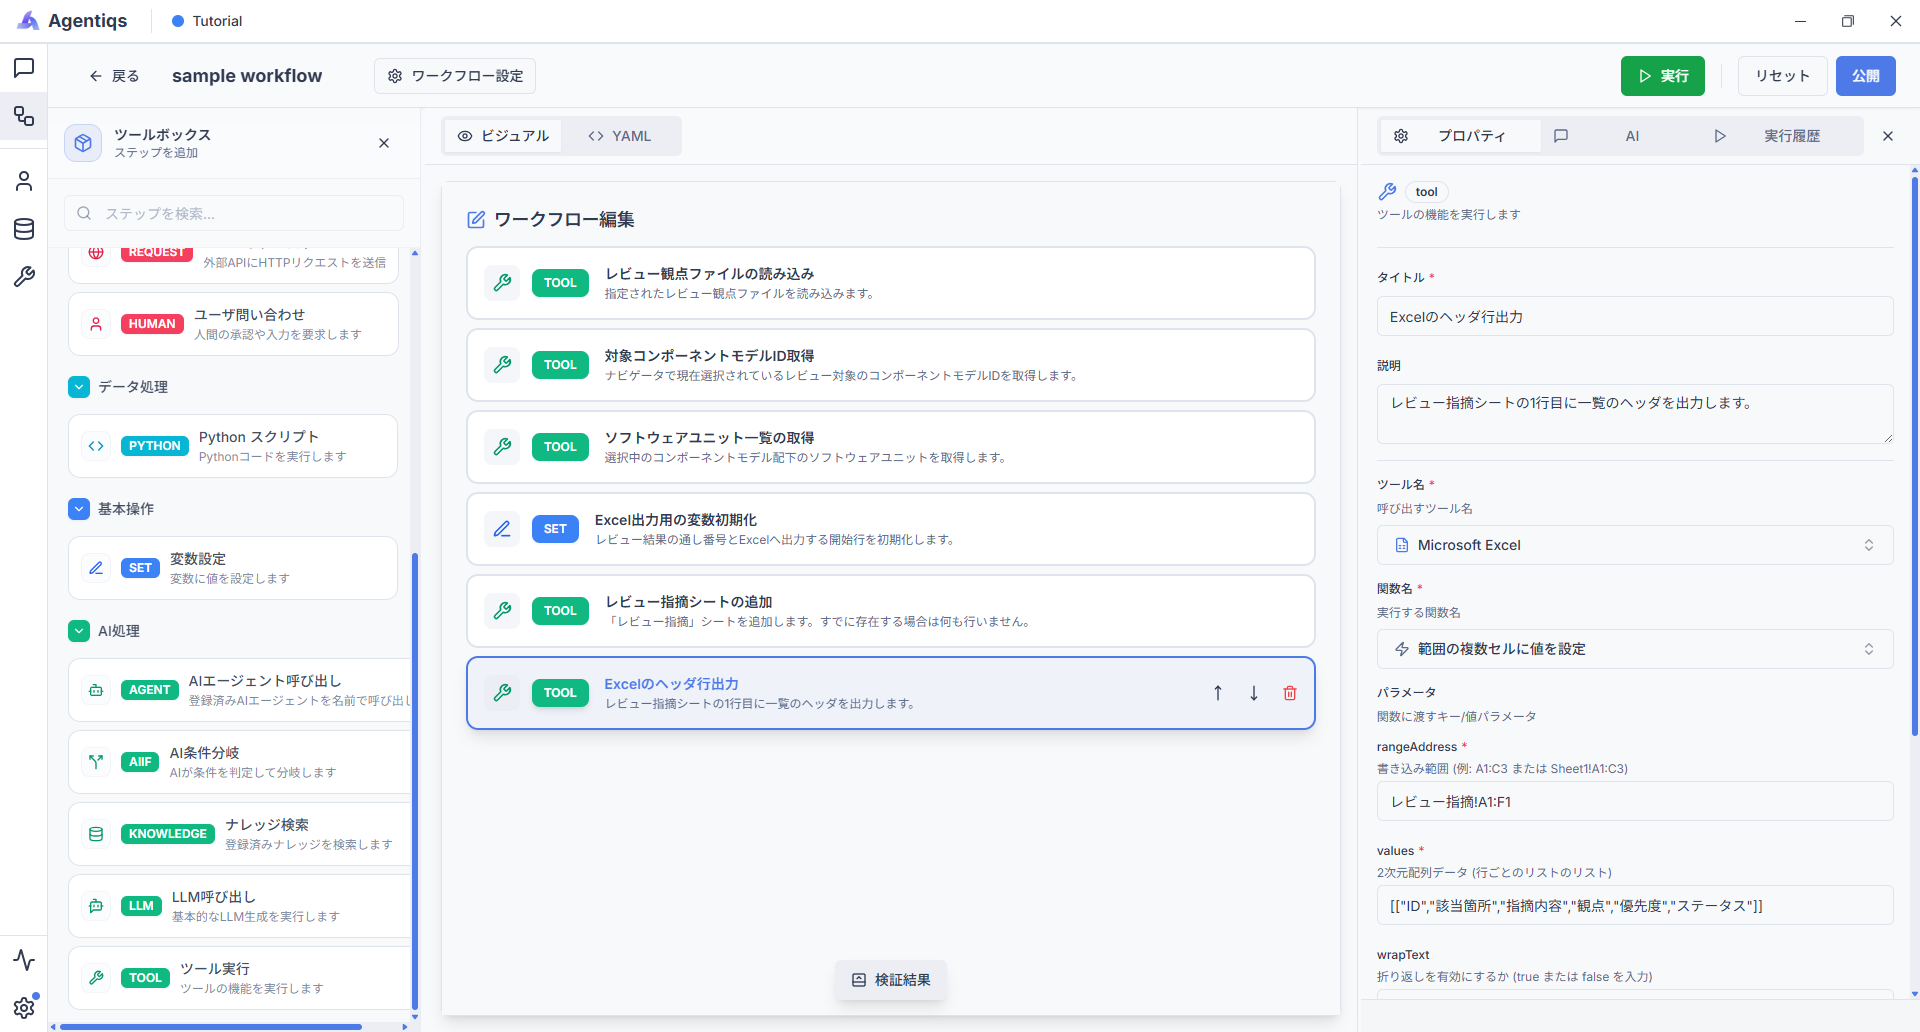
Property settings
Output the list header to the first row of the review-findings sheet.
Property Required Setting Details Title Output Excel Header Row Use a clear name that can be identified later. Description Output the list header to the first row of the review-findings sheet. Describes what the step does. Tool name 〇 Microsoft ExcelWrites to Excel. Function name 〇 SetCellValuesWrites values to specified cells. rangeAddress 〇 レビュー指摘!A1:F1Destination of the header row. values 〇 [["ID","該当箇所","指摘内容","観点","優先度","ステータス"]]Header to output in the first row. wrapText trueWraps text as needed. applyBorders trueAdds borders to make the table easier to read.
5. Get model information under each software unit
-
Configure a loop for each unit model.
Drag and drop "Loop" and configure the properties.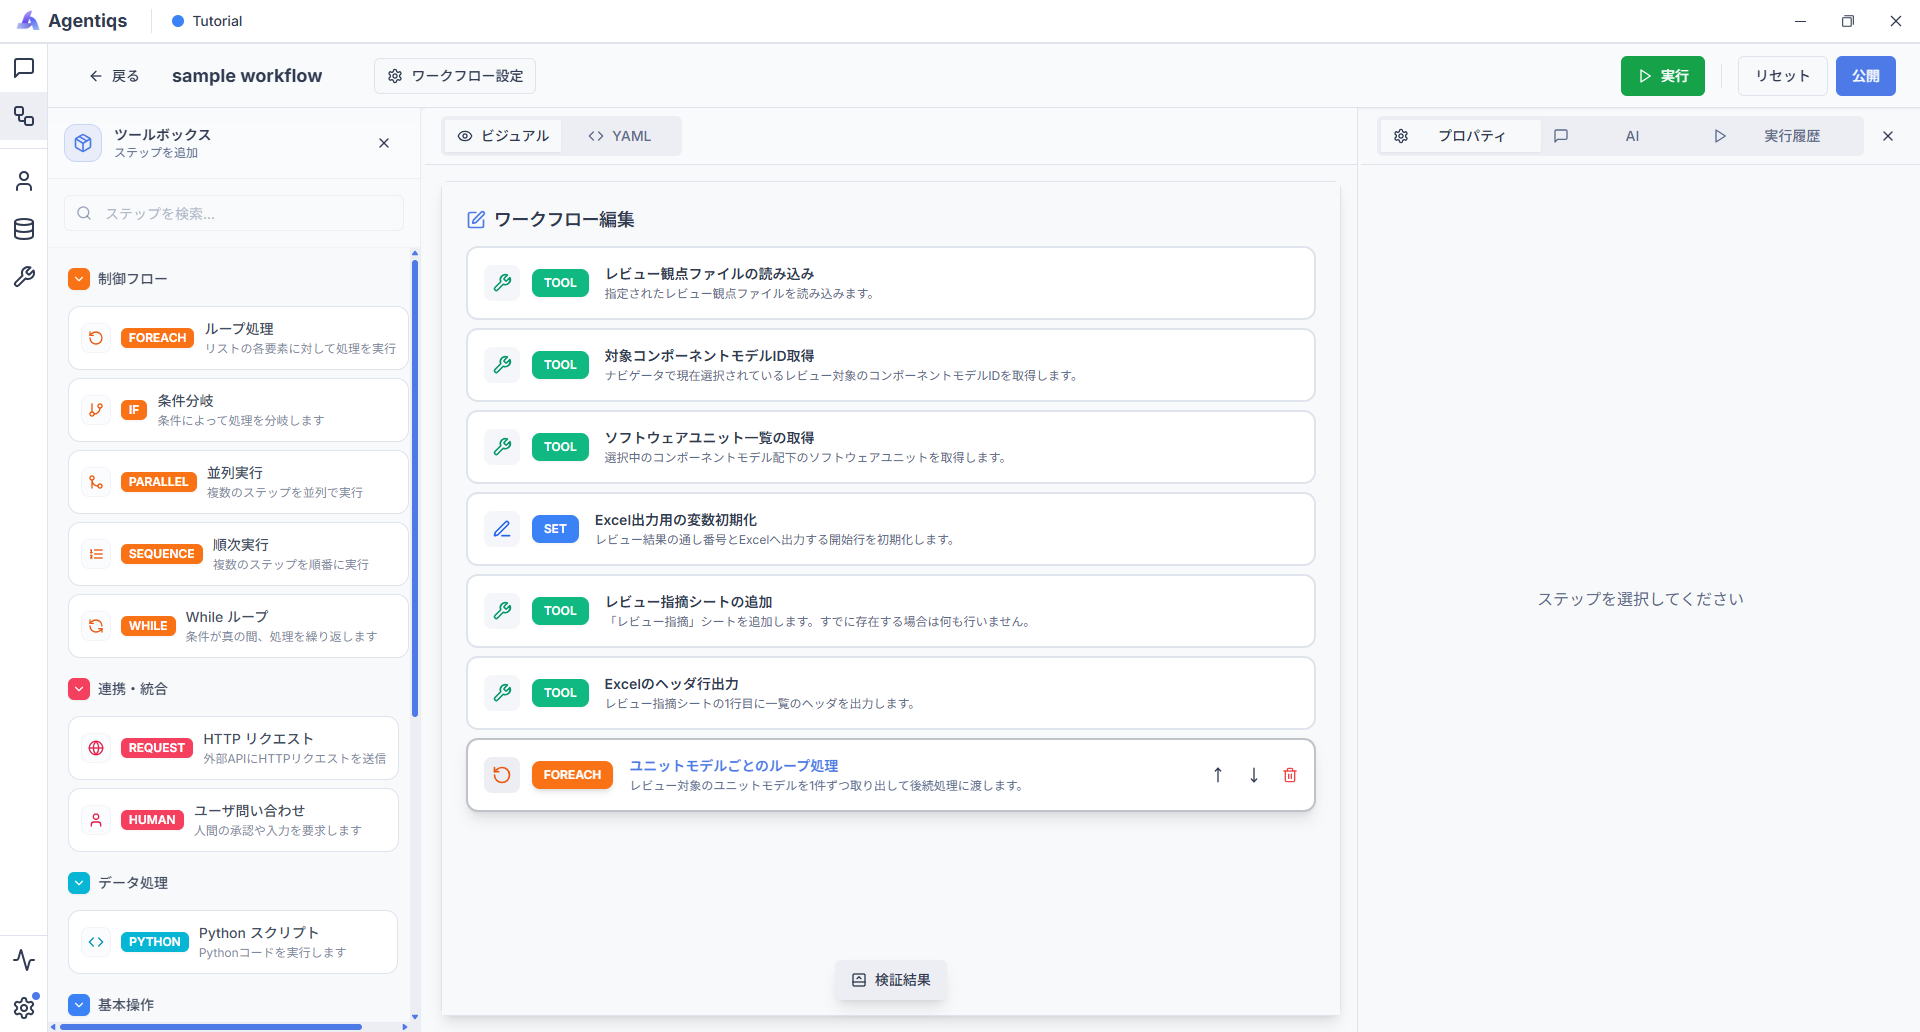
Property settings
Pass each unit model to the subsequent processing one at a time.
Property Required Setting Details Title Loop Through Unit Models Use a clear name that can be identified later. Description Pass each unit model to the subsequent processing one at a time. Describes what the step does. Iteration target 〇 {{unitModels}}List of units to review. Item variable 〇 unitStores the unit currently being processed. Maximum runs 3 Set the loop limit based on the number of targets.
Here, set it to 3 for debugging. -
Configure retrieval of all elements under each unit.
Drag and drop "Tool execution" inside "Loop Through Unit Models" and configure the properties.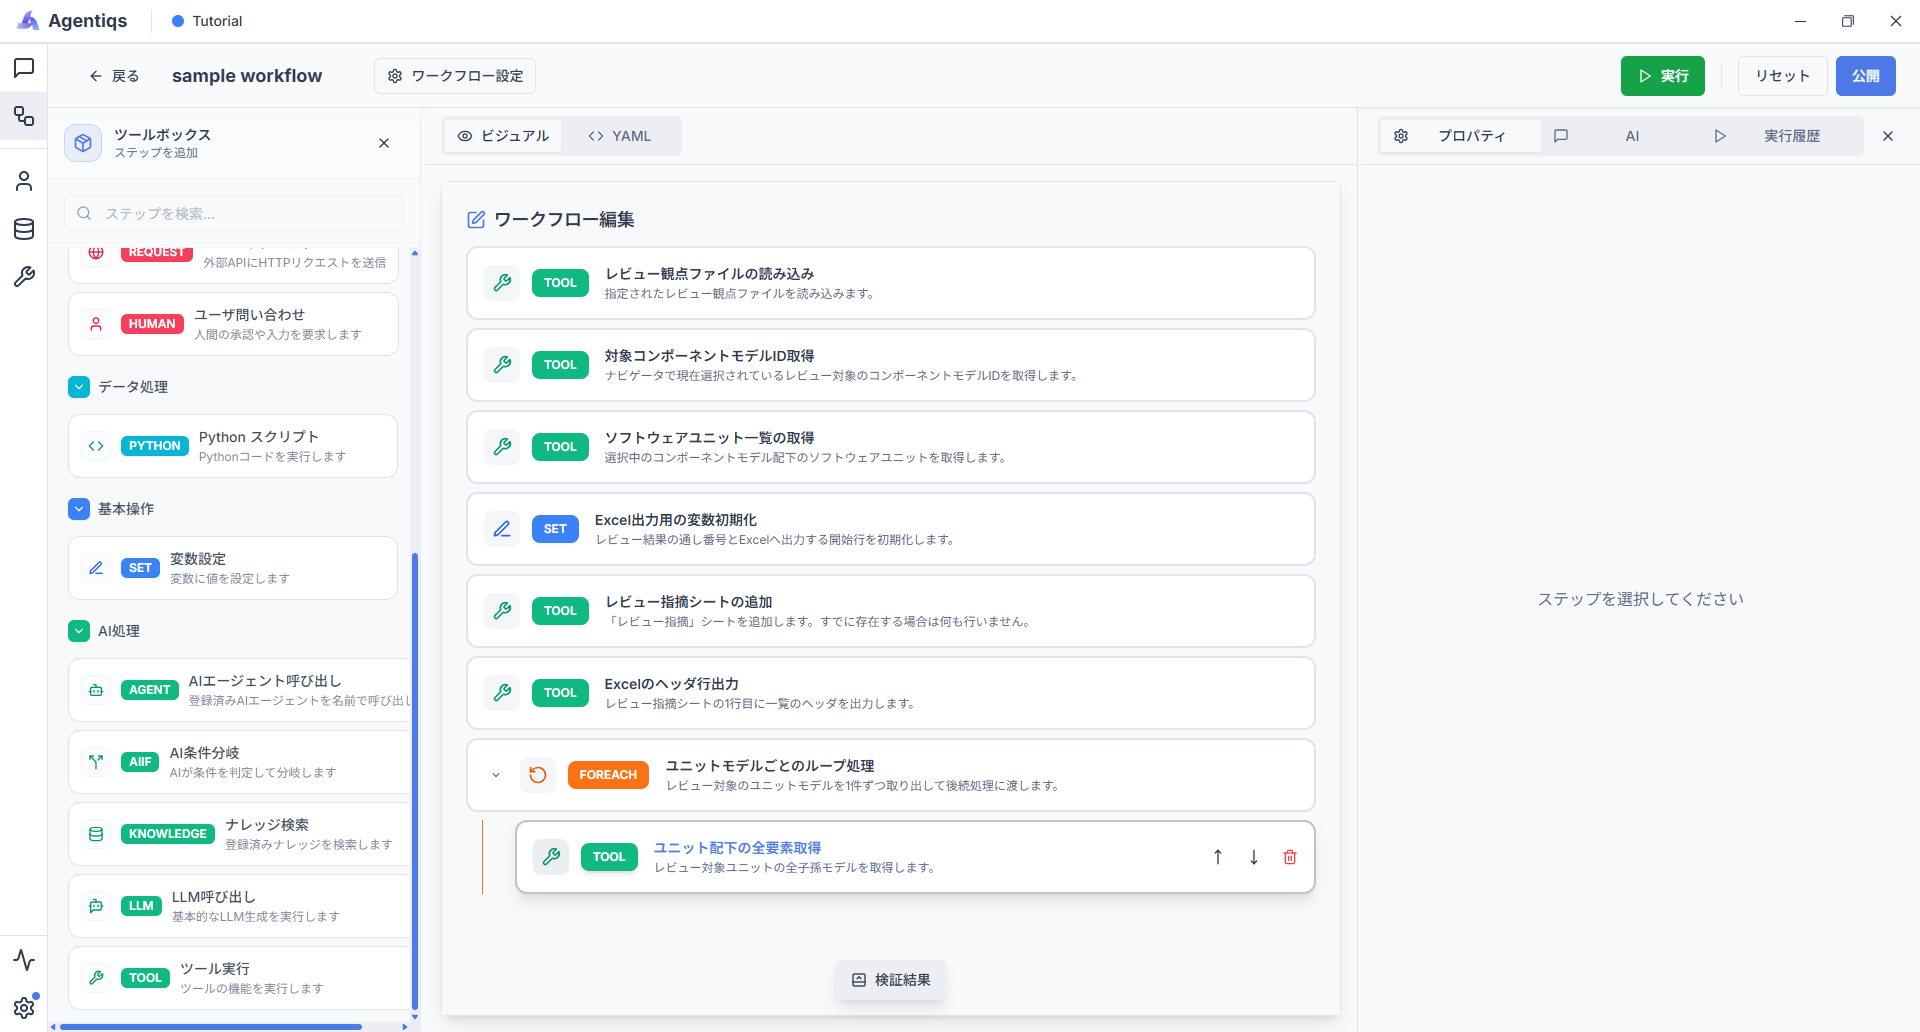
Property settings
Get all descendant models under the unit being reviewed.
Property Required Setting Details Title Get All Elements Under Unit Use a clear name that can be identified later. Description Get all descendant models under the unit being reviewed. Describes what the step does. Tool name 〇 Next Design FunctionsRetrieves model information from Next Design. Function name 〇 GetAllChildrenGets all elements under the target. parentId 〇 {{unit.Id}}Specify the ID of the unit currently being processed. Result destination 〇 unitElementsStores all retrieved elements.
6. Ask the AI agent to review each review point
-
Configure a loop for each review point.
Drag and drop "Loop" inside "Loop Through Unit Models" and configure the properties.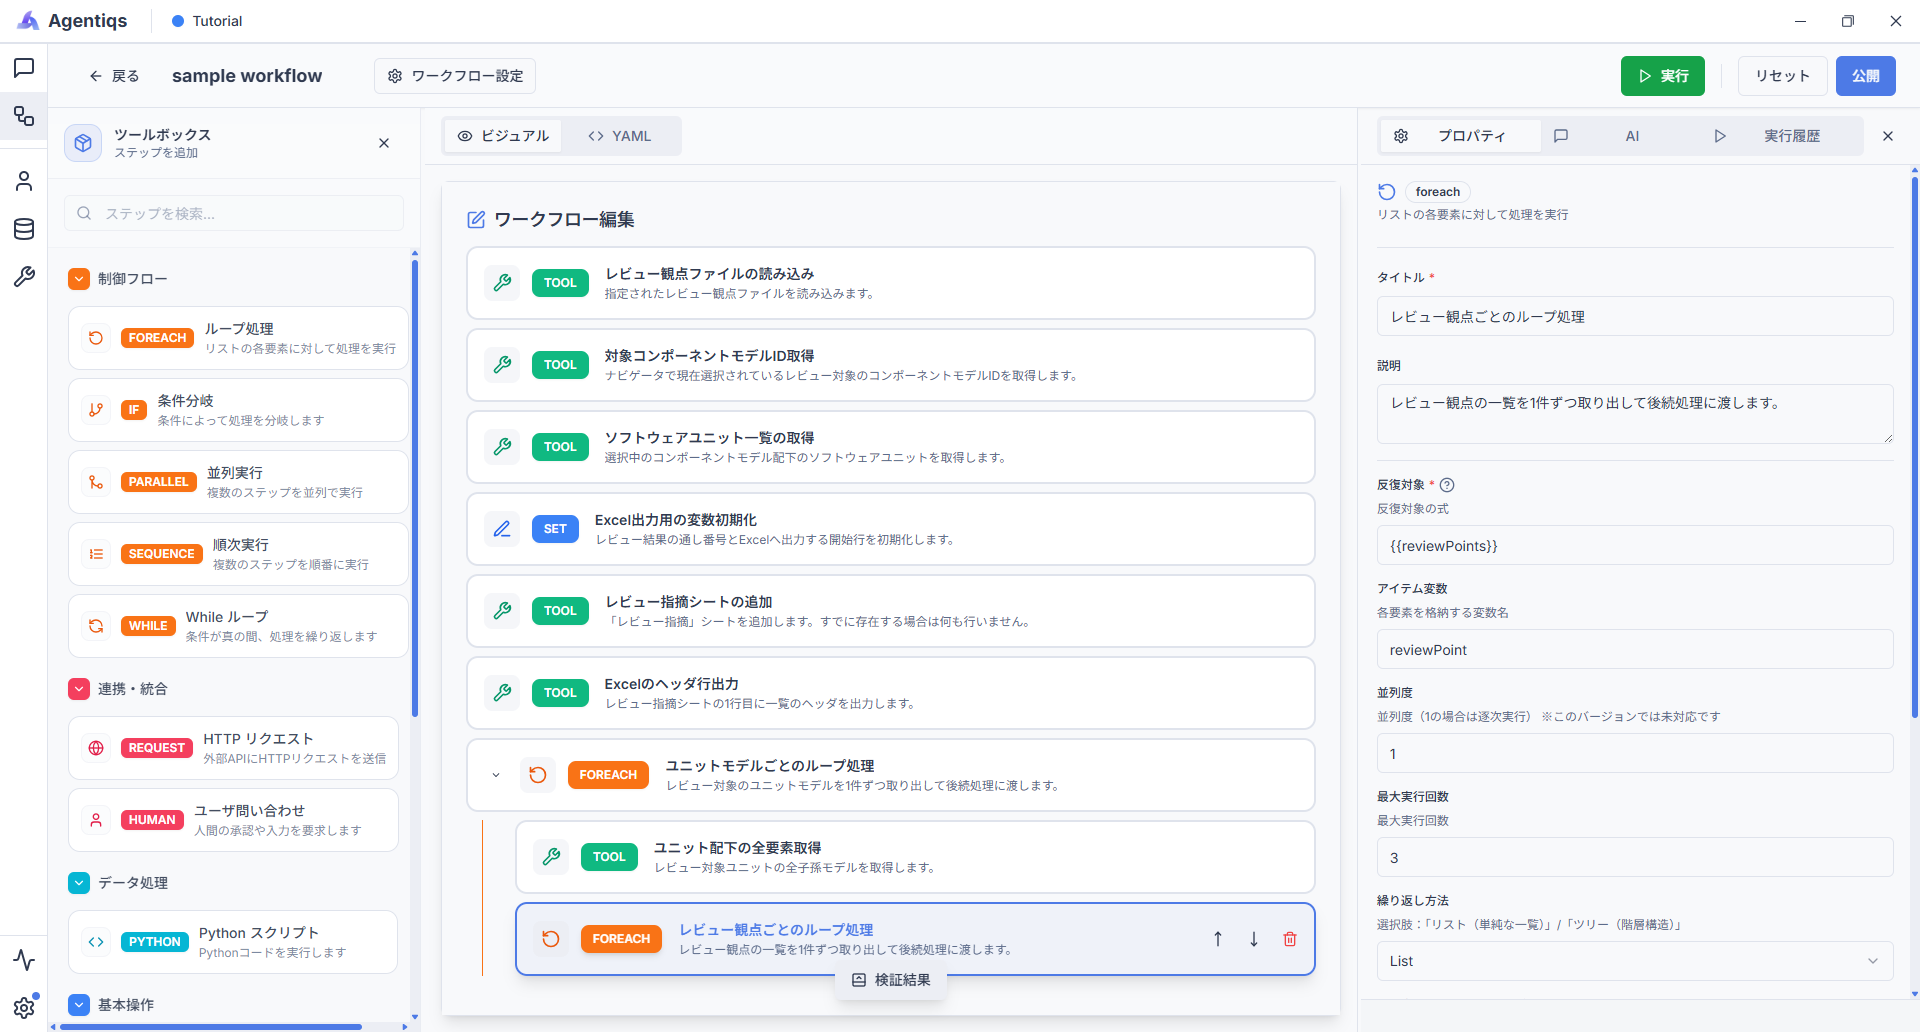
Property settings
Pass each review point to subsequent processing one at a time.
Property Required Setting Details Title Loop Through Review Points Use a clear name that can be identified later. Description Pass each review point to subsequent processing one at a time. Describes what the step does. Iteration target 〇 {{reviewPoints}}List of review points. Item variable 〇 reviewPointStores the review point currently being processed. Maximum runs 〇 3 Set the loop limit based on the number of review points.
Here, set it to 3 for debugging. -
Configure AI review execution.
Drag and drop "AI agent" inside "Loop Through Review Points" and configure the properties.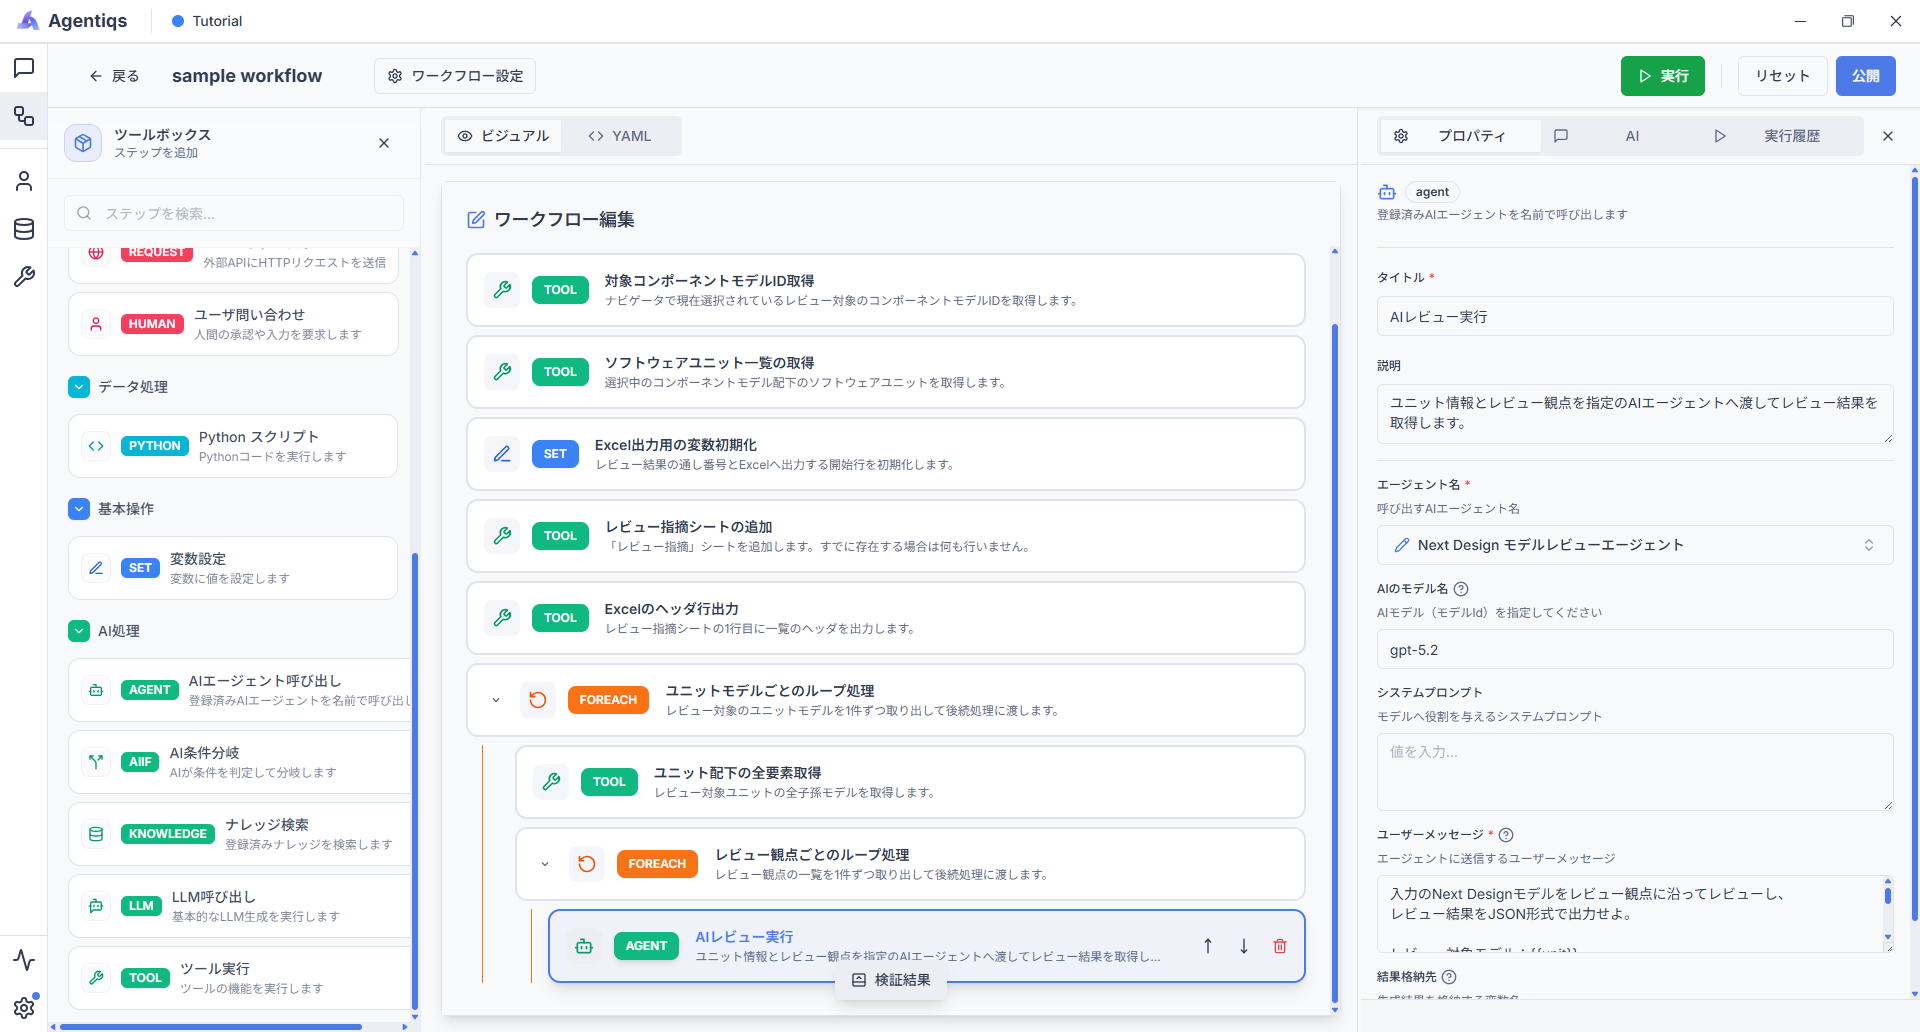
Property settings
Pass the unit information and review point to the specified AI agent and obtain review results.
Property Required Setting Details Title Run AI Review Use a clear name that can be identified later. Description Pass the unit information and review point to the specified AI agent and obtain review results. Describes what the step does. Agent name 〇 Next DesignモデルレビューエージェントReview AI agent created in Prepare the AI agent. AI model name 〇 gpt-5.2Specify the AI model to use. User message 〇 Set the content below. Passes the unit information and review point. Result destination 〇 issuesStores the review results. User message:
Review the input Next Design model according to the review point and output the review results in JSON format.Target model: {{unit}}Review point: {{reviewPoint}}Child model list: {{unitElements}}
7. Format the review results and output them to Excel
-
Configure JSON formatting for
issues.
Drag and drop "Python script" inside "Loop Through Review Points" and configure the properties.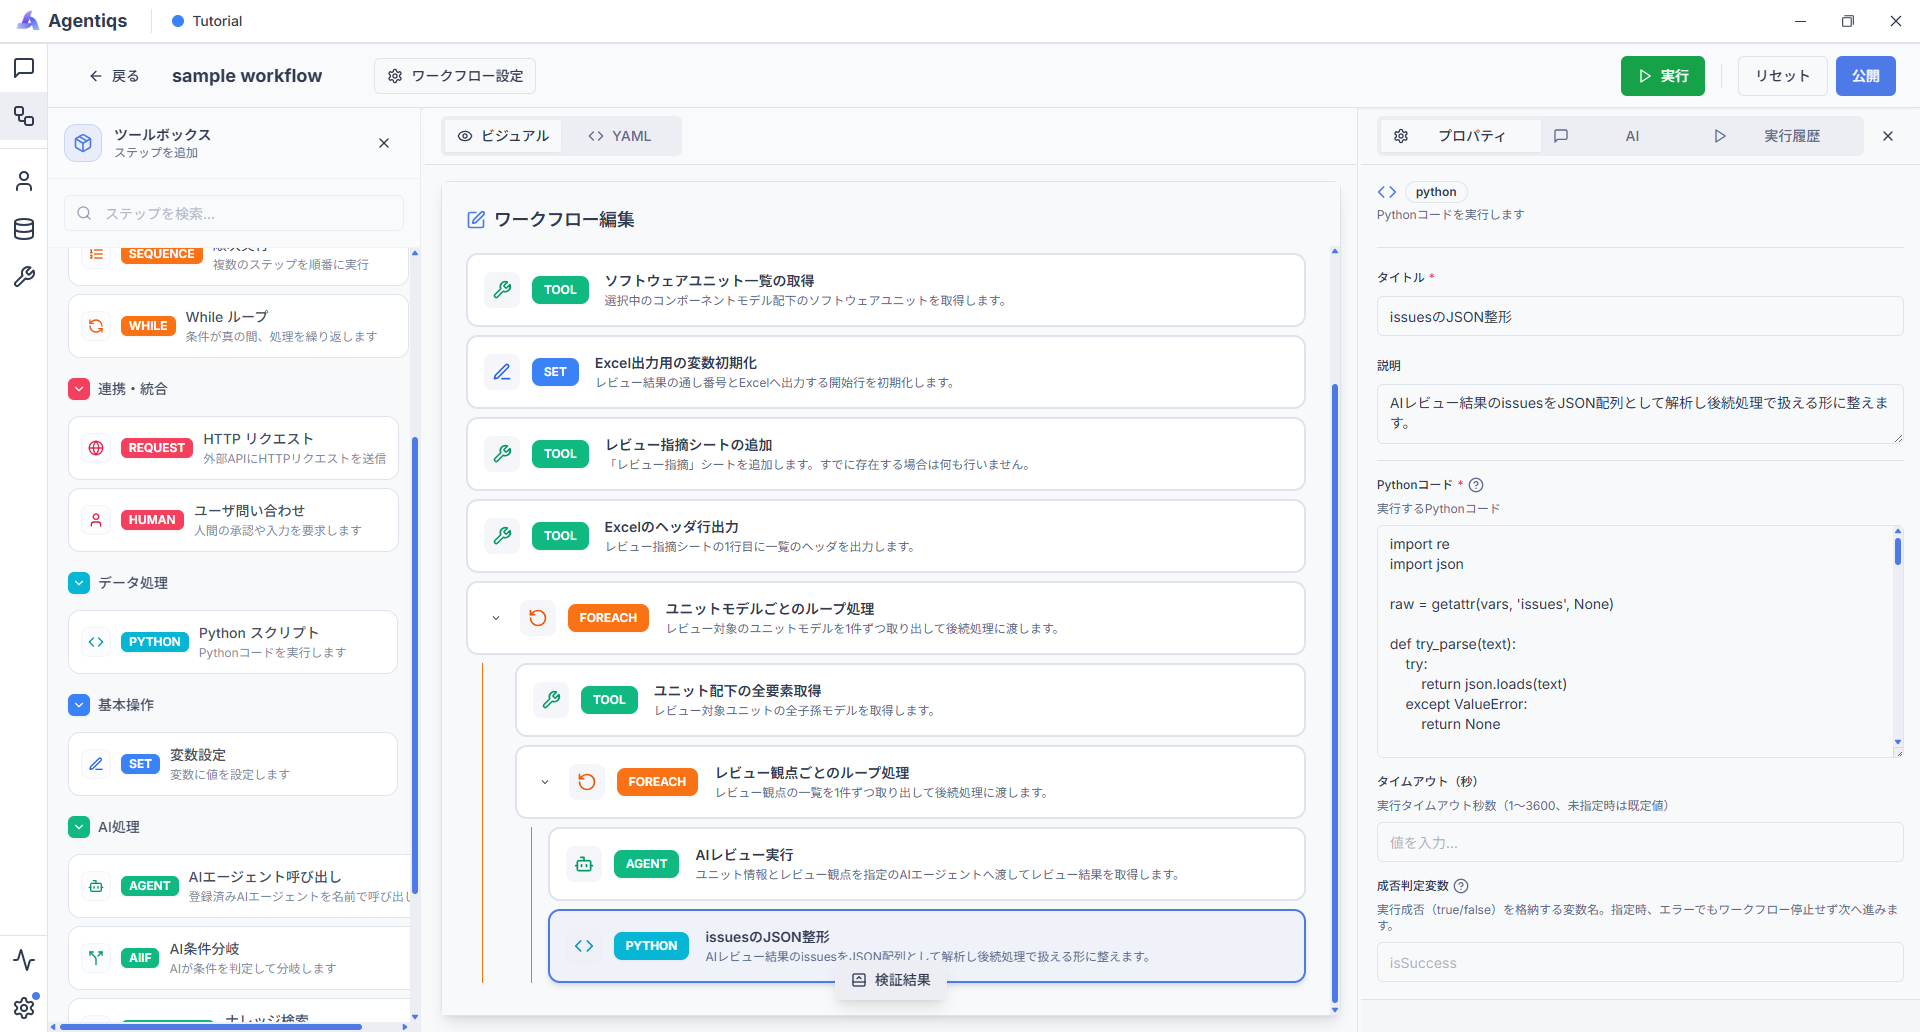
Property settings
Parse the AI review result
issuesas a JSON array and format it for subsequent processing.Even if the AI agent's system prompt restricts output to JSON, the selected model or response may add a Markdown code fence or outer quotation marks.
This script removes them and converts the result into a format that can be handled as a JSON array.Property Required Setting Details Title Format issues JSON Use a clear name that can be identified later. Description Parse AI review result issues as a JSON array and format it for subsequent processing. Describes what the step does. Python code 〇 Paste the following code. Corrects the value so it can be parsed as a JSON array. Python code:
import reimport jsonraw = getattr(vars, 'issues', None)def try_parse(text):try:return json.loads(text)except ValueError:return Nonedef strip_code_fence(text):if text is None:return texttext = text.strip()fence = re.compile(r'^\s*```(?:json)?\s*([\s\S]*?)\s*```\s*$',re.IGNORECASE)m = fence.match(text)return m.group(1).strip() if m else textdef strip_wrapping_quotes(text, max_times=2):s = text.strip()for _ in range(max_times):if len(s) >= 2 and ((s[0] == '"' and s[-1] == '"') or(s[0] == "'" and s[-1] == "'")):s = s[1:-1].strip()else:breakreturn sif isinstance(raw, list):vars.issues = rawelse:s = '' if raw is None else str(raw)s = s.strip()s = strip_code_fence(s)s = strip_wrapping_quotes(s)parsed = try_parse(s)if parsed is None:try:s2 = bytes(s, 'utf-8').decode('unicode_escape')except UnicodeDecodeError:s2 = ss2 = strip_code_fence(s2)s2 = strip_wrapping_quotes(s2)parsed = try_parse(s2)else:s2 = sif parsed is None:for candidate in (s2, s):start = candidate.find('[')end = candidate.rfind(']')if start != -1 and end != -1 and end > start:parsed = try_parse(candidate[start:end + 1])if parsed is not None:breakif parsed is None:raise Exception('issues could not be parsed as JSON. Please check the output format.')if not isinstance(parsed, list):raise Exception('issues must be a JSON array.')vars.issues = parsed -
Configure the findings-list loop.
Drag and drop "Loop" inside "Loop Through Review Points" and configure the properties.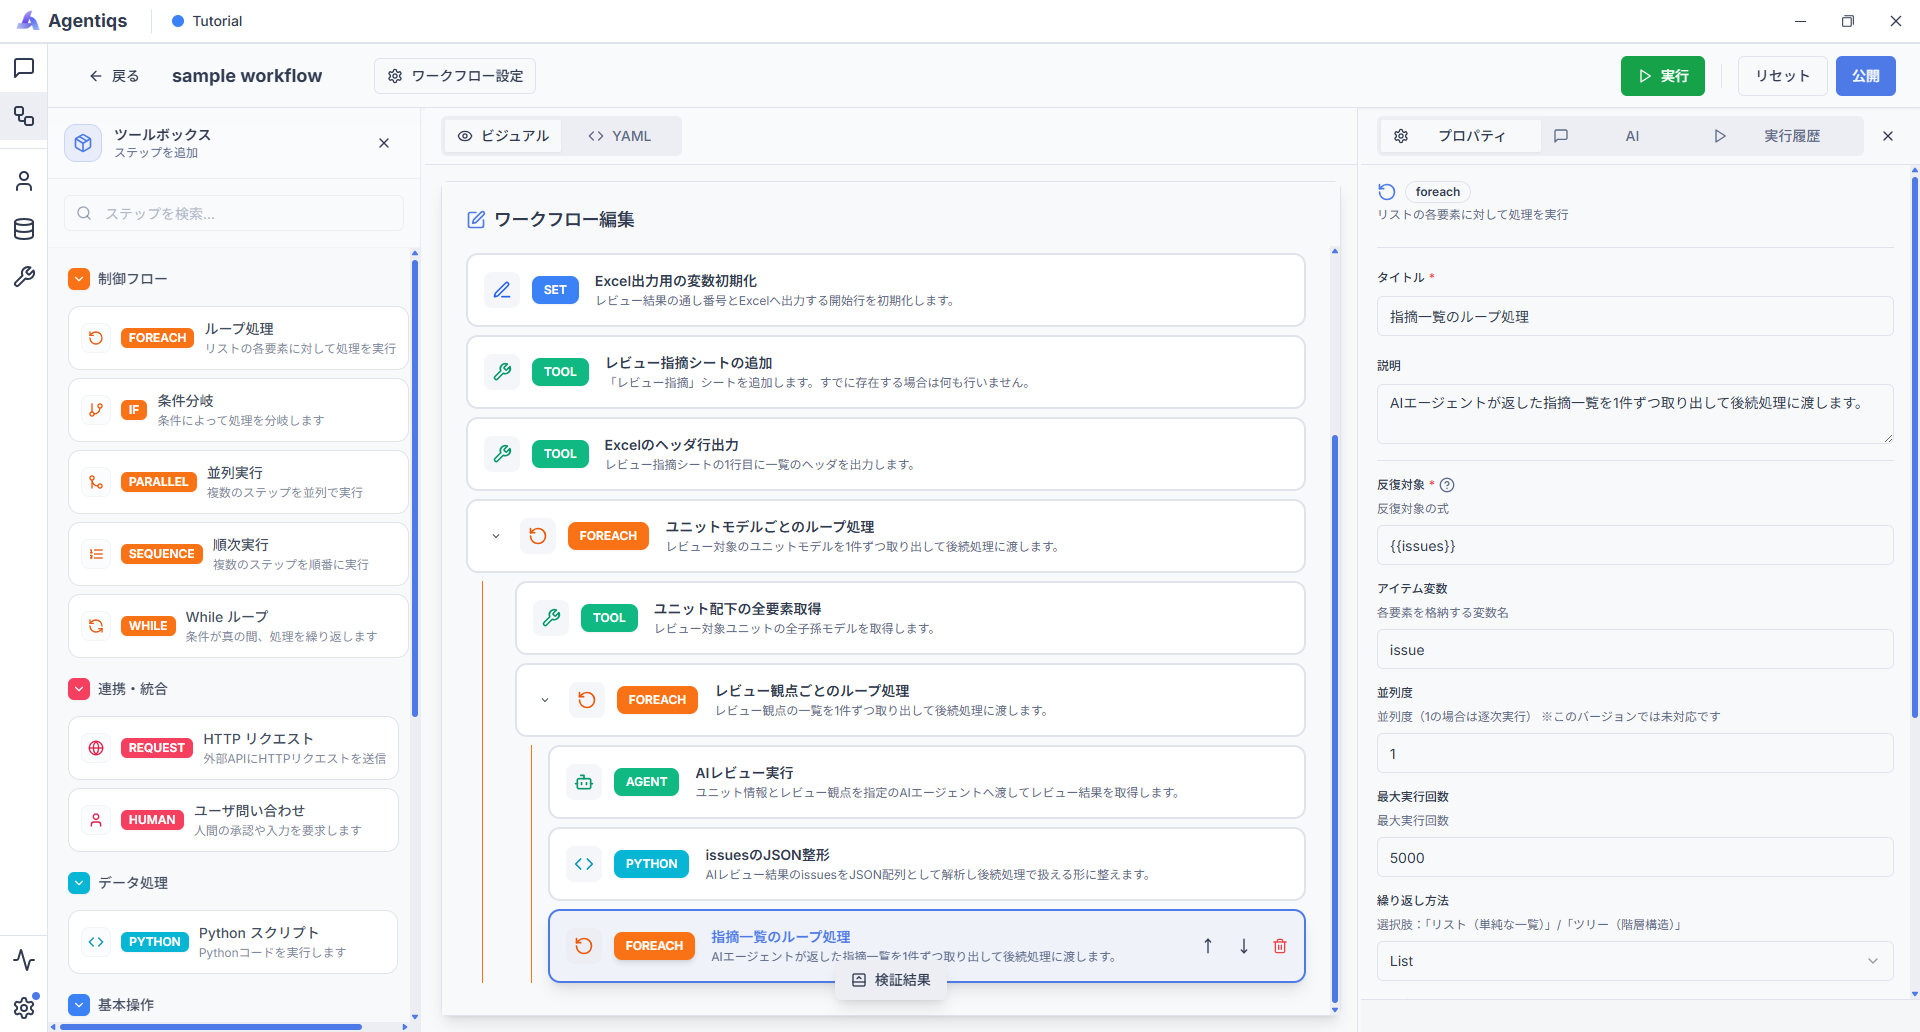
Property settings
Pass each finding returned by the AI agent to subsequent processing one at a time.
Property Required Setting Details Title Loop Through Findings Use a clear name that can be identified later. Description Pass each finding returned by the AI agent to subsequent processing one at a time. Describes what the step does. Iteration target 〇 {{issues}}List of findings returned by the AI agent. Item variable 〇 issueStores one finding. Maximum runs 〇 3 Set this based on the expected number.
Here, set it to 3 for debugging. -
Update the review-result sequence number.
Drag and drop "Set variable" inside "Loop Through Findings" and configure the properties.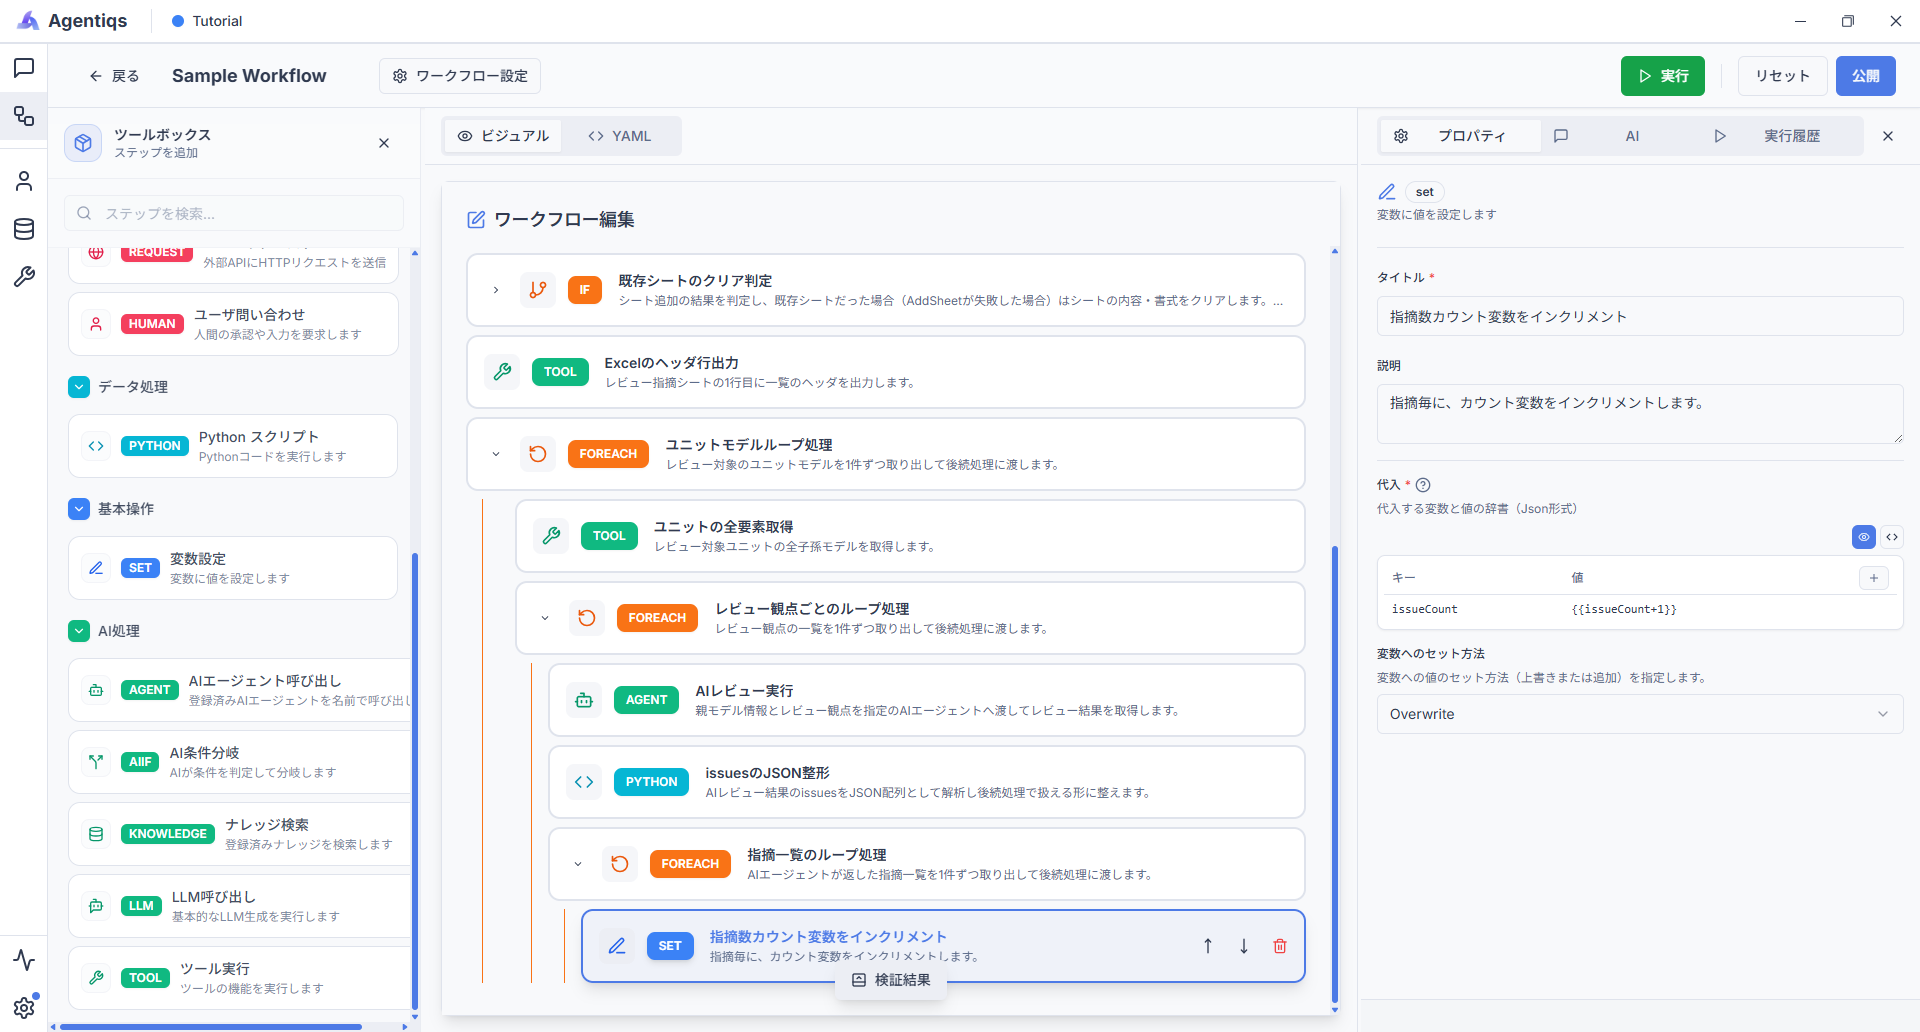
Property settings
Increment the counter for each finding.
Property Required Setting Details Title Increment Finding Counter Use a clear name that can be identified later. Description Increment the counter for each finding. Describes what the step does. Setting method 〇 OverwriteOverwrites the current value. Variable name 〇 issueCountFinding sequence number. Value 〇 {{issueCount+1}}Adds 1 to the current value. -
Configure output of the finding row to Excel.
Drag and drop "Tool execution" inside "Loop Through Findings" and configure the properties.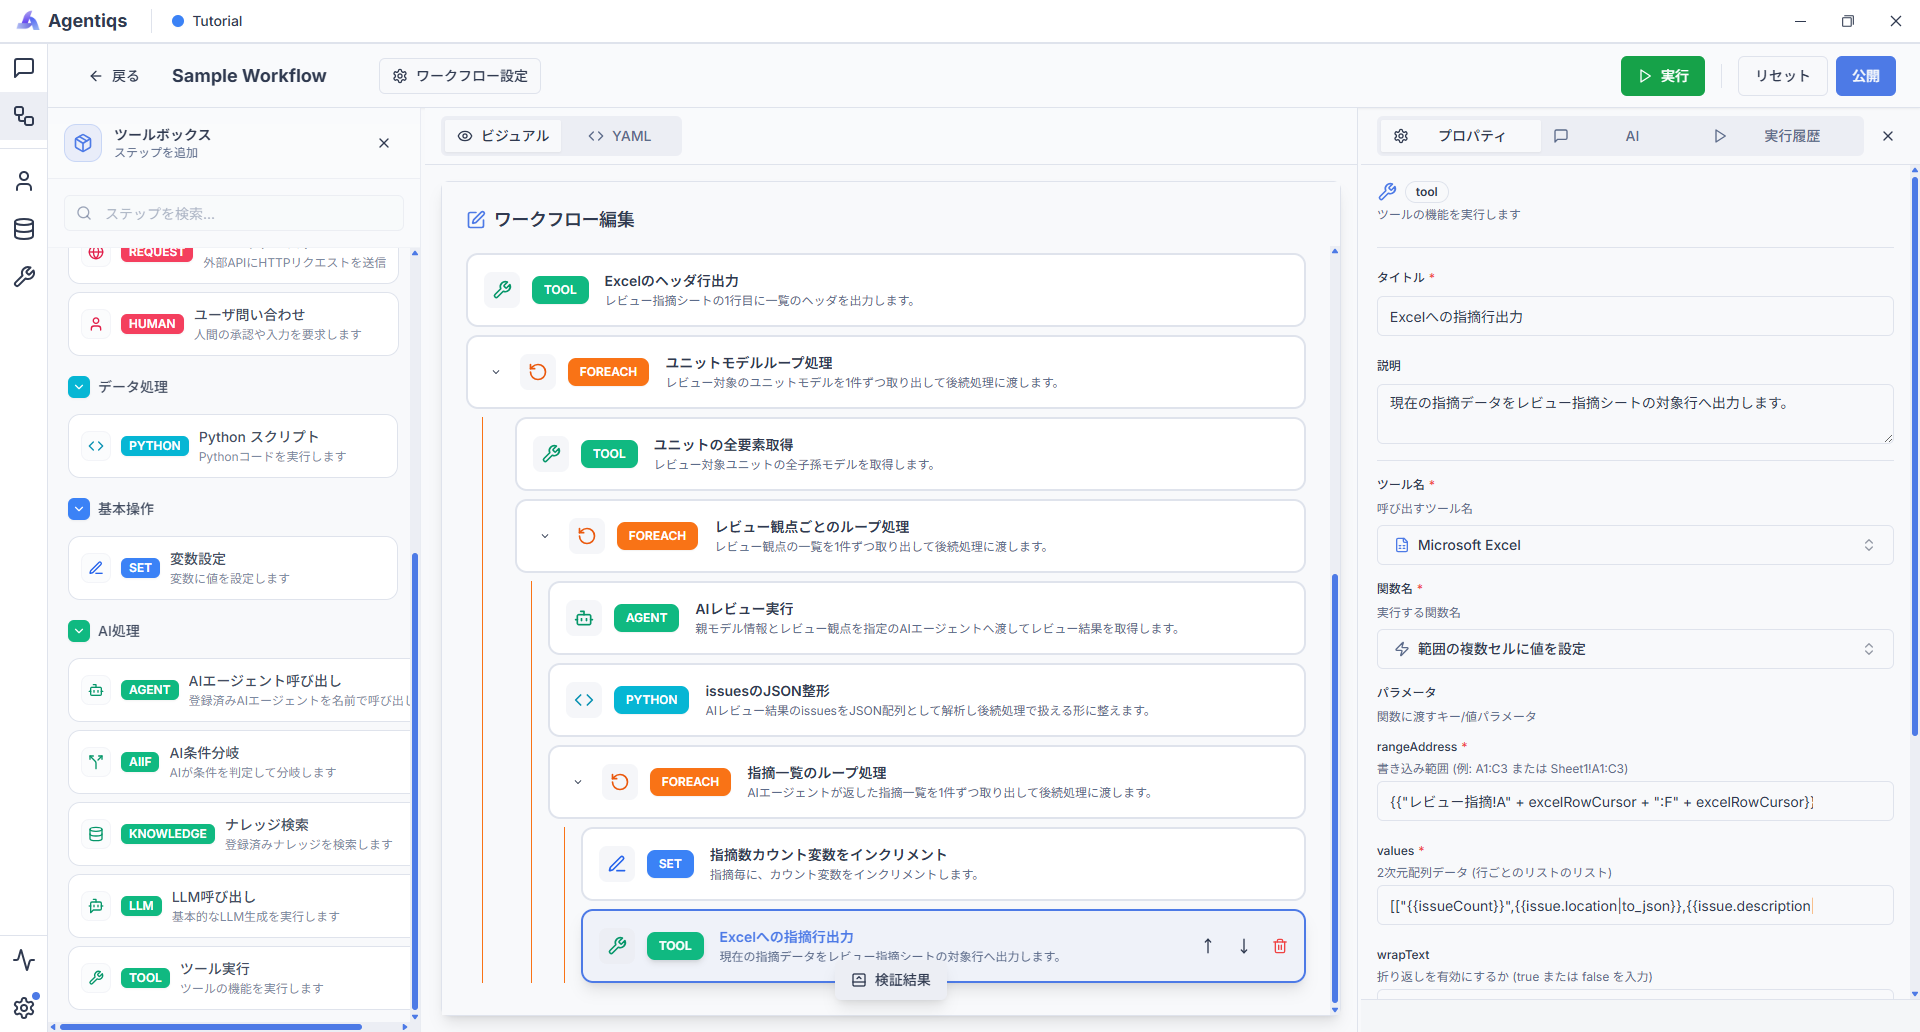
Property settings
Output the current finding to the target row of the review-findings sheet.
Property Required Setting Details Title Output Finding Row to Excel Use a clear name that can be identified later. Description Output the current finding to the target row of the review-findings sheet. Describes what the step does. Tool name 〇 Microsoft ExcelWrites to Excel. Function name 〇 SetCellValuesWrites values to specified cells. rangeAddress 〇 {{"レビュー指摘!A" + excelRowCursor + ":F" + excelRowCursor}}Outputs one finding to the current row. values 〇 See below. Outputs values for one finding. wrapText trueWraps long text. applyBorders trueAdds borders. Value of values:
[["{{issueCount}}",{{issue.location|to_json}},{{issue.description|to_json}},{{issue.viewPoint|to_json}},{{issue.priority|to_json}},{{issue.status|to_json}}]] -
Update the Excel row number.
Drag and drop "Set variable" inside "Loop Through Findings" and configure the properties.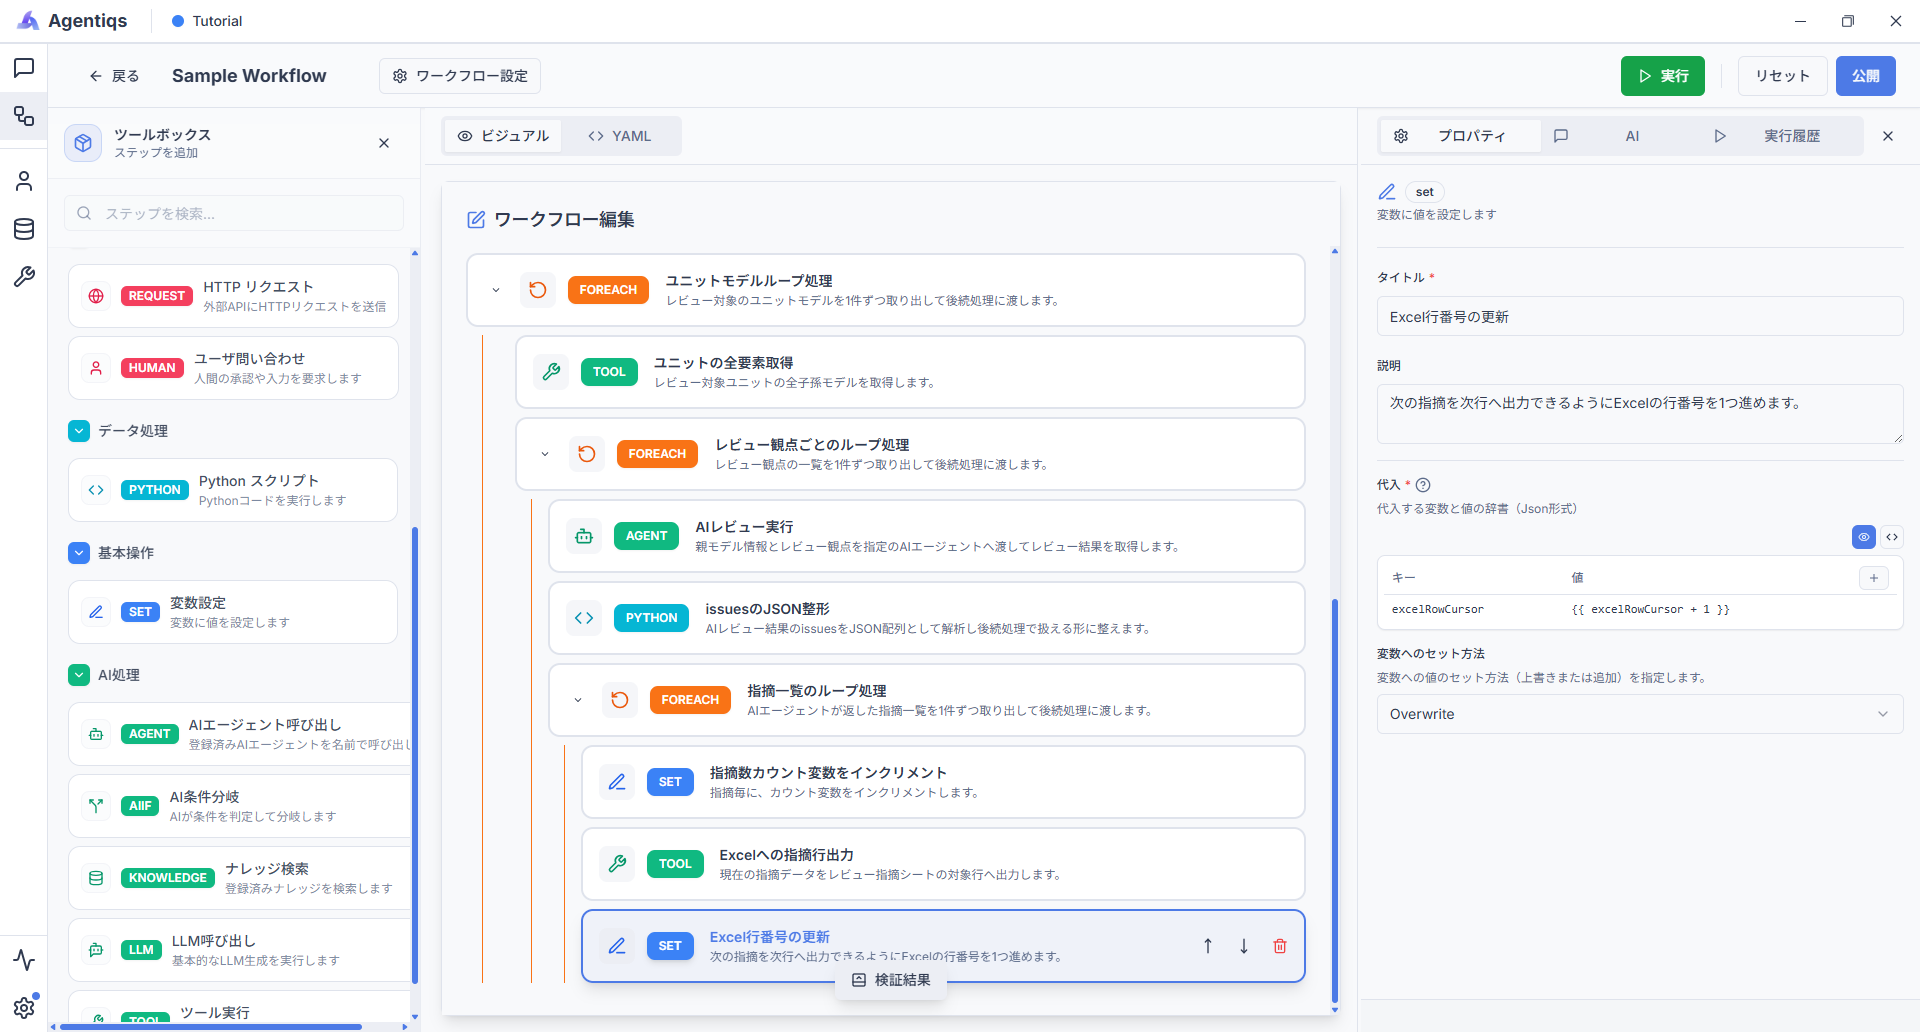
Property settings
Advance the Excel row number by one so the next finding can be output on the next row.
Property Required Setting Details Title Update Excel Row Number Use a clear name that can be identified later. Description Advance the Excel row number by one so the next finding can be output on the next row. Describes what the step does. Setting method 〇 OverwriteOverwrites the current value. Variable name 〇 excelRowCursorInternal variable to update. Value 〇 {{ excelRowCursor + 1 }}Advances one row.
3. Run the workflow
Run the workflow you created.
If the selected review target model or review-point file format differs from the workflow's assumptions,
you may not obtain the expected review results.
- Open the Next Design file (組込みソフト開発.nproj), and select the target software component.
For the sample:
組込みソフト開発/ソフトウェアコンポーネント設計/APPレイヤ/車速偏差算出 - Start Excel and open the workbook to use as the review-result output destination.
- If findings are already present, delete them so there are no findings.
- Click [Run] in the upper-right corner of the workflow.
- In the [Workflow Execution Parameters] dialog, click [Run].
More loop iterations increase the processing time and token consumption.
This procedure reduces the loop count to "3" for debugging.
After verifying operation, change it to the production value.
4. Check the execution results
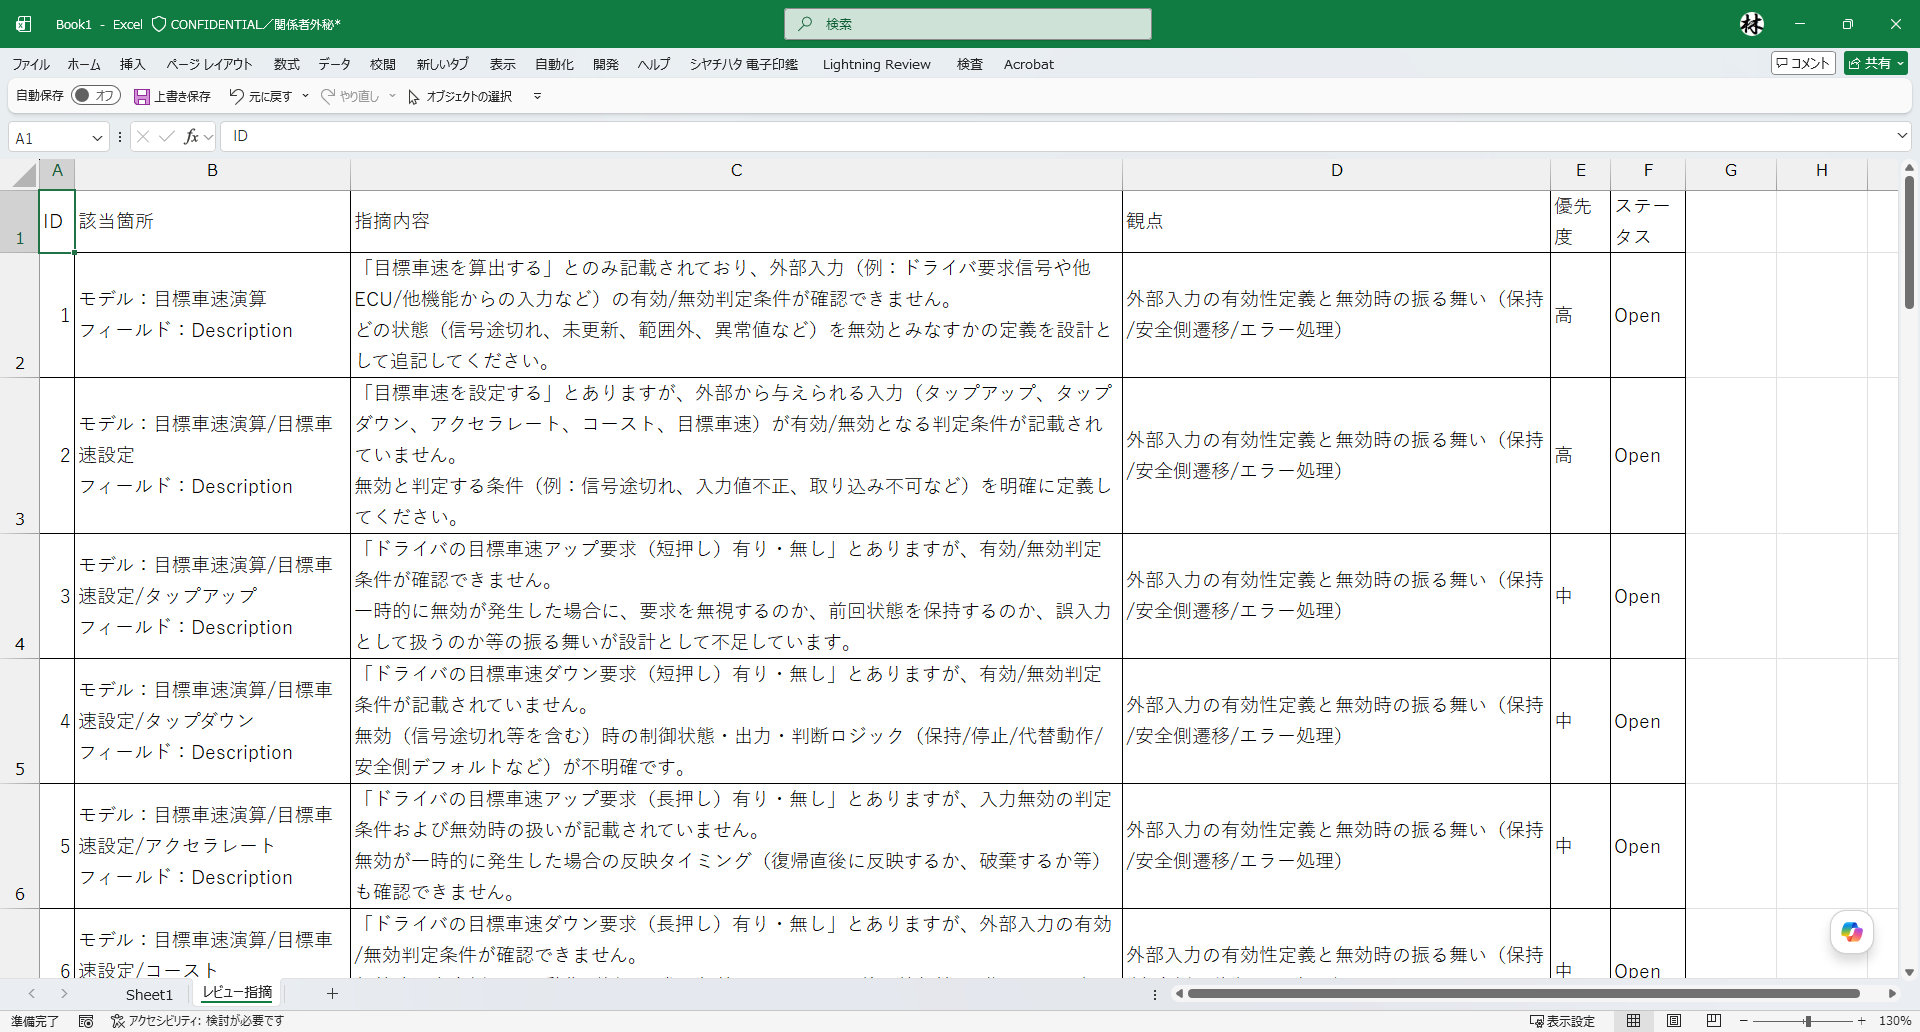
When the workflow completes successfully, the review results are output to the review-findings sheet in Excel.
Check that the following items are output.
- ID
- Location
- Finding
- Perspective
- Priority
- Status
Next steps
This tutorial presents a sample case.
Make the following changes for practical use.
- Review-point file: Replace its contents to review from other perspectives using the same workflow configuration.
- Check the metamodel structure of the target project, and change the workflow loop structure, field names, and model hierarchy to match the hierarchy and field configuration of the target models.