Import existing design assets
Overview
Import Existing Assets is a feature for reading existing design documents and using an AI agent to bring them into a Next Design model.
- Converts existing design documents managed in Word, Excel, PDF, and similar formats into a Next Design model from chat instructions.
- Not only conversion, but also review and correction of the conversion results are supported as part of a single workflow.
This feature is not a single execution module. Instead, it is used by combining the following components:
- Existing Assets Migration Support Agent
nextdesign-document-importskill- Next Design MCP tool (installed automatically when Agentiqs is installed)
What this feature can do
- You can instruct the system to modelize existing design documents through chat.
- AI interprets the document contents and creates or updates models according to the meta-model of the import destination project.
- Reference relationships in the document are reflected in the model wherever possible.
- You can partially rebuild the model through additional instructions to the AI.
- You can review a summary of the built model in chat.
- A verification report (final confirmation report) for the import results can be output as a Markdown file.
- From the report, you can review issues and items that were not reflected.
- The built model can be edited directly using standard Next Design features.
Supported file formats
- Word (
.docx) - Excel (
.xlsx) - PDF (
.pdf)
Install the environment
Prepare the following tools and files:
- Agentiqs: v1.2 or later
- Next Design: v5.0 or later
- Existing Assets Migration Support Agent
1. Import the agent
Import the Existing Assets Migration Support Agent into Agentiqs.
- Download the "Existing Assets Migration Support Agent".
The account and password are the same as those used for downloading the Agentiqs installer. - Import the agent.
- Import the exported data (
export-data.txt) and passkey (passkey.txt) that come with the download. - For detailed import steps, see "Share personal settings - Import settings".
- Import the exported data (
After the above steps, the following items are imported into Agentiqs:
- Agent: Next Design Existing Assets Migration Support Agent
- Tool settings: Next Design Mcp Tool
Notes
We verified the agent and MCP tool with their ON/OFF settings in the state immediately after import.
They will also work if the necessary features are turned ON, but please make sure to verify the results carefully.
2. Configure the skills for the agent
Configure the skills for the [Next Design Existing Assets Migration Support Agent].
- Target skills
- nextdesign-document-import
- nextdesign-mcp
- Storage location: directly under
%LOCALAPPDATA%\DENSO CREATE\Agentiqs\app\skills\
Skills folder, see "Use Skills".For the path to use when specifying the skill, see Related files - About macro definitions.
How to use
Import design documents
- Open the target project in Next Design.
- Prepare the meta-model in advance.
- Make sure that the target project is definitely open.
- If the model file is split into multiple units, load all unit files.
- Open the Agentiqs chat pane.
- Open it from the Next Design chat pane.
- Select the imported agent.
- Configure the following in the chat screen:
- Agent: select Next Design Existing Assets Migration Support Agent
- Auto approval: enable
- Working folder: specify a working folder that includes the folder containing the documents to import
- Model: specify any model. For details, see About the LLMs used.
Turning OFF "write" and "command execution" for the working folder can reduce token usage. - In chat, request the import.
Example:Please import the contents of the following file into the current model:{file path}Notes- Specify the file by file path, not by attaching the file.
- Only one file can be imported at a time.
- Close the document to be imported before running the import.
- The agent reads the document and proceeds with model generation, reference resolution, and validation.
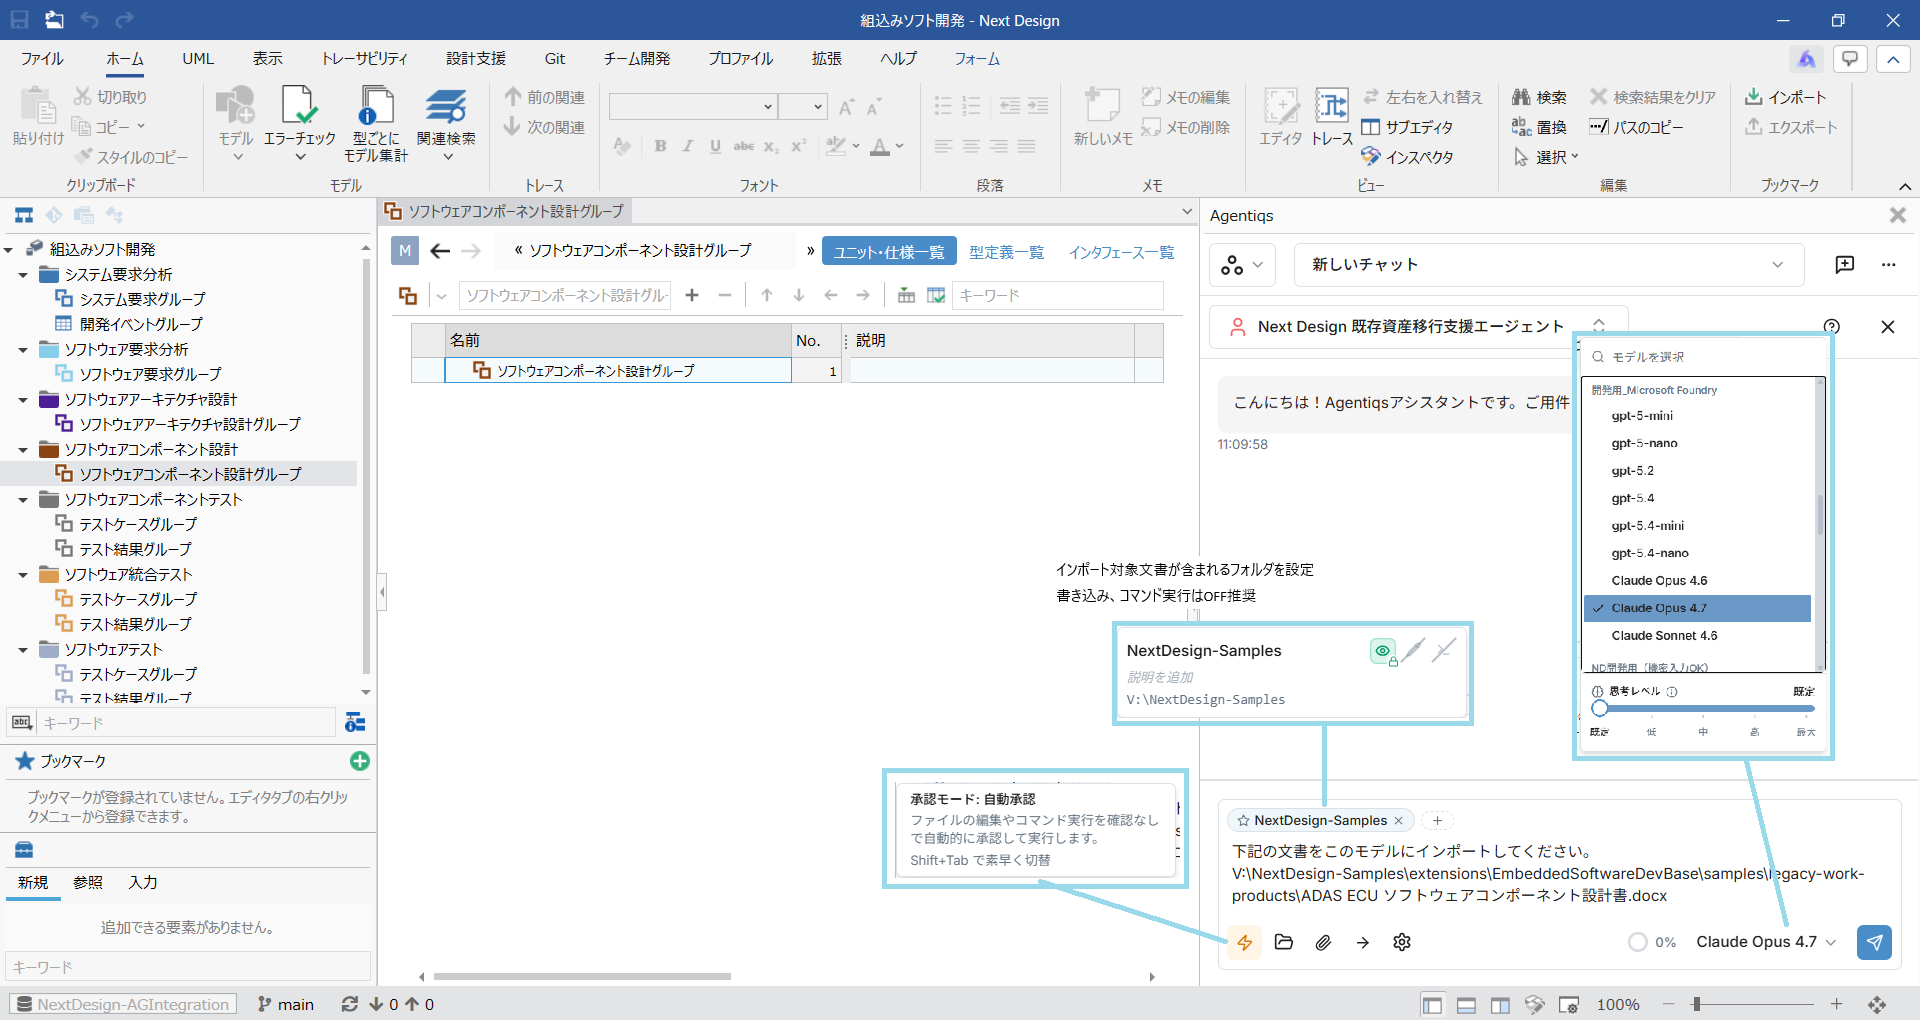
When the agent finishes processing, the import of the existing asset is complete.
Keeping the destination model (the model under which you want the imported information to be created) visible in the editor makes the work easier.
Output a verification report
If you want to check completeness and reflection status, instruct the chat to output a report.
- Turn ON the write permission for the working folder.
- In chat, give an instruction such as:
Summarize the final verification results in a report
The report lists the elements in the document in appearance order and describes the mapping and reflection status for each item in the ND model.
| Reflection status | Description |
|---|---|
| Reflected (no issues) | Items whose conversion to the model completed normally |
| Reflected (issues found) | Items that were converted but require confirmation |
| Not reflected | Items that could not be converted into the model |
| Item | Description |
|---|---|
| Output location | If no instruction is given in chat: same folder as the target document If instructed: the specified folder |
| File name | verification-report_<target-file-name>_<YYYYMMDD-HHmm>.md |
Notes
- Always verify the model created by AI using both the final verification report and the content in Next Design.
- Not all design documents can be converted with the same level of accuracy.
- Diagrams are not imported.
- The drawing itself is not modeled.
- If traceable information such as diagram numbers or headings exists, it is imported.
- Import is possible without limiting the profile, but please review the results carefully when reflecting into the following meta-models:
- Meta-models that differ greatly from the document structure
- Meta-models with complex inheritance relationships
- Design information contained in hidden Excel sheets, rows, or columns is not imported.
About the LLMs used
This feature is guaranteed to work with Claude Opus 4.7 (default thinking level).
Regarding other models:
- Operation has been confirmed with the following models:
- Azure OpenAI GPT-5.2, 5.2 Thinking, 5.5, 5.6-Terra
- Microsoft Azure AI Foundry Claude Sonnet 4.6
- GitHub Copilot (Claude Opus 4.7)
- However, be aware that compared to Opus 4.7, these models may show lower accuracy or worse cost performance.
Check the results in advance with the design document you plan to import.