Create and distribute AI providers
This page explains the procedures for administrators to deploy and manage Agentiqs in their organization.
Create an AI provider
This section explains how to create an AI provider.
First, obtain the API key for the LLM you want to use.
Get the API key
The way you obtain the API key, endpoint URL, and model ID differs by AI provider.
The table below shows examples for common providers. Always refer to the official documentation for the latest information and details.
If you use Entra ID authentication, first create the Azure app registration by following Set up an Azure app for Entra ID authentication.
| Model | How to obtain the API key / endpoint | Model ID (reference) |
|---|---|---|
| Azure OpenAI | Open the Azure OpenAI resource in the Azure portal and get the API key and endpoint URL from the "Keys and Endpoint" screen. | ■ |
| OpenAI | Sign in to the OpenAI platform and get the API key from the "API keys" page. | ■ |
| Google Gemini | Sign in to Google AI Studio and issue a project API key. | ■ |
| Microsoft Foundry | Create a project in the Azure portal or the AI Foundry portal, then create an API key from the "Keys and Endpoint" section on the overview page. | ■ |
Configure Agentiqs
Configure Agentiqs with the obtained API key information.
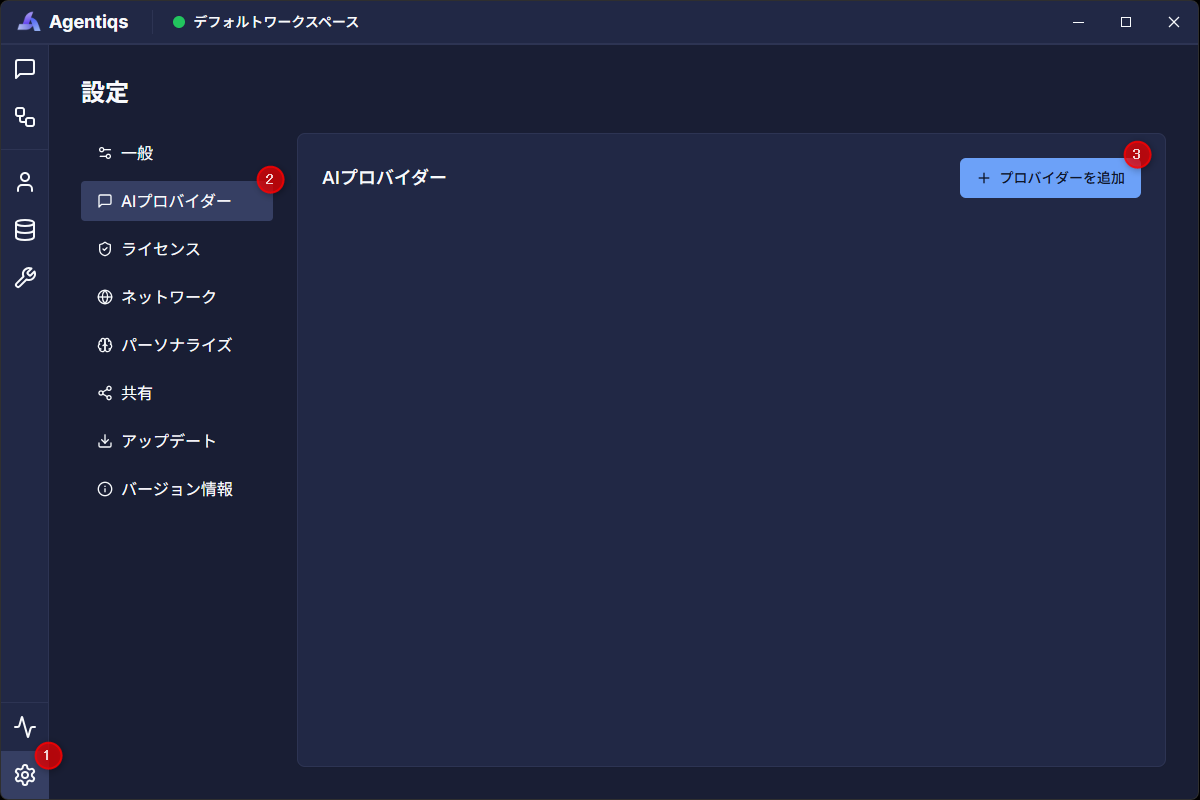
- Click [Settings] > [AI Providers] > [Add provider].
- The [Add AI Provider] dialog appears.
- Select the AI provider you want to use.
- The selected provider is added to the list.
- Click [Edit] for the provider in the list.
- The [Edit AI Provider] dialog appears. Configure it using the steps in Set the AI provider.
- Select [API settings] and enter the required items.
- Run [Test connection] in the Test connection step to verify the connection.
- If the connection succeeds, a notification is shown.
(If the connection fails, see Proxy settings.)
- If the connection succeeds, a notification is shown.
- Click [Update] to save.
- Monthly cost limits are determined based on the estimated usage fee. Check the official information from the AI provider you are using for actual billing amounts and the latest prices.
- For how to check estimated usage fees, see User Guide > Check AI model usage cost.
Set the AI provider
This section explains how to configure the AI provider you added.
-
API settings
Select the [Authentication method].-
For API-key-based authentication: Enter the API key and endpoint you obtained in Get the API key.
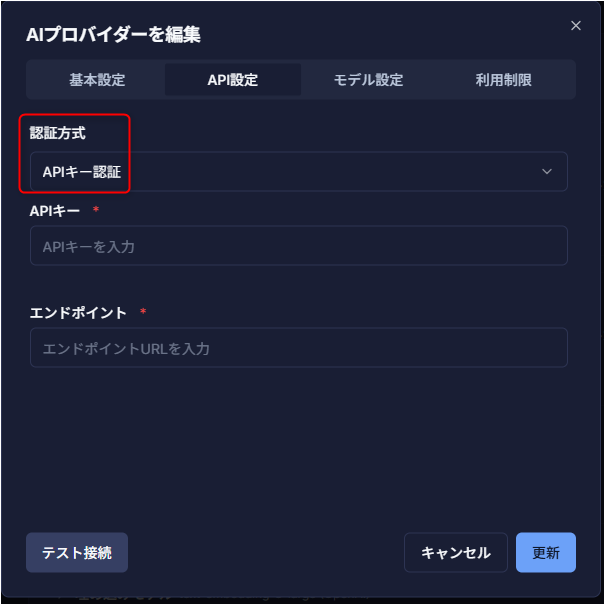 For
ForAzure OpenAI, enter the API version.The following versions are supported by Agentiqs (as of June 2026):
2024-06-01,2024-10-21,
2024-08-01-PREVIEW,2024-09-01-PREVIEW,2024-10-01-PREVIEW,2024-12-01-PREVIEW,
2025-01-01-PREVIEW,2025-03-01-PREVIEW,2025-04-01-PREVIEW -
For Entra ID authentication: Enter the endpoint obtained by following Set up an Azure app for Entra ID authentication.
-
-
Model settings and usage limits
On the AI provider settings screen (① in the figure below), click [Edit] (②) in the edit dialog for the target AI provider.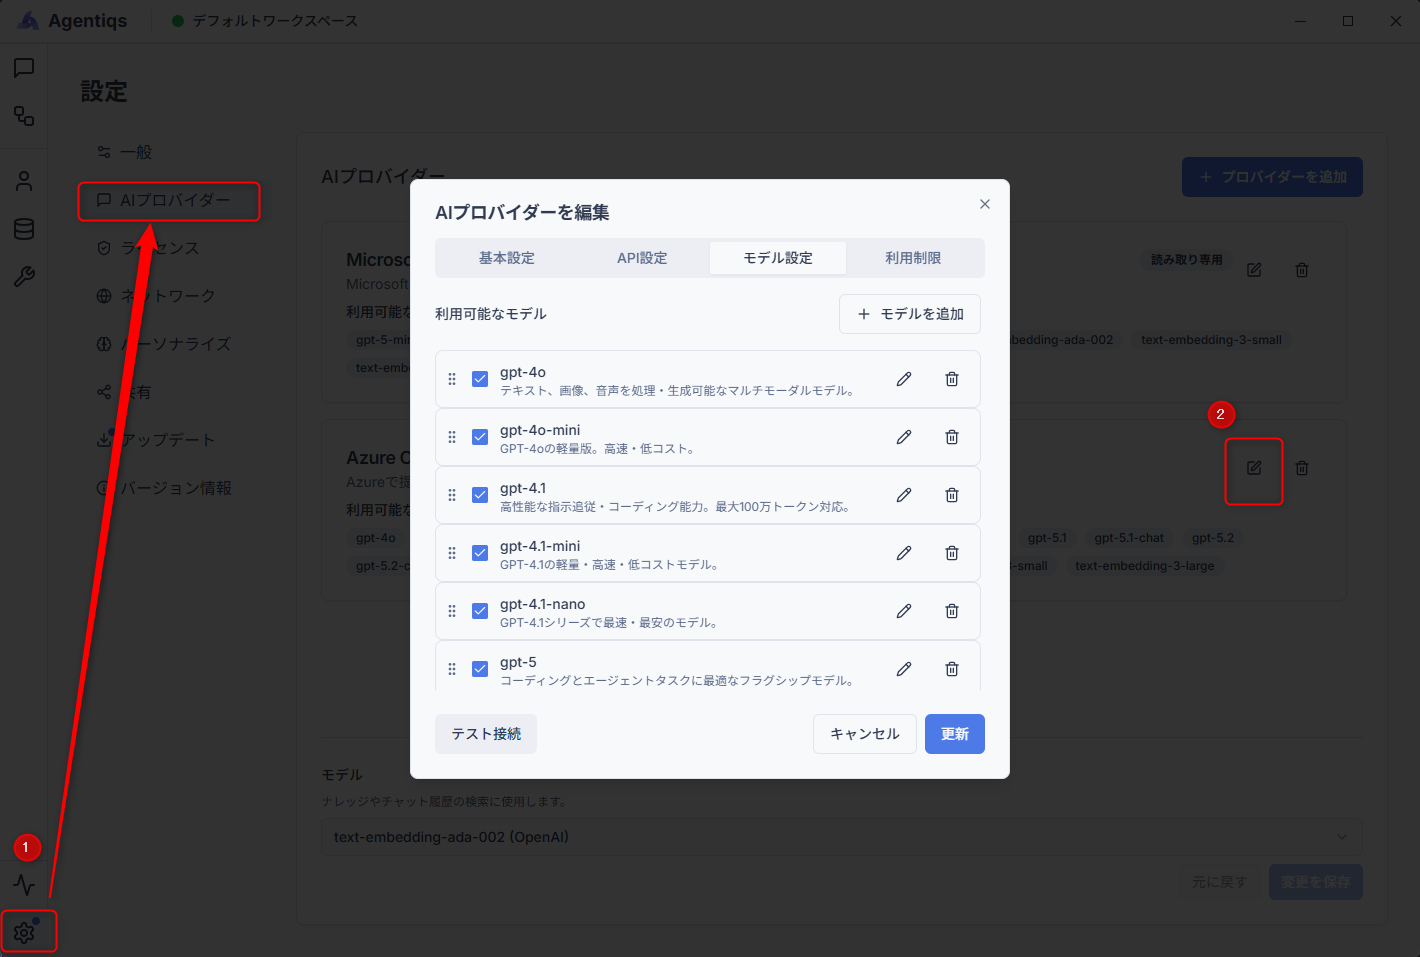 Procedure
- From [Model settings] > [Add model], add the latest AI models.
- From [AI provider details] > [Usage limits], set the following limits:
- Expiration date
- Monthly cost (per user)
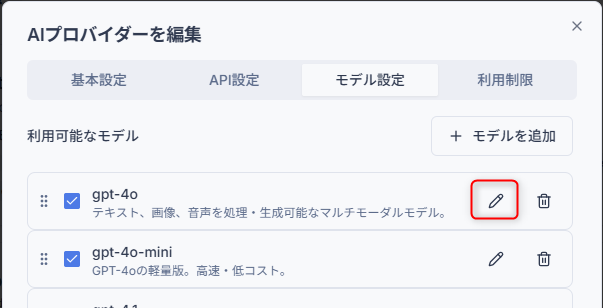
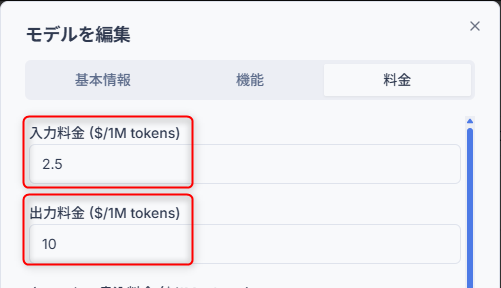
If model pricing is not set, it will not be reflected in AI model usage cost.Open the model settings dialog from the red-framed area below and set "Input price" and "Output price" on the [Pricing] tab.
 →
→ 
Test connection
After all settings are complete, use Test connection to confirm that the connection works.
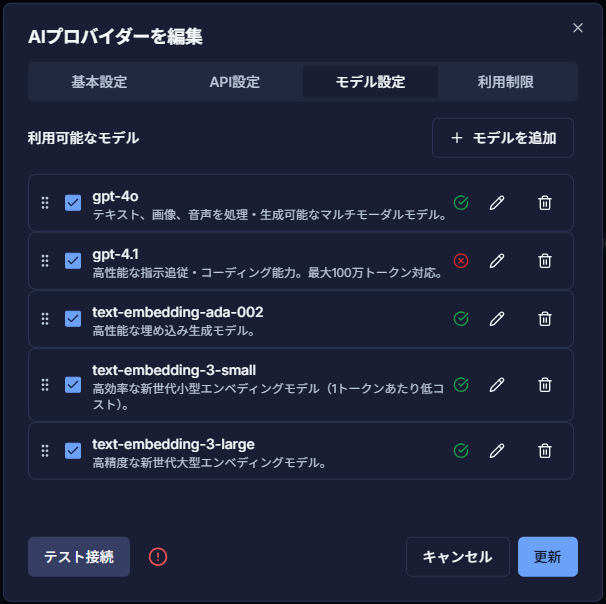
- When you run [Test connection] on the [Model settings] tab, Agentiqs shows whether each added model can connect.
- Confirm that the model you plan to use succeeds.
- If you do not plan to use a model, delete it to keep the list tidy and reduce operational mistakes.
- If the models shown or the connection results differ from what you expect, review the entered settings (API key / endpoint URL / model ID).
Update model information in bulk
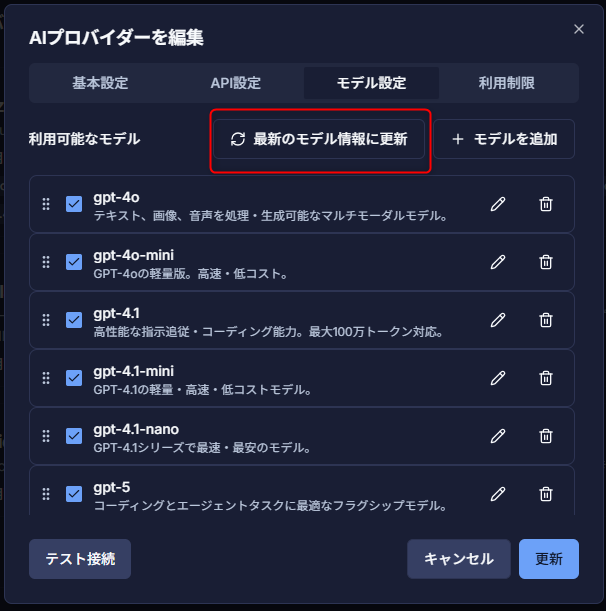
The model definitions for an AI provider can be bulk updated with the latest model information.
You do not need to add or edit new models one by one.
- In [Settings] > [AI Providers], click the edit icon for the target provider.
- On the [Model settings] tab, click [Update to latest models] in the upper-right corner.
- In the diff confirmation dialog, review the models that will be added or updated.
To delete models that are no longer needed, check those models.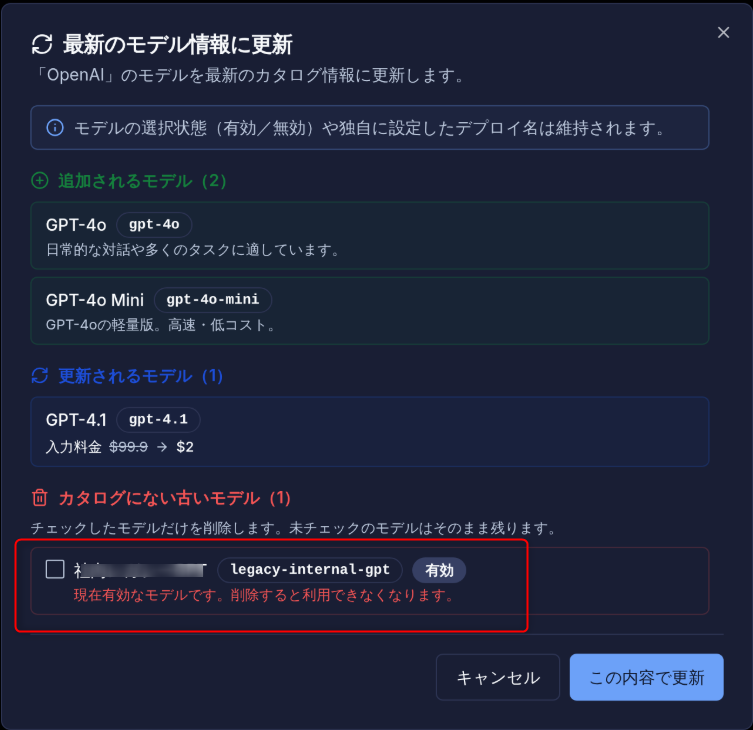
- Choose "Update with this content", then choose "Update" on the detail screen to save.
- Existing display names, deployment names, and enabled/disabled states are preserved.
- Custom models not in the list are not deleted unless you check them.
Distribute AI provider settings
By distributing the connection settings and usage limits for the AI providers created by administrators,
users can import the organization-defined settings and use AI models without entering connection information individually.
There are two distribution methods. Choose the one that matches your operating model.
| Distribution method | Best for | How updates are reflected | What the user does |
|---|---|---|---|
| Export file | One-time distribution, small groups | Redistribute the updated file | Import each time it is shared |
| Organization shared settings | Ongoing use within an organization | Automatically sync after the administrator re-exports | Register the shared settings reference once |
Distribute with an export file
Export the created AI provider settings to a file and distribute it to users.
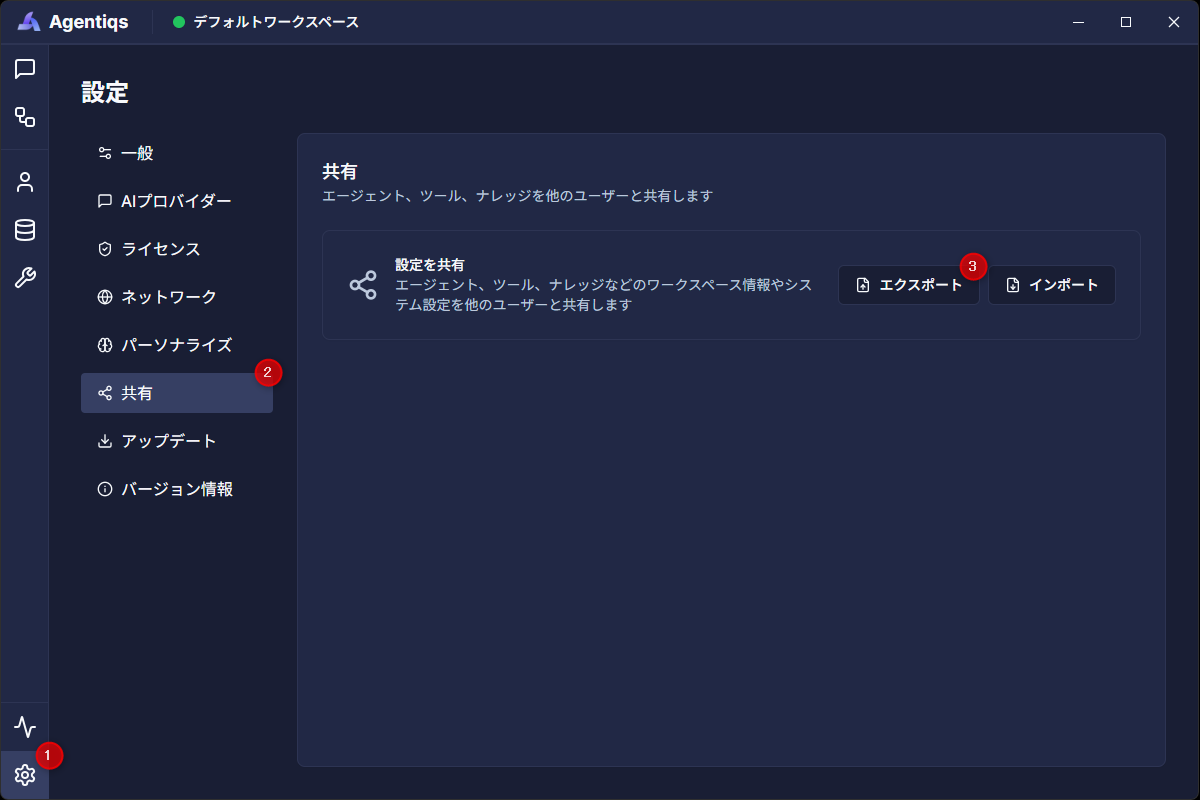
- Click [Settings] > [Sharing] > [Share settings] > [Export].
- The [Export settings] dialog appears.
- Enable the [System] check box.
- The [AI provider] and [Proxy] check boxes are enabled automatically.
- Enter any passkey and click [Generate export data].
- The passkey and export data are generated and shown on screen.
- Click [Download] to save the export data as a file.
- Distribute the saved export data file and passkey to users.
- Ask users to import them by following User Guide > Setting up an AI Provider.
- For security reasons, we recommend distributing the passkey and export data by different means.
- We recommend enabling [Make AI provider read-only] in the [Export settings] dialog.
When this is enabled, users in the import destination cannot change settings such as usage limits, so the settings distributed by the administrator are preserved.
Automatically distribute with organization shared settings
Settings are automatically distributed continuously through a shared folder.
Changes such as model additions, pricing updates, usage limits, and proxy settings can be reflected without user-side operations.
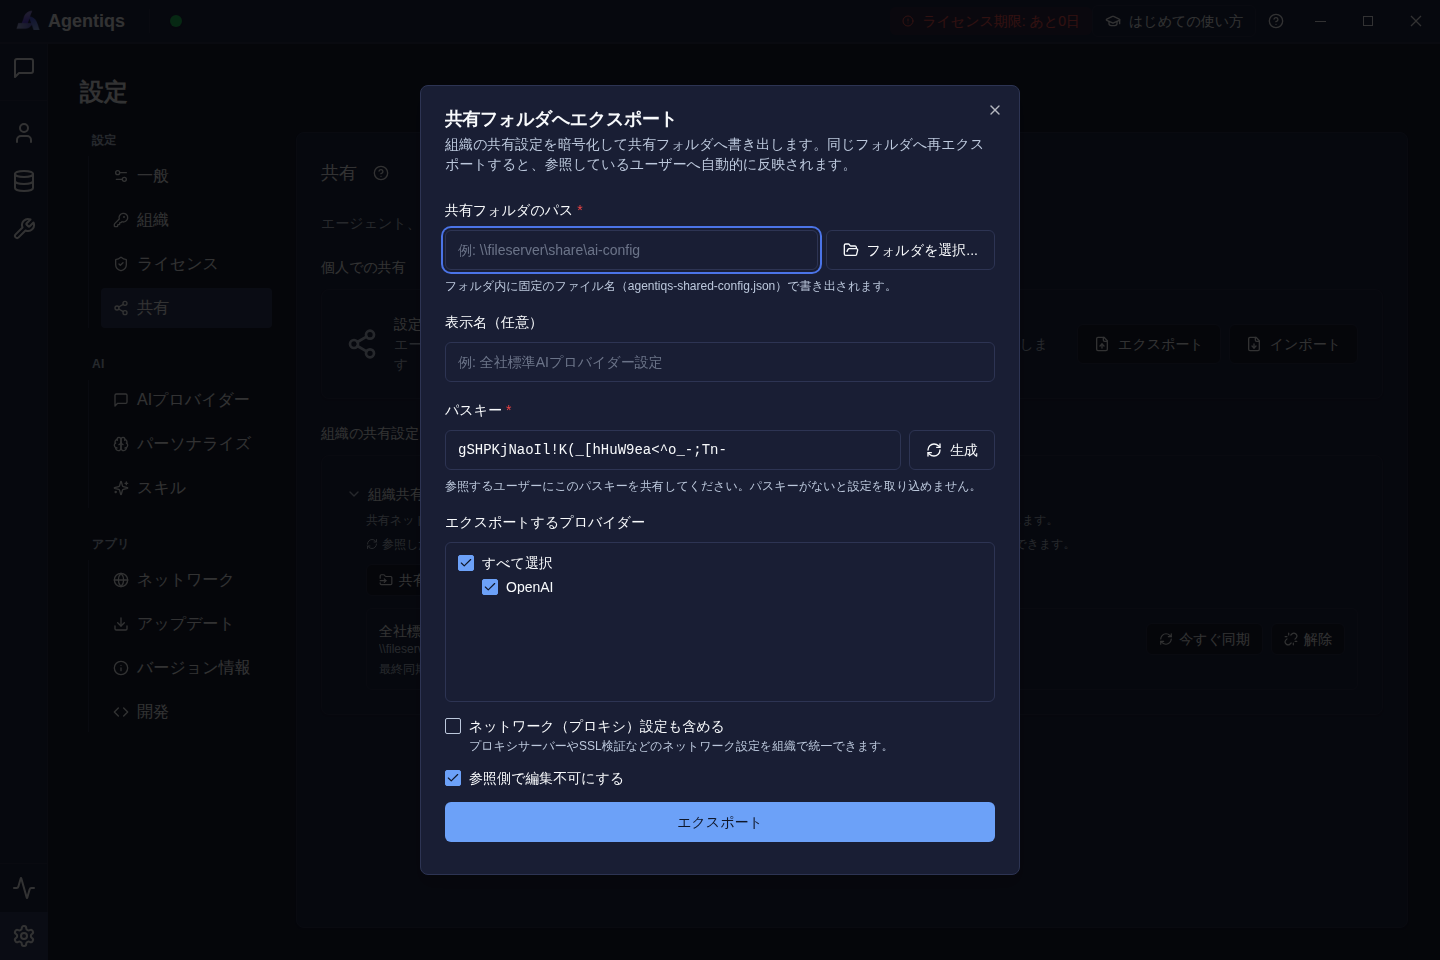
- Open [Settings] > [Sharing] > [Organization shared settings], then click [Export to shared folder].
- Set the shared folder path, display name, passkey, AI providers to distribute, and other items, then export.
- When you need to update the settings, export again to the same shared folder.
Tell users to follow User Guide > Use organization shared settings.
Notes for automatic distribution
- When re-exporting, use the same passkey as before.
- The update timing on the user side is as follows:
- When the application starts
- Every 10 minutes after application startup
- AI providers and models created by users themselves are not subject to automatic updates or automatic deletion.
- If proxy settings are included in the shared settings, the shared organizational settings are applied each time synchronization occurs.
User-side proxy-specific settings are overwritten.