Setting up an AI Provider
This page explains how to configure the AI provider required to use Agentiqs.
Configure an AI Provider
There are several ways to make an AI provider available.
| Setup method | Details |
|---|---|
| Import an AI Provider | Import settings shared by an administrator |
| Connect with Entra ID authentication | Use Azure OpenAI / Microsoft Foundry with a company account |
| Create an AI Provider | Create provider settings by entering the connection information yourself |
| Use a local LLM | Use an LLM that runs on your own PC or server, such as Ollama / LM Studio |
Import an AI Provider
This section explains how to import an AI provider.
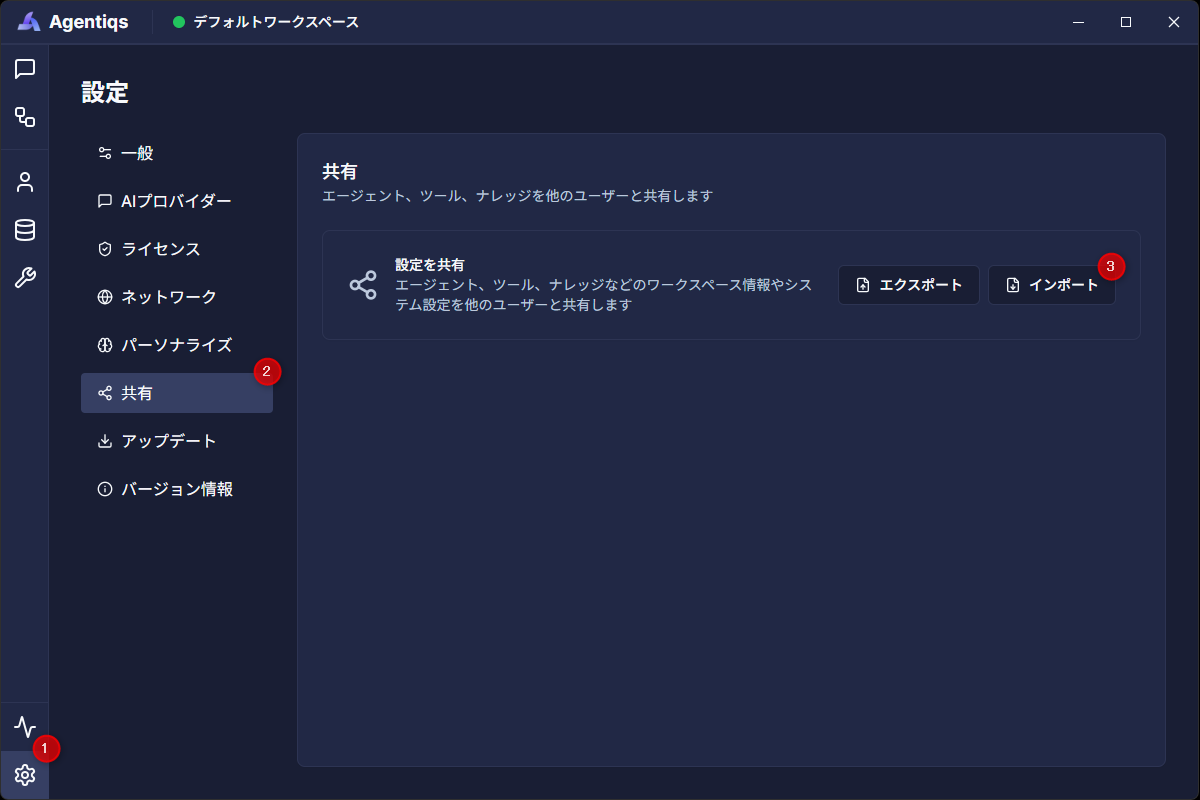
- Click [Settings] > [Sharing] > [Share Settings] > [Import].
- The [Import Settings] dialog appears.
- Enter the following data received from your administrator.
- Passkey
- Export Data
- Click [Import] in the [Import Settings] dialog.
- When the settings are imported successfully, the AI provider import results are displayed.
Connect with Entra ID authentication
When you use Entra ID authentication with an Azure OpenAI or Microsoft Foundry AI provider, you can connect to AI resources with your company account without distributing or configuring API keys individually.
- Import an Entra ID-compatible AI provider by following Import an AI Provider.
- From [Settings] > [Organization], initiate the connection.
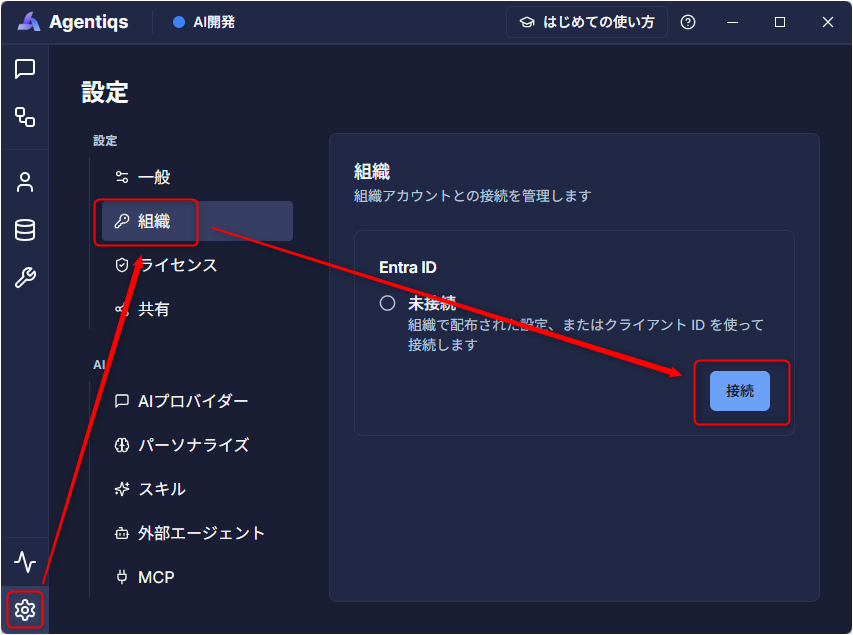
- Enter the client ID provided by your administrator and connect.
- If the browser asks you to authenticate, sign in with your company Microsoft account.
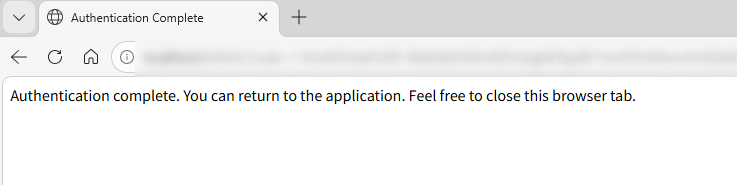
- If successful: the screen below is displayed. Close the browser.
- If it fails: report the displayed error message to your administrator.
- If successful: the screen below is displayed. Close the browser.
- Return to Agentiqs and confirm that the Entra ID connection status shows as connected.
- The existing API-key-based method can still be used.
- Depending on your organization, Entra ID settings on the organization side and permission settings on Azure may be required.
- Signing out disconnects the connection. To use it again, reconnect using the same procedure.
- Switching Azure directories is not supported. The organization in the home directory is used.
Create an AI Provider
If you want to configure it yourself by entering the connection information, create an AI provider.
Use a local LLM
You can use a local LLM running on your PC or server as an AI provider.
Because data does not leave your PC or server, this is suitable for sensitive use cases and for testing without incurring API charges.
- Supports chat (streaming), agent tool calls, knowledge search (embeddings), and image input, and can be used with the same workflow as an AI provider.
- For supported local LLMs, see System Requirements - Supported LLMs.
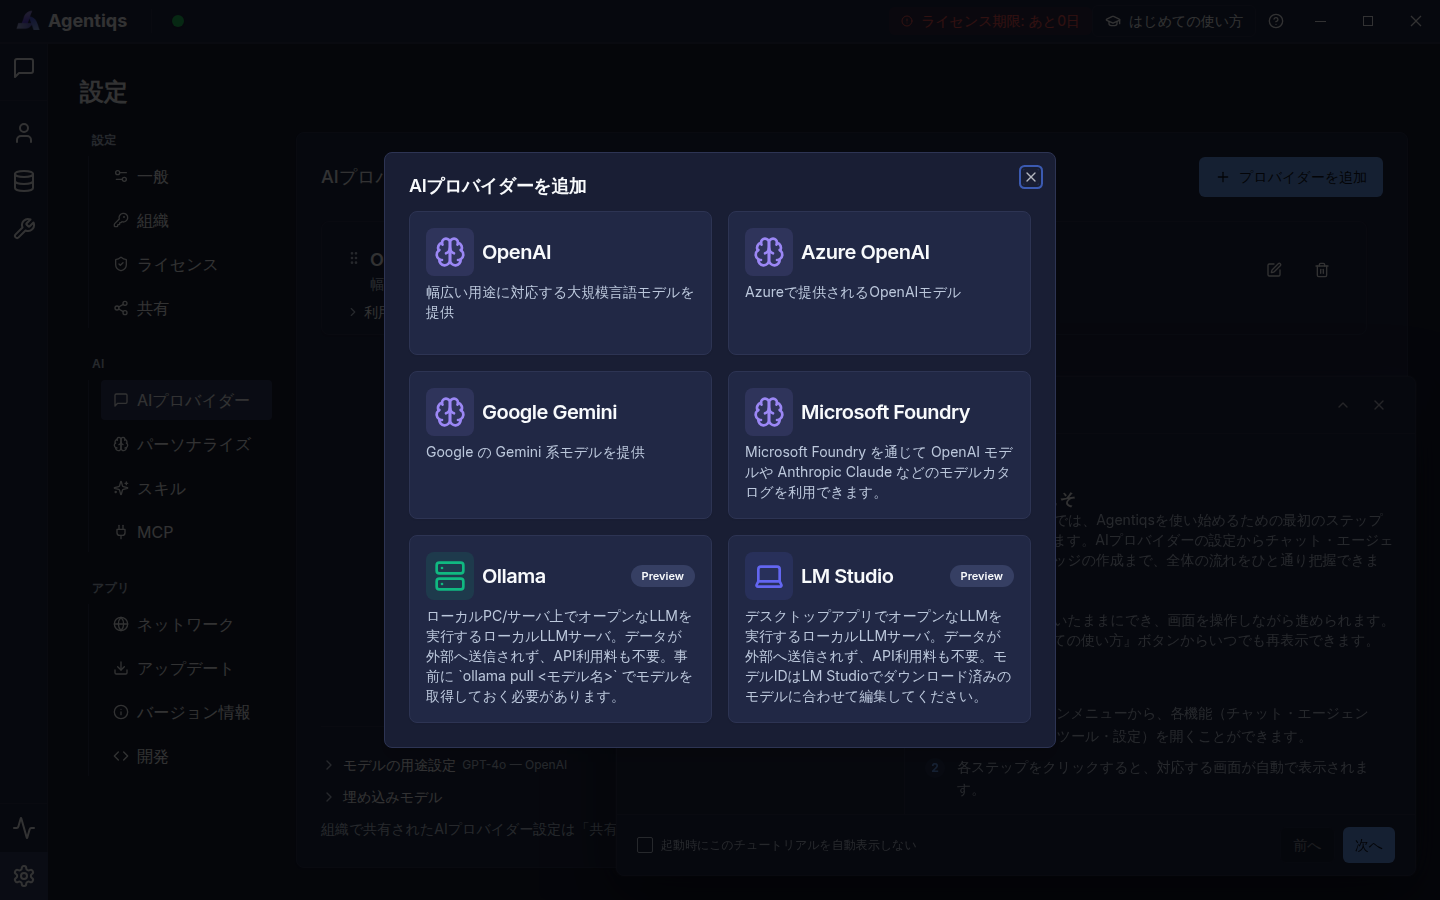
- Install a local LLM and obtain the model you want to use (for example:
ollama pull llama3.1:8b). - Go to [Settings] > [AI Provider] > [Add], then select the target provider from the gallery.
- Enter the endpoint on the [API] tab (an API key is usually not required).
Example: Ollama:http://localhost:11434, LM Studio:http://localhost:1234 - On the [Model] tab, edit the model definition to match the model you obtained.
- Use [Test connection] to verify connectivity, then save.
- What you can achieve in Agentiqs depends on your local environment (GPU / memory) and the model you use.
- Tool call quality, image input quality, response quality, speed, and more.
- Some features, such as image generation, web search, and the code interpreter, are not available.
- Usage is counted as $0.
Configure the models you use
The models registered in an AI provider are configured in different locations depending on the purpose.
| Setting | Target | Use case |
|---|---|---|
| Purpose-specific models | Models used for chat, summarization, sub-agents, and image generation | AI generation and processing |
| Search model | Embedding model | Search knowledge and chat history |
AI provider priority and model roles
AI providers can be reordered by drag and drop.
The order is reflected in the list display, the model selection list, and the default selection at runtime.
- In [Model usage settings (model roles)], you can review and change the models used for chat, summarization, sub-agents, and image generation.
- Assigning models that are appropriate for each task helps optimize model selection.
| Purpose | Description |
|---|---|
| Default | The standard model for chat |
| Summarization | The model used to summarize and compress conversation history |
| Sub-agent | The model used when running sub-agents |
| Image generation | The model used to generate images |
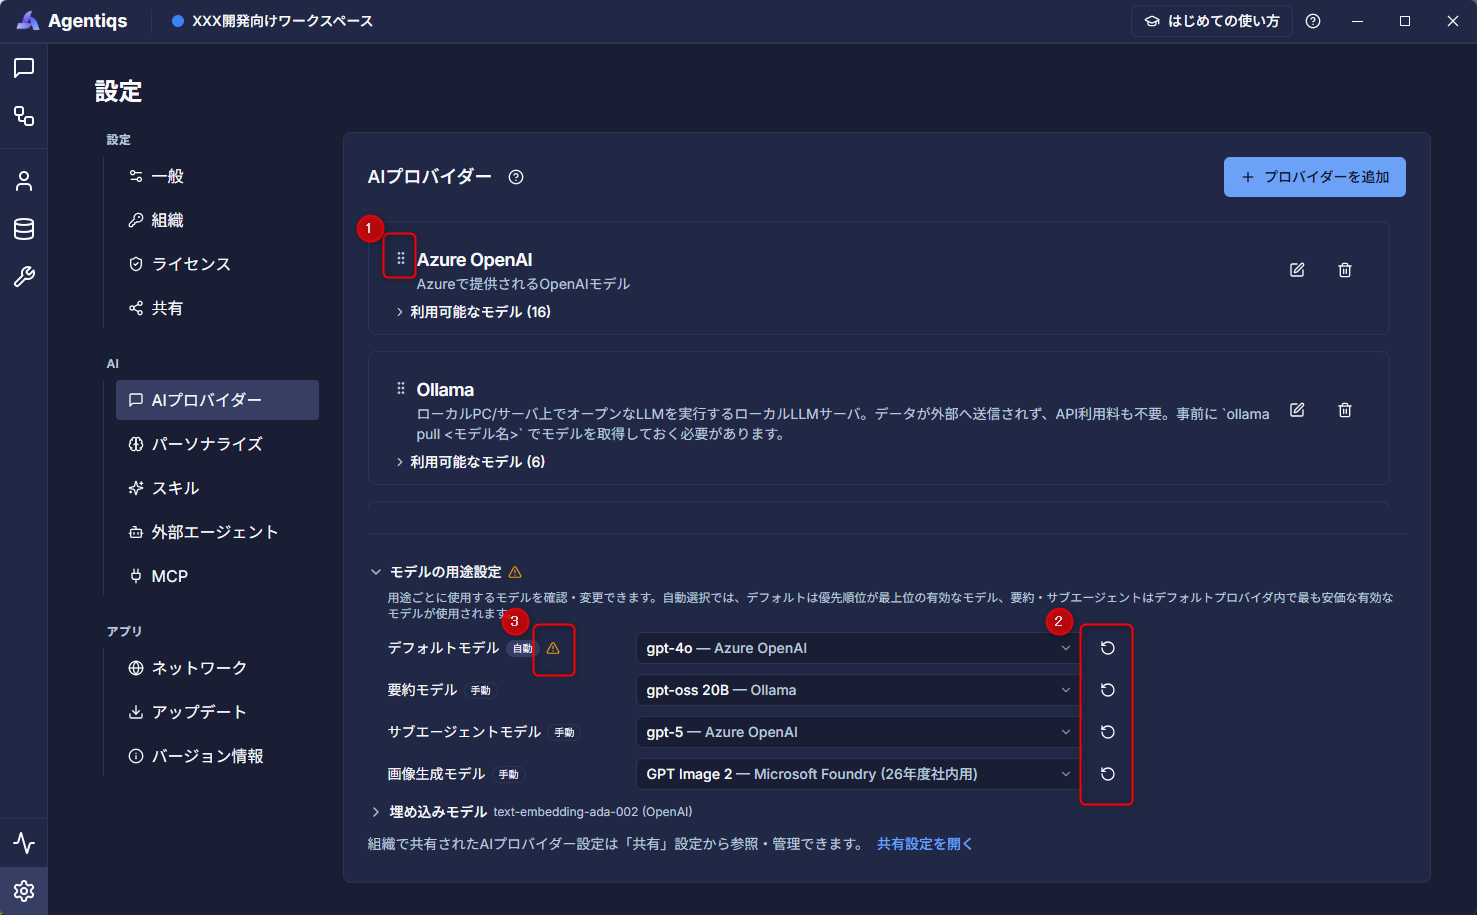
- Open [Settings] > [AI Provider].
- Drag the handle (⋮⋮) at the upper left of the provider card to reorder priority. (Figure ①)
- In [Model usage settings], review the model for each purpose and select one manually if needed.
You can return to automatic selection by choosing [Return to automatic]. (Figure ②)
A replacement model is selected automatically and you are notified with a ⚠ icon. (Figure ③)
Search model for knowledge and chat history
Select the embedding model used to search knowledge and chat history.
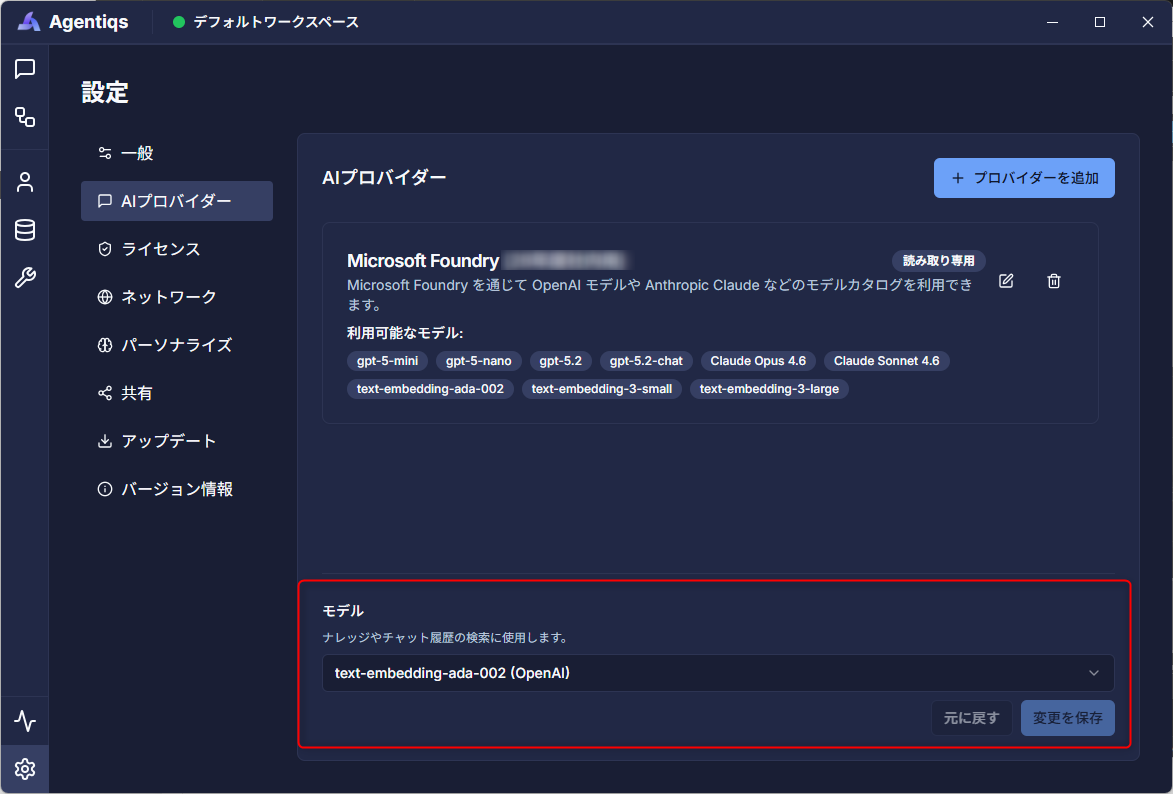
- Click [Settings] > [AI Provider].
- The AI provider selection screen is displayed.
- Select the target model from [Model] and save the changes.
Create an AI Provider
Create an AI provider using the same procedure as the administrator.