Chat with AI
This page explains the basic steps for chatting with AI in Agentiqs and how to use the related settings.
Chat
This section explains how to chat with AI.
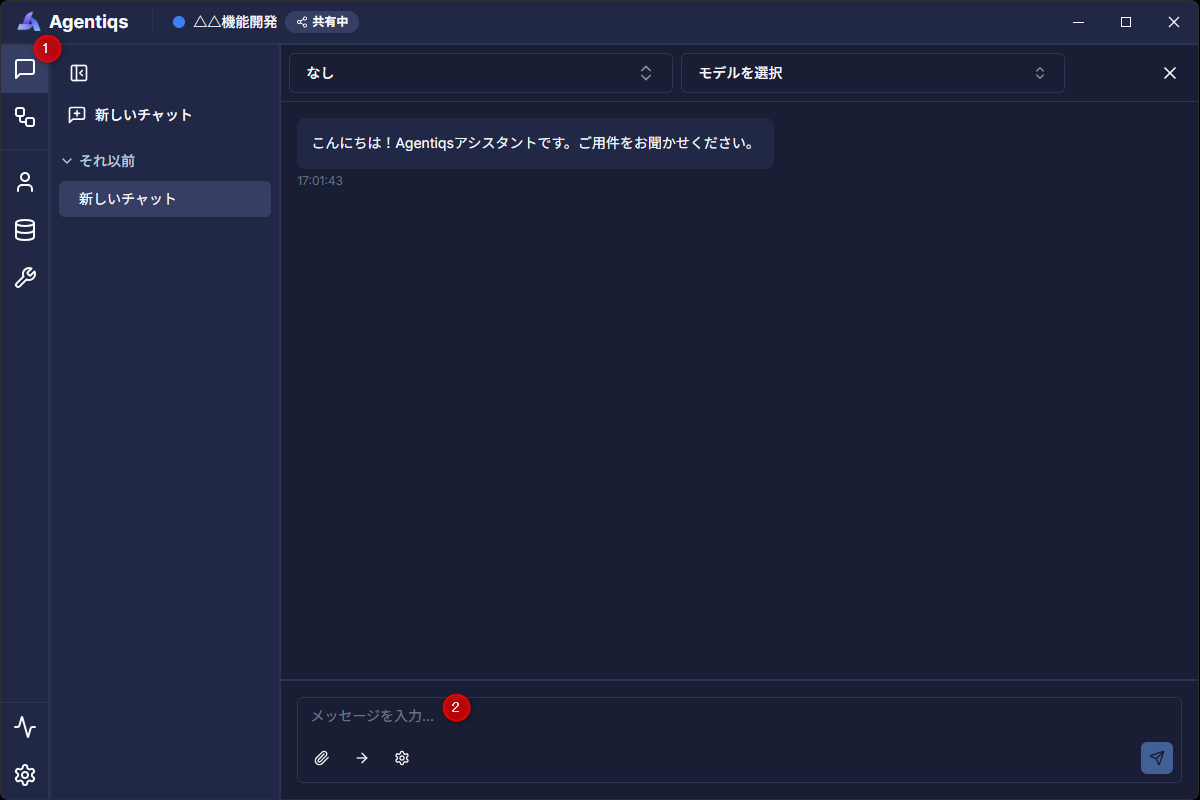
- Click [Chat].
- The AI chat screen appears.
- Type your chat content in the [Enter a message...] text box and press [Enter].
- The AI generates a response and displays it in the chat screen.
Tool call history
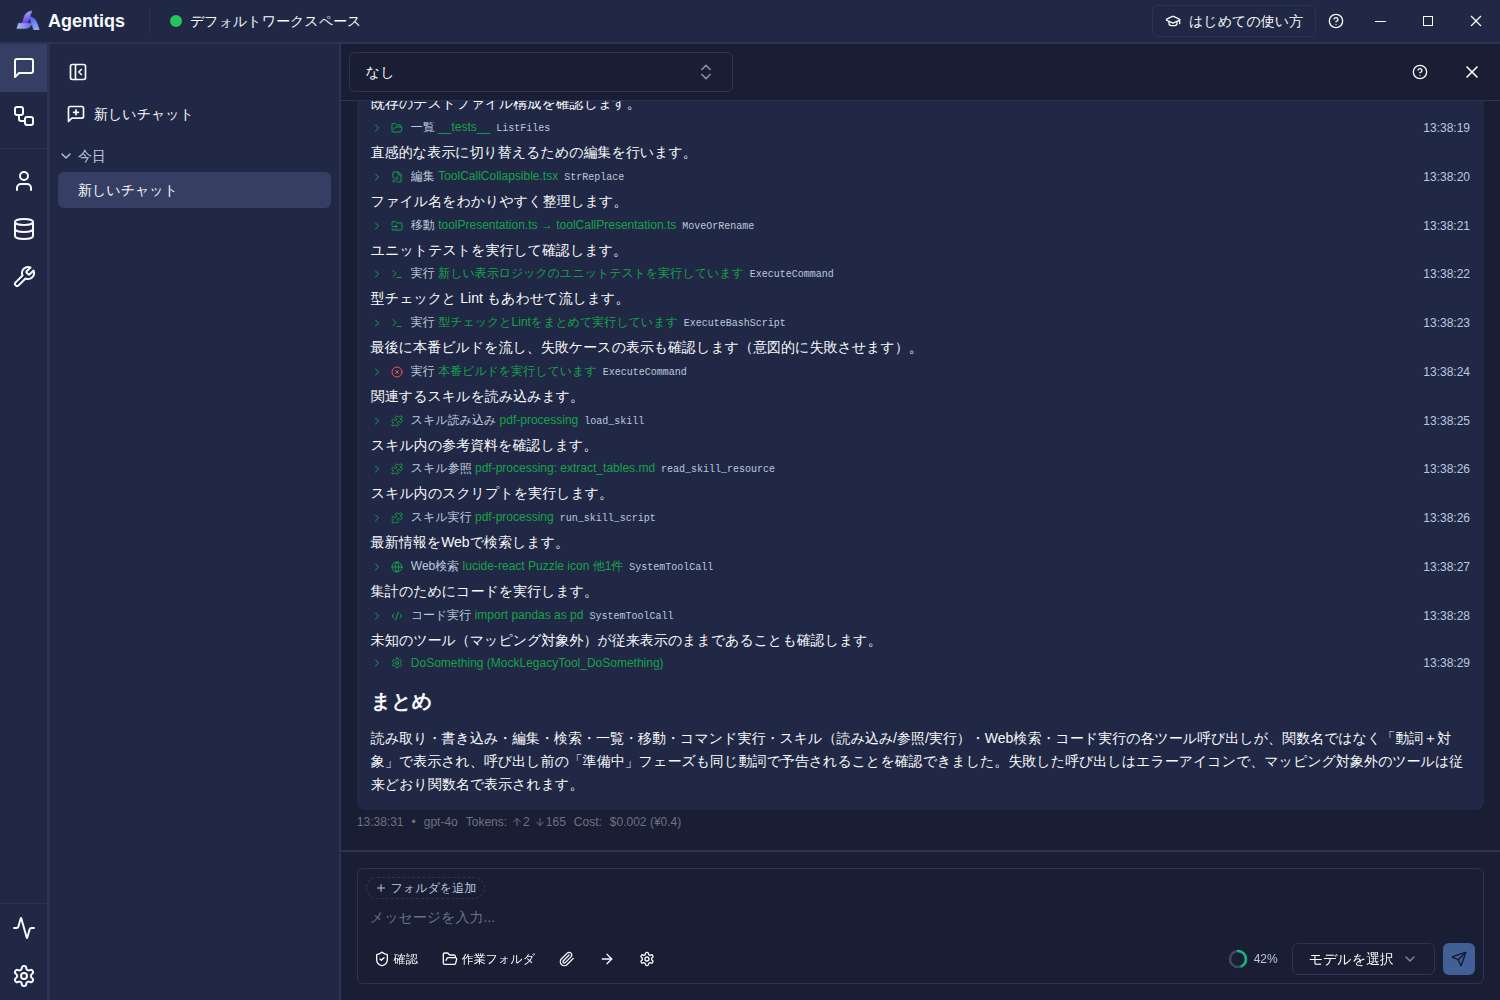
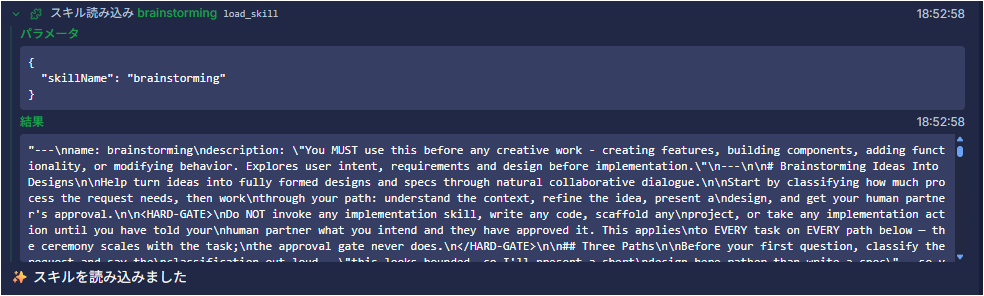
When the agent calls a tool in chat, the action and target are shown in the event row, for example, "Read: report.md" or "Run: npm test".
You can check what happened from the icon for each action.
Examples: reading files, running commands, loading Skills, web search, code execution, and more.
Adjust input and reference context
This section explains how to adjust the materials passed to chat and the context used for responses.
Attach files to chat
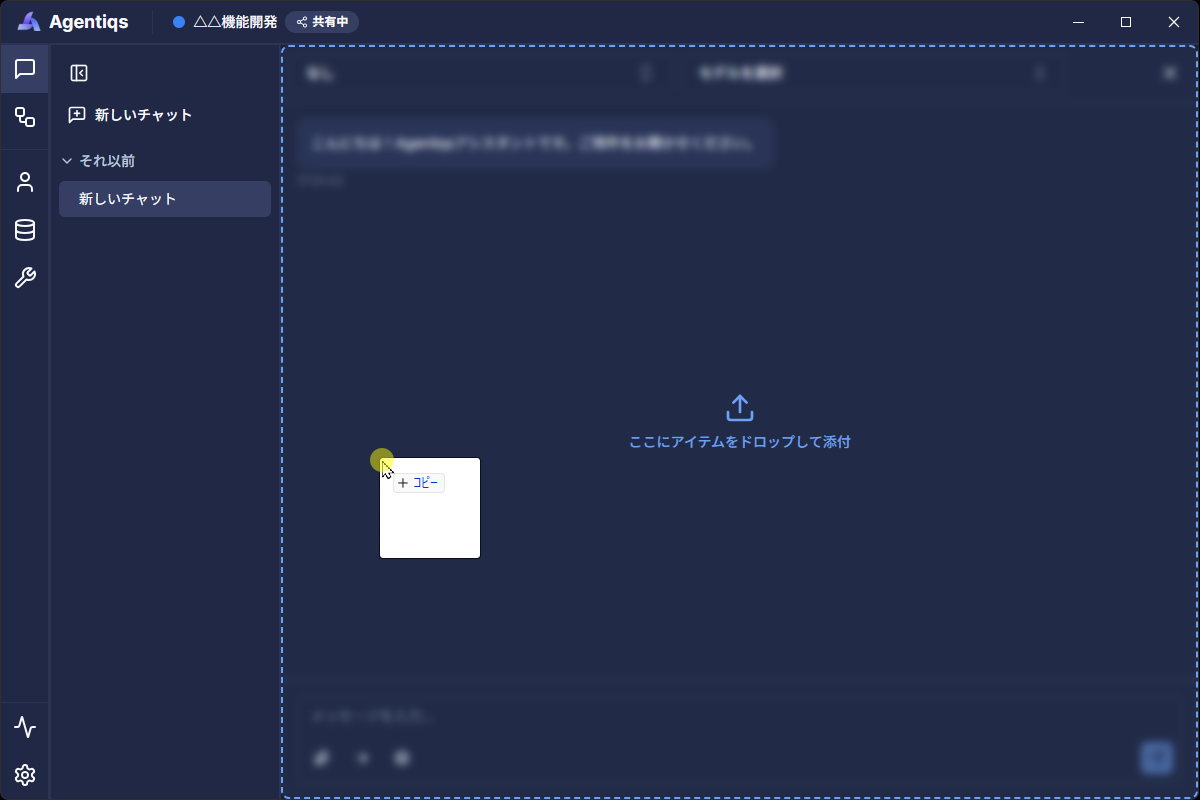
If you drag and drop files onto the chat screen, you can pass the file contents to the AI.
Supported file types:
- PDF, Office (Word / Excel / PowerPoint)
- Text (TXT / Markdown, etc.)
- Images (PNG / JPEG, etc.)
Recommended limits for attached files:
- Size per file: 20 MB
- Per send: 25 MB total, up to 10 files
Use chat history
When context settings are enabled, it becomes easier to get responses based on past chat history.
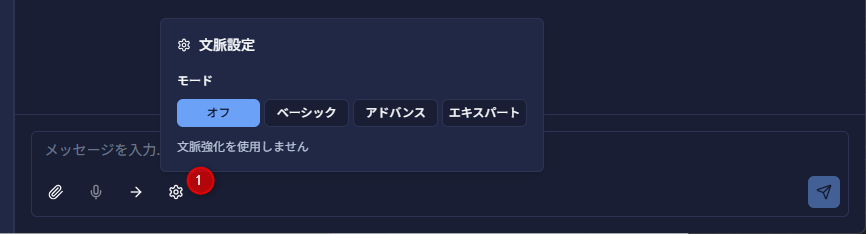
| Setting | Chat history used | Cost level |
|---|---|---|
| Off (default) | Most recent 10 items | 1 (lowest) |
| Basic | Most recent 10 items + 3 similar items | 2 |
| Advanced | Most recent 15 items + 5 similar items | 3 |
| Expert | Most recent 20 items + 8 similar items | 4 (highest) |
- The more chat history is referenced, the higher the per-chat usage cost becomes.
- On the other hand, it can be easier to get responses based on earlier chat content, which may reduce overall cost.
Switch the AI to use
From the chat screen, you can switch the AI model or AI agent you use.
Select an AI model
This section explains how to change the AI model used from the chat screen.
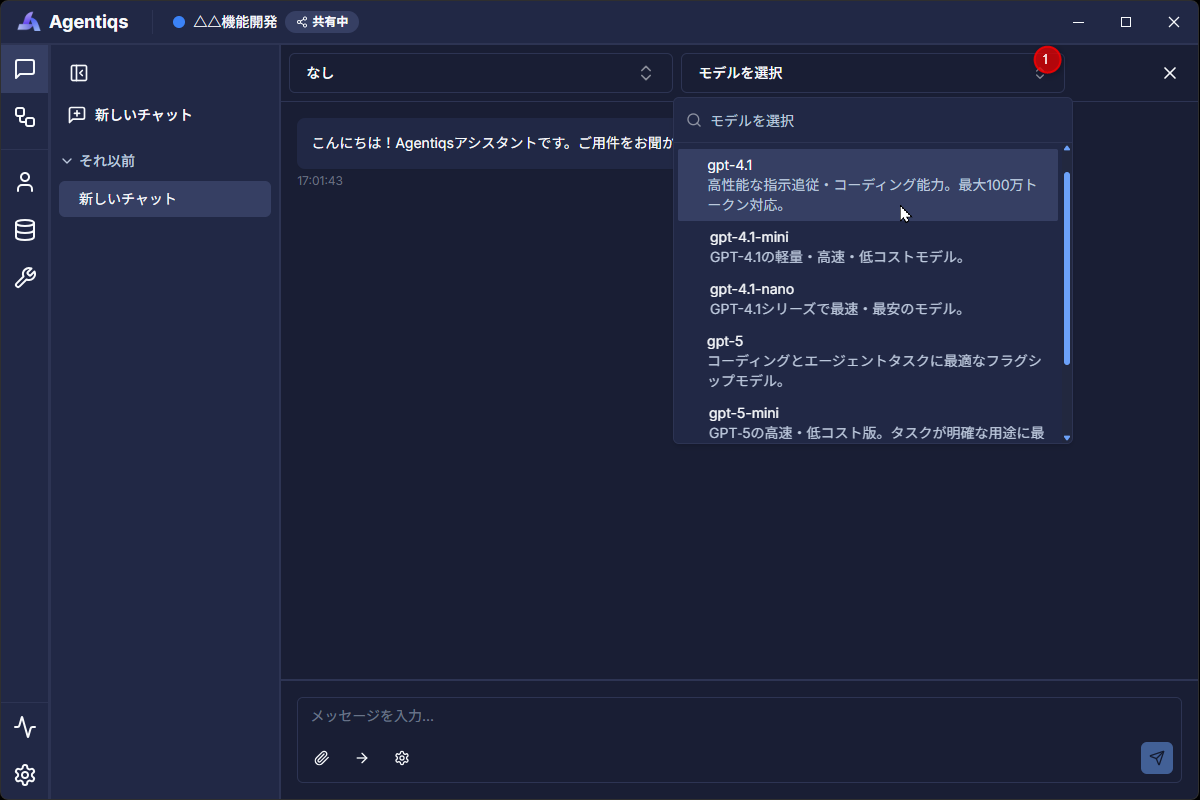
- Click the [Select model] dropdown.
- A list of available AI models appears.
- Select the AI model you want to use.
- The selected AI model is used in chat.
- If no AI model is configured, the first model defined in the AI provider is used automatically.
Select an AI agent
This section explains how to change the AI agent used from the chat screen.
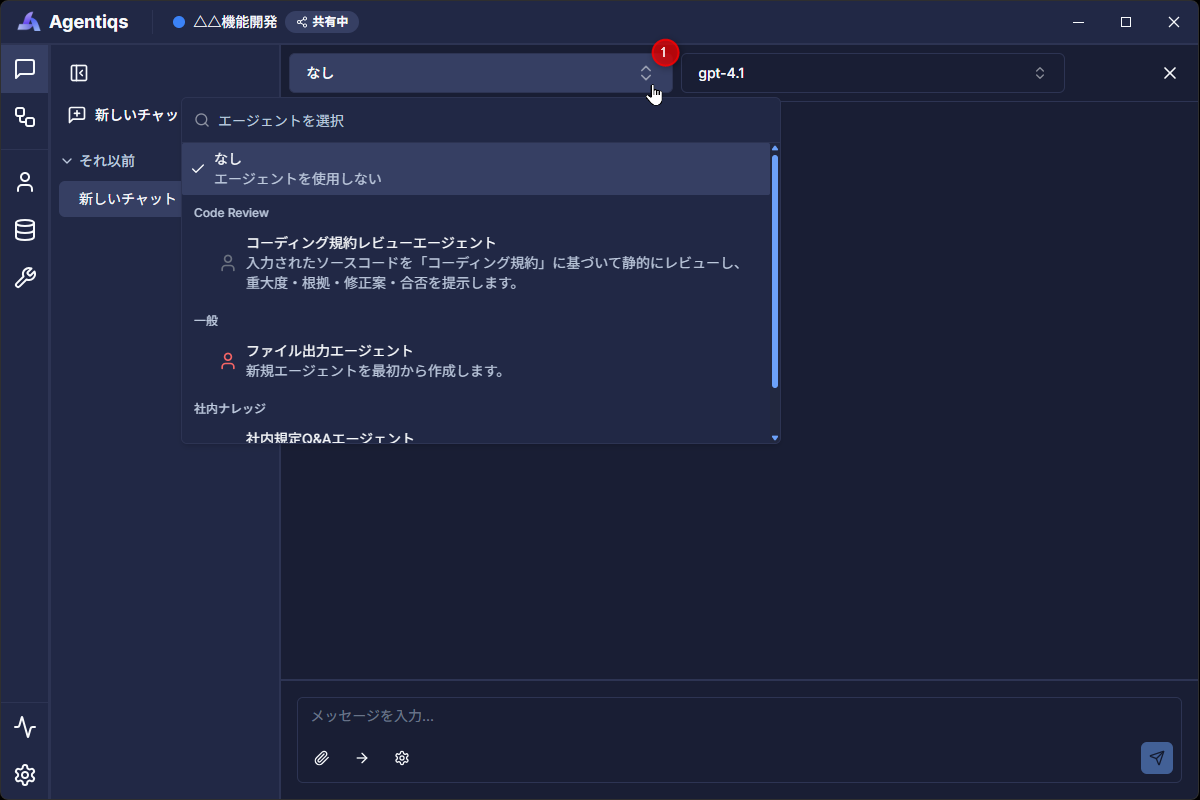
- Click the [Select agent] dropdown.
- A list of available AI agents appears.
- Select the AI agent you want to use.
- The selected AI agent is used in chat.
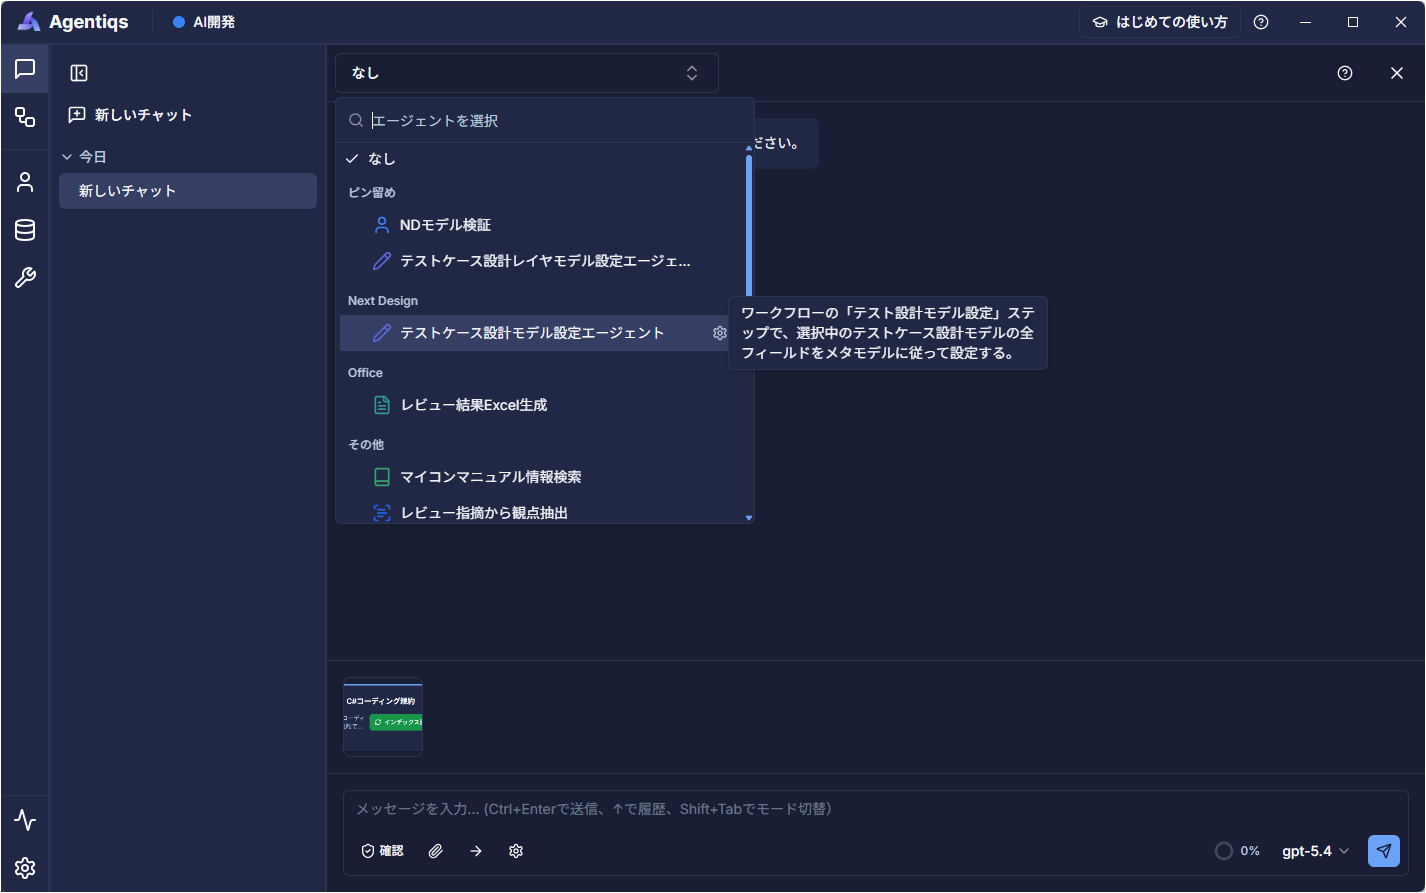
- For how to create an AI agent, see Configure dedicated AI > Create an AI agent.
Create a new agent from chat
You can create a new agent by starting with chat first and creating the agent on the spot when you need it.
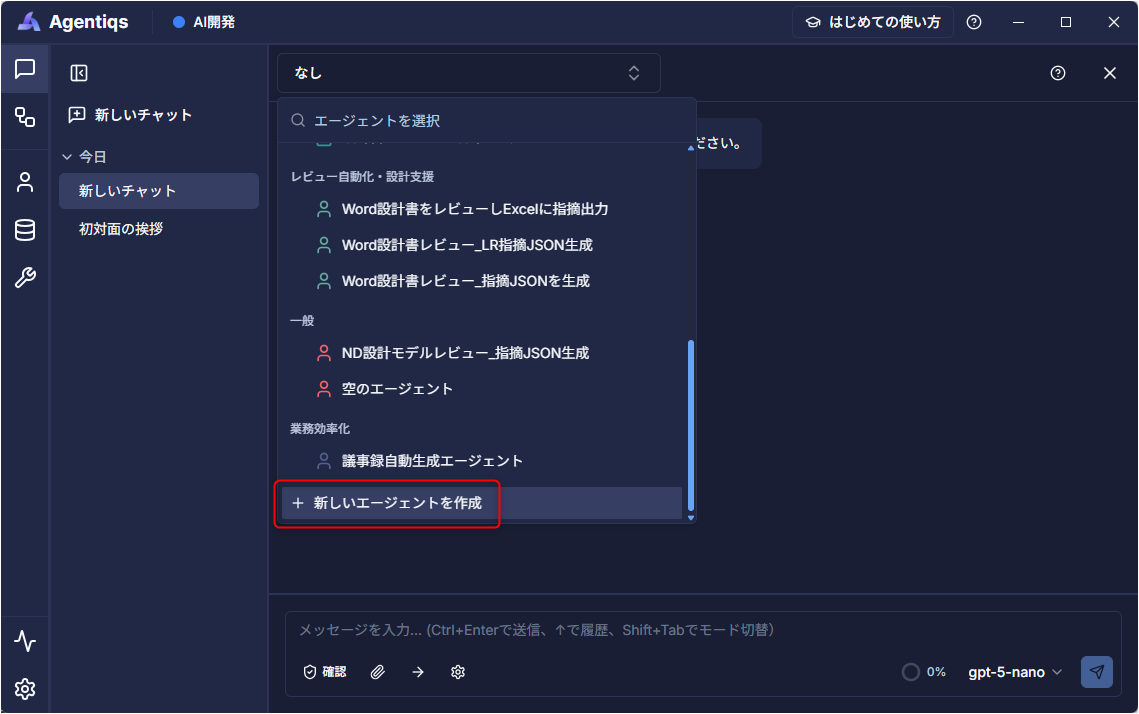
- Click [Create new agent] at the bottom of the [Select agent] dropdown.
- Create the AI agent using the method described in Configure dedicated AI > Create an AI agent.
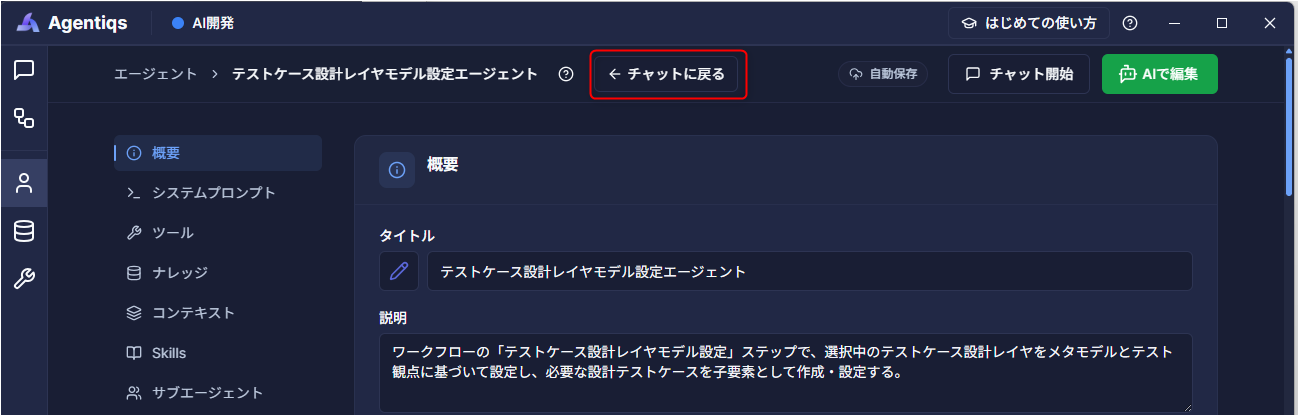
- Click [Back to chat].
- You can continue using the agent you just created.
Edit an agent from chat
If you need to, you can create a new agent and adjust its settings on the spot even while chatting.
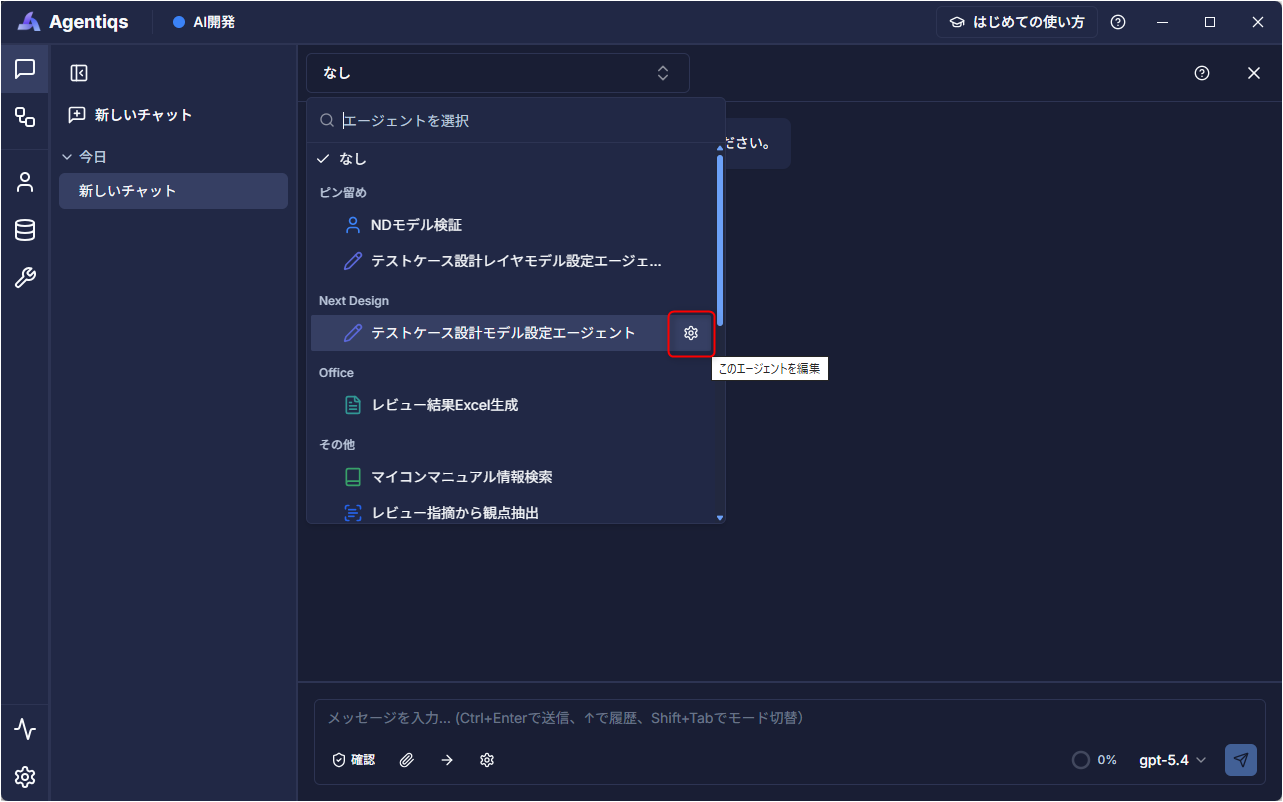
- In the [Select agent] dropdown, click the edit icon.
- You are taken to the agent editing page.
- Change settings such as the system prompt and tools.
- For detailed setup instructions, see Create an AI agent > Basic settings.
- Click the [Back to chat] button at the top of the screen.
- You return to the same chat (the same history) you came from.
Tune AI response quality and cost
This section explains how to adjust response depth and the amount of context used in conversations.
Set the reasoning level
Models that support reasoning, such as GPT-5 series and Claude 4 series models, can use the "thinking" (extended thinking / reasoning) feature.
- For tasks such as complex analysis, design, and coding, you can expect more accurate responses.
- While the AI is thinking, the content is summarized and streamed in the chat screen.
You can change the reasoning level for each chat based on your needs, such as "I want it to think more deeply" or "I want to prioritize response speed."
Open the model selection button in the lower-right corner of the chat screen, then change the setting from the "Reasoning level" slider below the model list.
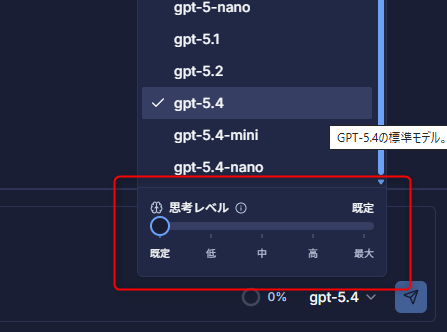
- The higher the reasoning level, the better the response quality, but token usage (cost) and response time increase.
- If you select a model that does not support reasoning (for example, GPT-4o), the slider cannot be used.
Check context window usage
A donut-style indicator showing context window usage in real time appears on the chat screen.
- Usage is easy to read at a glance by color (green / yellow / red).
- Green = under 60%, Yellow = 60–79%, Red = 80% or higher
- Click it to view the breakdown of used tokens and summarization status.
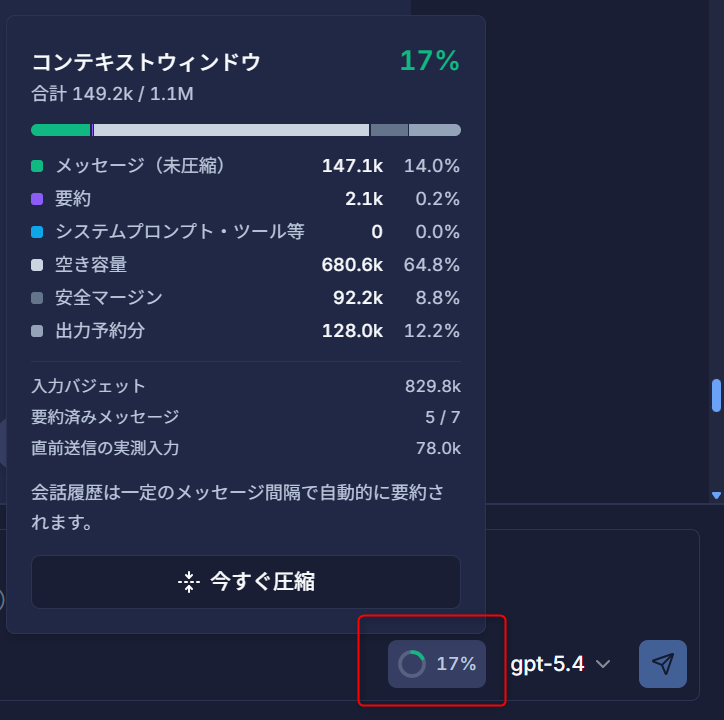
- If you want to compact the conversation (compress it by summarizing the chat history), you can do so in either of the following ways:
- Automatic execution by the system
- Click the [Compact now] button
- Because the conversation history is summarized and compressed, detailed past conditions or intent may be lost, which can reduce response accuracy.
Re-enter any important assumptions or instructions as needed.
Switch knowledge bases
The knowledge referenced in chat can be added or changed for each chat.
Set knowledge
This section explains how to change the knowledge referenced from the chat screen.
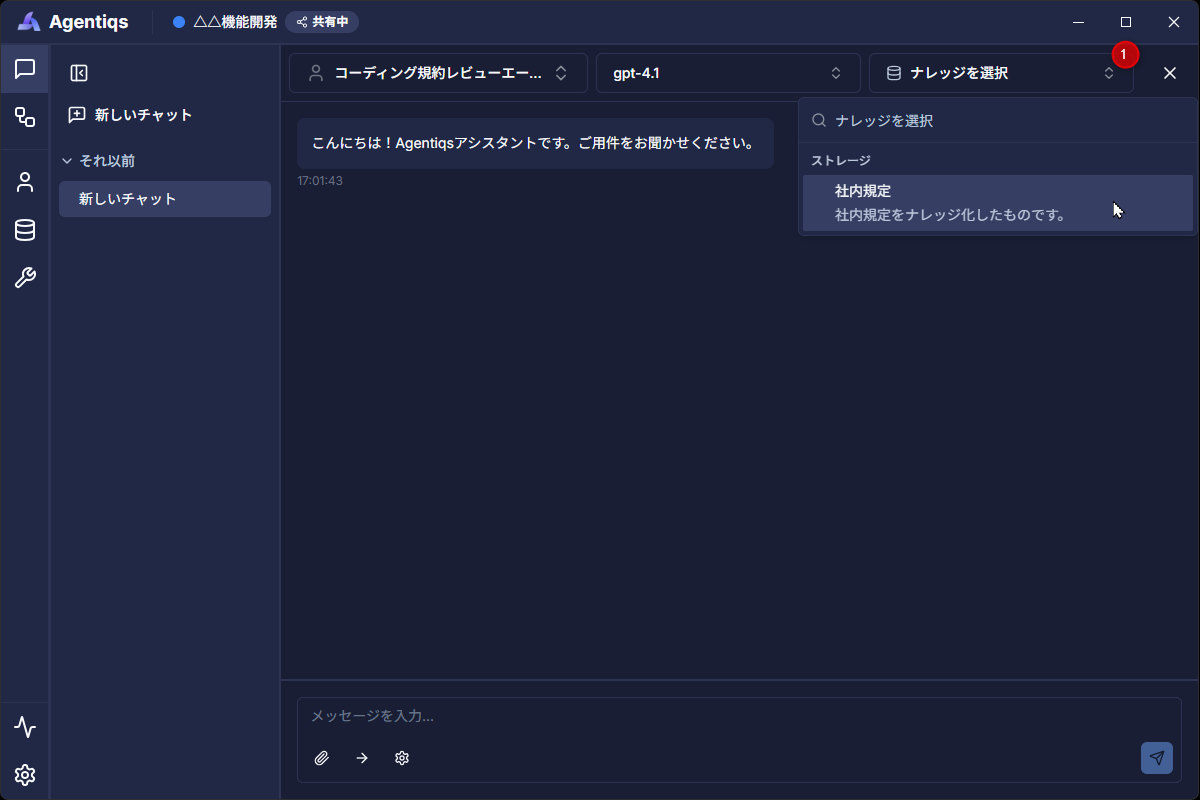
- Click the [Select knowledge] dropdown.
- A list of available knowledge items appears.
- Select the knowledge you want to use.
- The selected knowledge is referenced in chat.
- You can configure knowledge only when the [Use knowledge] setting is enabled for the AI agent.
- You can configure multiple knowledge items at the same time.
- For how to create knowledge, see Configure dedicated AI > Create knowledge.
Knowledge configured in the chat screen is session-only and is not reflected in the AI agent's persistent settings.
If you want to use it permanently, add the knowledge from the AI agent settings.
Create new knowledge from chat
If there is no knowledge you want to reference in chat, you can create it on the spot.
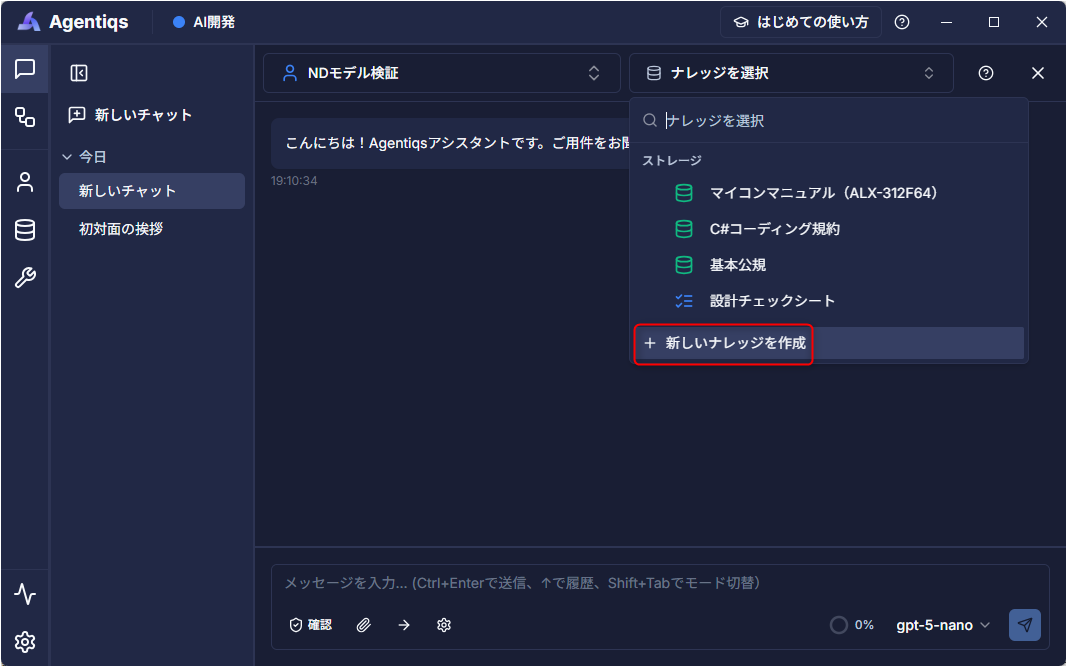
- Click [Create new knowledge] at the bottom of the [Select knowledge] dropdown.
- Select the knowledge to use as a base from the knowledge gallery.
- For detailed steps, see Create knowledge.
- After creating it, click [Back to chat].
- You can start using the knowledge you created right away.
Edit knowledge in place from chat
This section explains how to update knowledge while chatting.
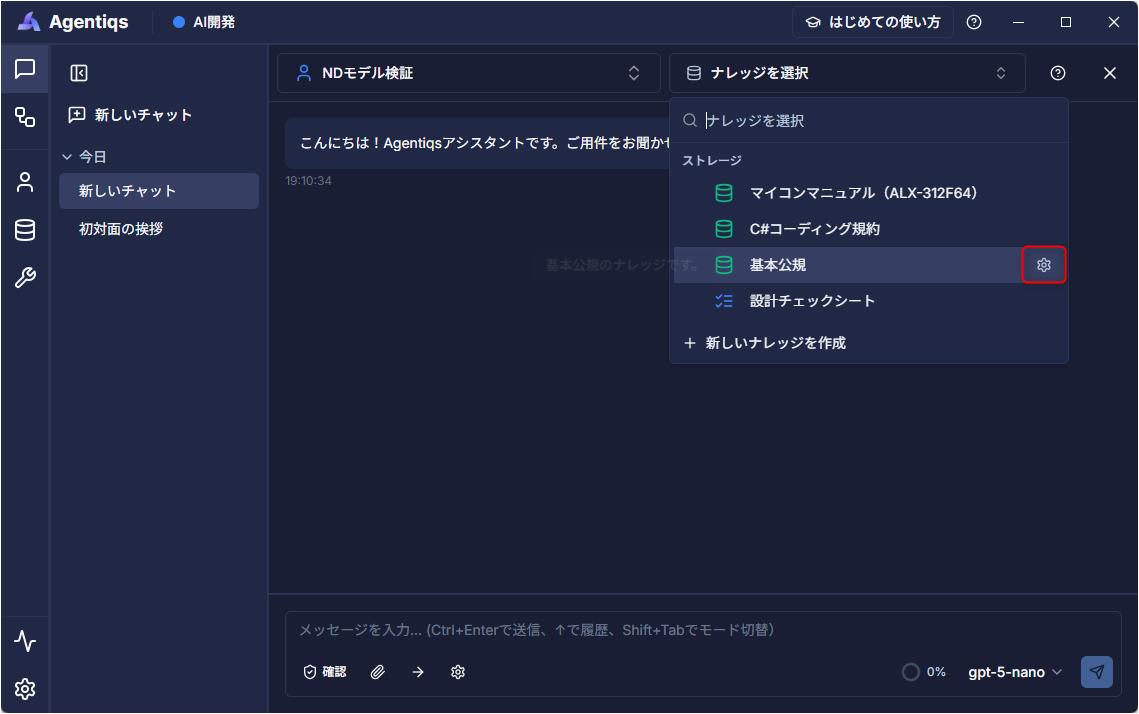
- In the [Select knowledge] dropdown, click the edit icon.
- You are taken to the knowledge editing page.
- Change the settings, then click the [Back to chat] button at the top of the screen.
- You return to the same chat you came from.
Set up the workspace
For work that involves reading/writing files or running commands, set a work folder to make the access scope clear.
Set work folders
Work folders define the scope in which the AI agent is allowed to read/write files and execute commands.
Because you can specify multiple folders per chat, even when working with multiple repositories or design documents,
you can make the access scope clear before making a request.
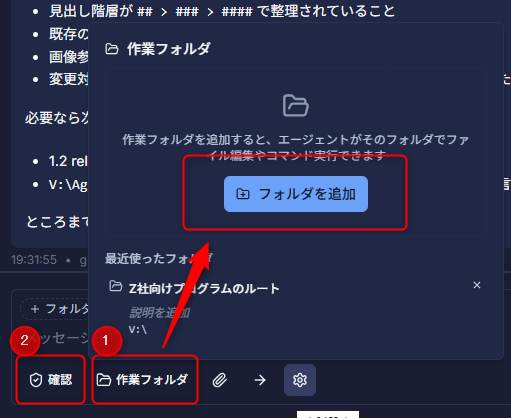
- Click [Work folder] below the chat input field, then select the target folder from [Add folder]. (Image 1)
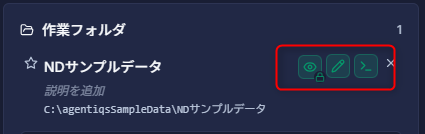
- Set the folder name and description, and configure write and execution permissions for each folder.
- Open the target AI agent and enable file access and command execution in [System tools].
- For details, see AI agent settings.
- If you do not configure this, the feature cannot be used.
- From the approval mode in the chat input field, select the mode you want. (Image 2)
This switches between having a person confirm each AI action as it runs, or letting it run to completion without confirmation.
The folder name, description, and permissions are preserved, so you can avoid reconfiguring the same work target in another chat.
Notes on work folders
- Access to files outside the work folder is denied. Please configure an appropriate folder.
- Folder trust, name, description, and permissions are configured per PC. Set them again on another PC.
- New chats inherit the work folder and approval mode used in the previous chat.
Check the target folder and mode before sending. - If you specify a work folder, you cannot use the following tools configured in the AI agent's tool settings.
If needed, add them to the work folder.- File Access
- Command execution
Organize chats
This section explains how to organize the chat list and conversation context so that necessary information is easier to handle.
Organize the chat list
You can set groups and pin chats in the chat list in the sidebar to organize chats by purpose.
- Hover over the chat you want to organize and open the [...] menu.
- Select [Move to group] > [New group...].
- Enter a group name and click [Create].
- The group is created and the chat is placed inside it.
You can perform the following actions for chats and groups.
-
Work with chats
Overview Actions Rename a chat - Double-click the chat name.
- Change it from the dialog in the [...] menu under [Rename chat].Pin frequently used chats - Select [Pin] from the [...] menu.
- Click the pin button that appears when you hover over the chat. -
Work with groups
Overview Actions Move a chat into a group - In the chat's [...] menu > [Move to group], select the destination group.
- Drop the chat onto the group name.Remove a chat from a group - In the chat's [...] menu > [Remove from group], select it.
- Drag the chat to the unclassified area.Change the display order of groups - Drag the group name.
- Drag chats within a group or within pinned items.Rename or delete a group - From the group's [...] menu, rename the group or delete it.
If you delete a group, the chats return to unclassified.
Organize conversation context
This section explains how to organize the range of messages sent and pass only the necessary context to the AI.
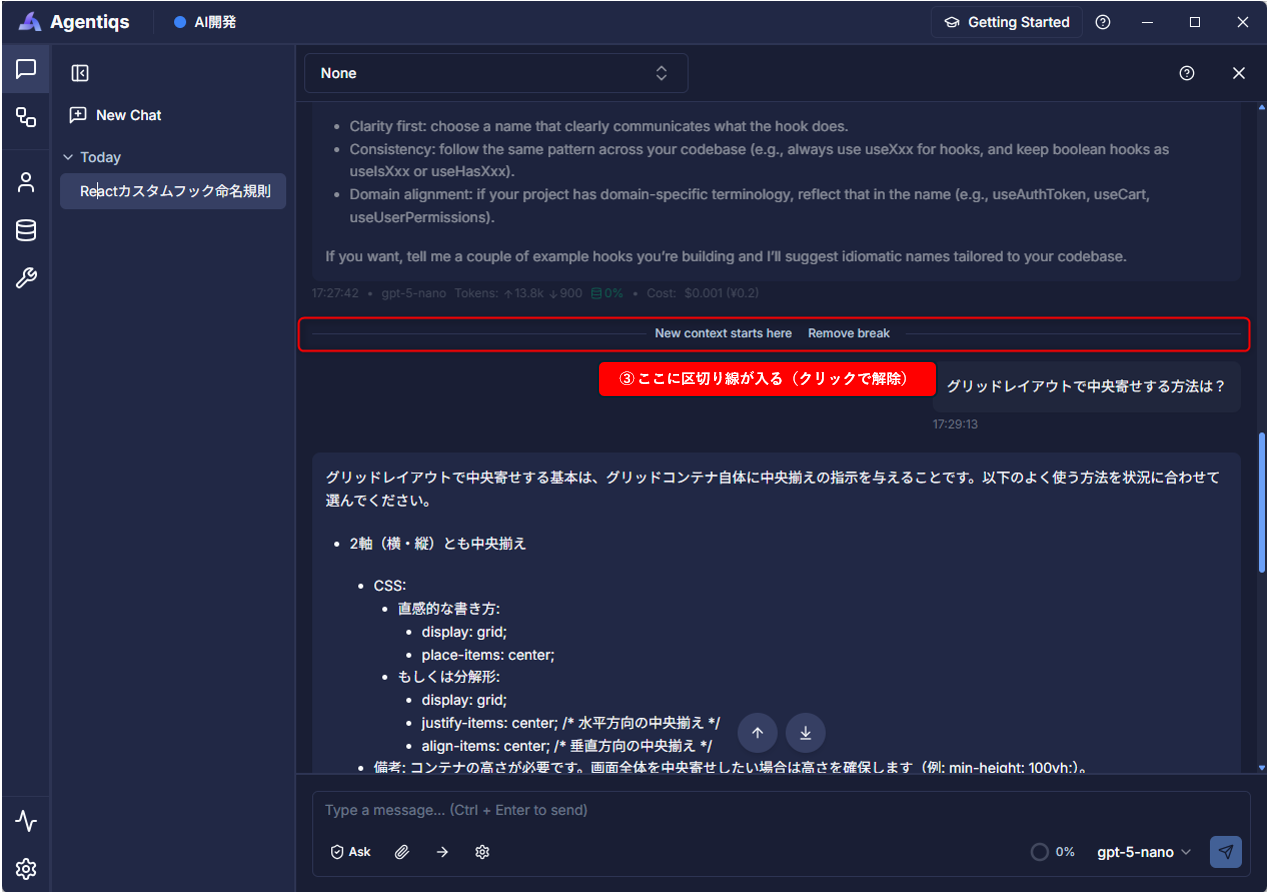
By inserting a separator line between chat messages, you can exclude all messages before the separator from what is sent to the AI.
When the topic changes significantly, you can continue the conversation without reopening the chat.
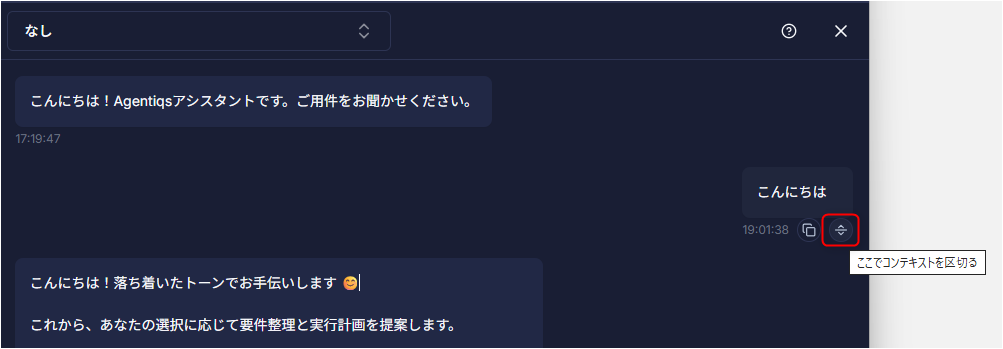
- Hover over the message immediately before the point where you want to add a separator, then click the separator icon (horizontal line) in the action menu.
- Messages before the separator line are shown in light gray and are excluded from what is sent to the AI.
- Perform the following actions on the separator line as needed.
- Remove the separator: Click the [Remove separator] button in the center of the separator line.
- Move the separator line: Click the separator icon in another location.
- There can be only one separator per chat (setting a new one moves it).
- If you remove a separator in a long conversation, the entire history may suddenly become eligible to be sent again, causing the context size to increase sharply.
Use chat efficiently
This section explains features that make it easier to interact with the agent and check generated results and execution details.
Answer agent questions with options
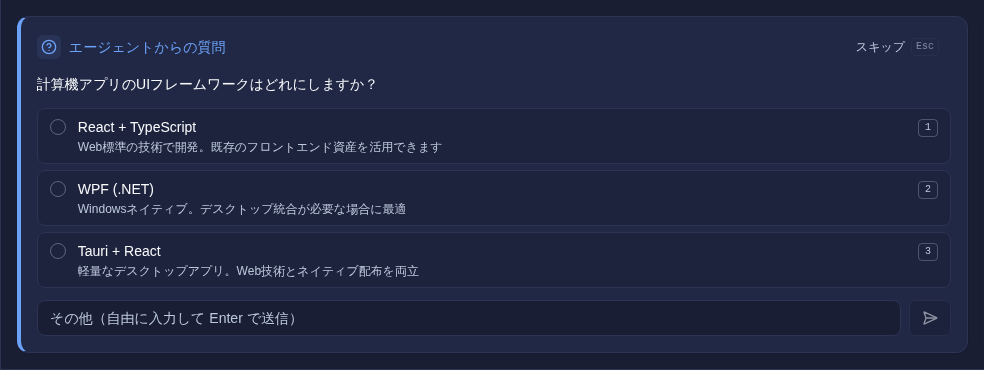
If clickable options are shown for a question from the agent, you can answer by clicking an option or pressing a number key.
- It supports single select, multi-select, free input, and skip, and the response remains in the conversation history as a card.
- Multiple confirmation items are presented together as a "question set."
You answer them one page at a time, then use the confirmation screen to send the final instructions to the AI agent all at once.
Live preview HTML code
You can preview HTML code blocks included in chat responses as fully interactive UI in a larger view.
- You can interact with and check forms, buttons, charts, and styled reports on the spot.
- The preview runs in a secure sandbox isolated from the app and cannot access login information or saved data.
- Click the preview icon above the HTML code block.
- You can perform the following actions:
- Show the full code with the maximize button, switch between "Code" and "Preview" on the screen, rerun it, download it as an HTML file, and copy it.