Automating Business Processes
This page explains how to automate business processes using Agentiqs workflow functionality. Workflows are defined by combining rules (conditions, branches, and so on) with AI agents. By fixing the steps with rules, omissions can be prevented, and by leaving only the processes that require judgment to AI, variation in responses can be reduced.
Creating a Workflow
This section explains how to create an Agentiqs workflow.
- Click [Workflow] > [New].
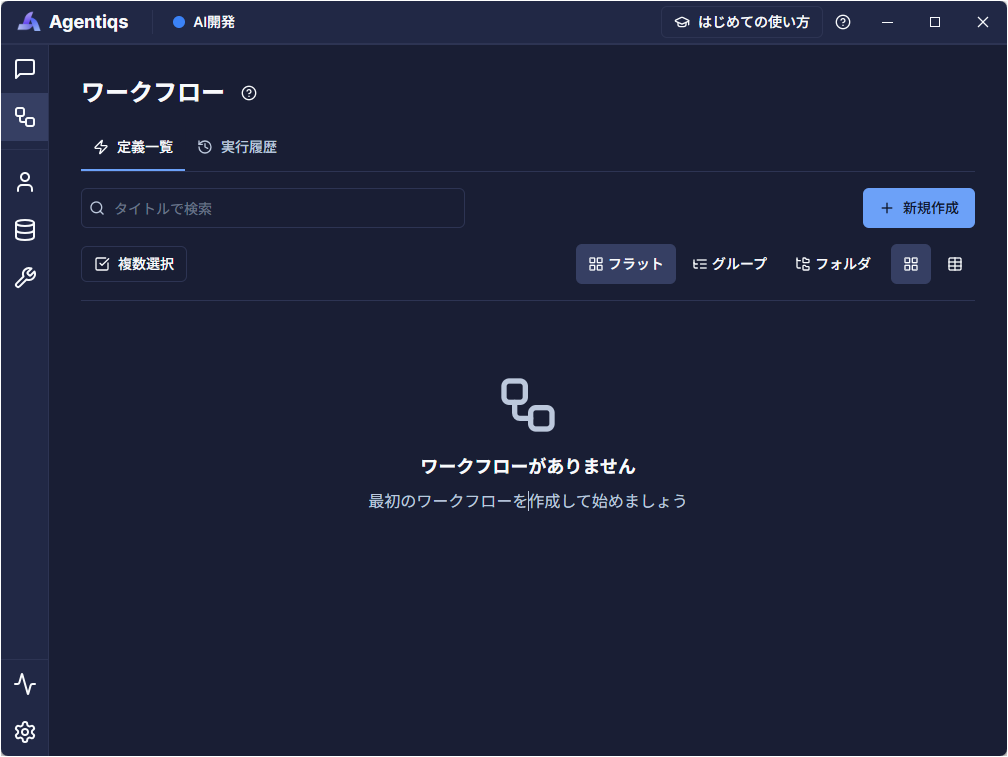
- Creation options ([Create Manually] / [Create with AI]) will be displayed.
- Select a creation method.
- [Create Manually]: A blank workflow editing screen is displayed. Add steps manually.
- [Create with AI]: Proceed to the screen where you enter what you want to create (see the next section for details).
In the list view, you can switch the display layout, group items by category, and pin items. For details, see "Organizing lists such as agents".
Creating with AI
This section explains how to tell AI what you want to build and have it generate a workflow automatically.
- Enter the details of the process you want to automate as the initial prompt.
- Select the AI model to use.
- Click [Start Creation].
Building the workflow manually helps deepen your understanding of the content and enables an operation that continuously improves it. [How-to]-[Create a workflow for comprehensive review] explains the full creation process in detail. The following benefits are expected, so try creating one from start to finish:
- You will be able to understand the workflow output by AI, preventing it from becoming a black box.
- You can improve efficiency by dividing responsibilities, such as having AI create the overall structure while humans handle the details.
Editing the Workflow
This section explains how to edit a workflow you have created.
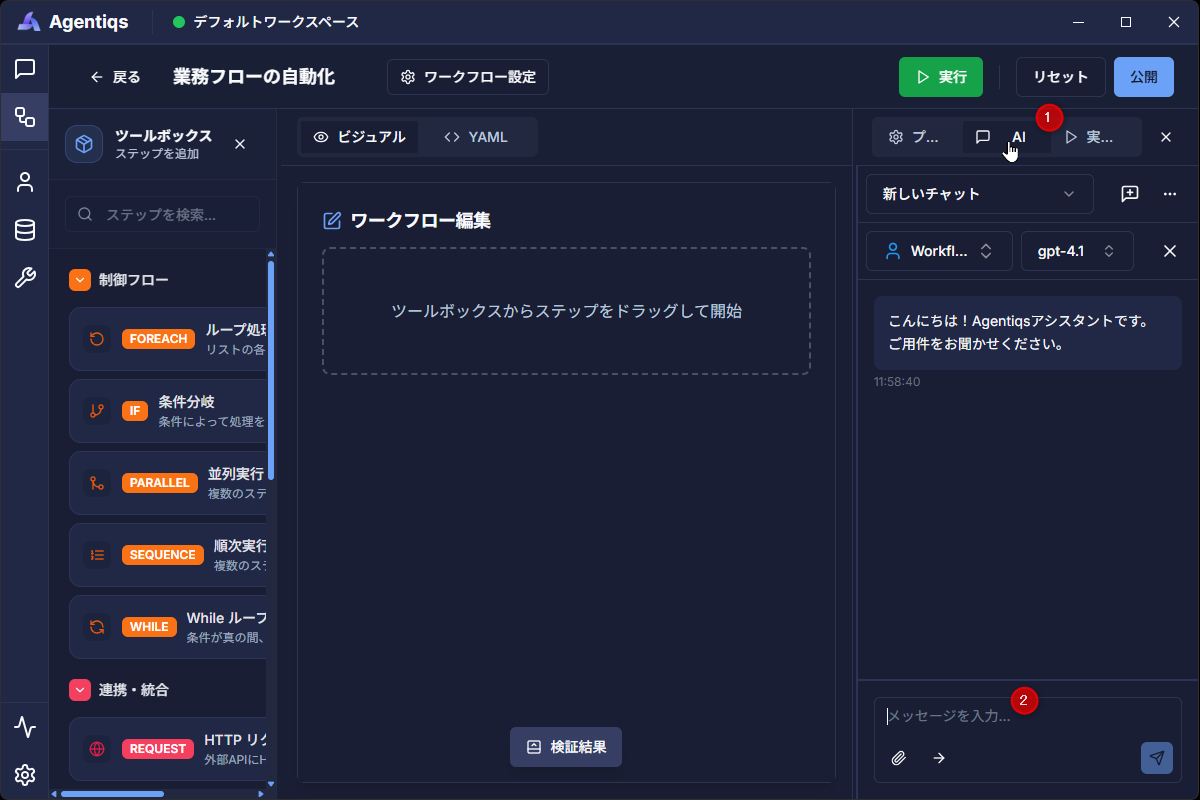
- Click [Workflow].
- A list of workflows will be displayed.
- Select the workflow you want to edit.
- The workflow editing screen will be displayed.
- For detailed parameter settings, see "Reference: Parameters per Step".
- Click the [AI] tab in the right-hand pane.
- The chat screen will be displayed.
- Edit interactively with AI in chat and run tests as needed to check the results.
- Workflows created or edited interactively with AI do not always work correctly. Run a test to confirm that you get the intended results.
Define Inputs, Outputs, and Internal Variables
You can define workflow inputs and outputs, as well as internal variables that can be referenced from each workflow step. Define them from [Workflow Settings] by clicking the following items.
-
Input/Output Parameters
An input dialog is displayed when you run the workflow.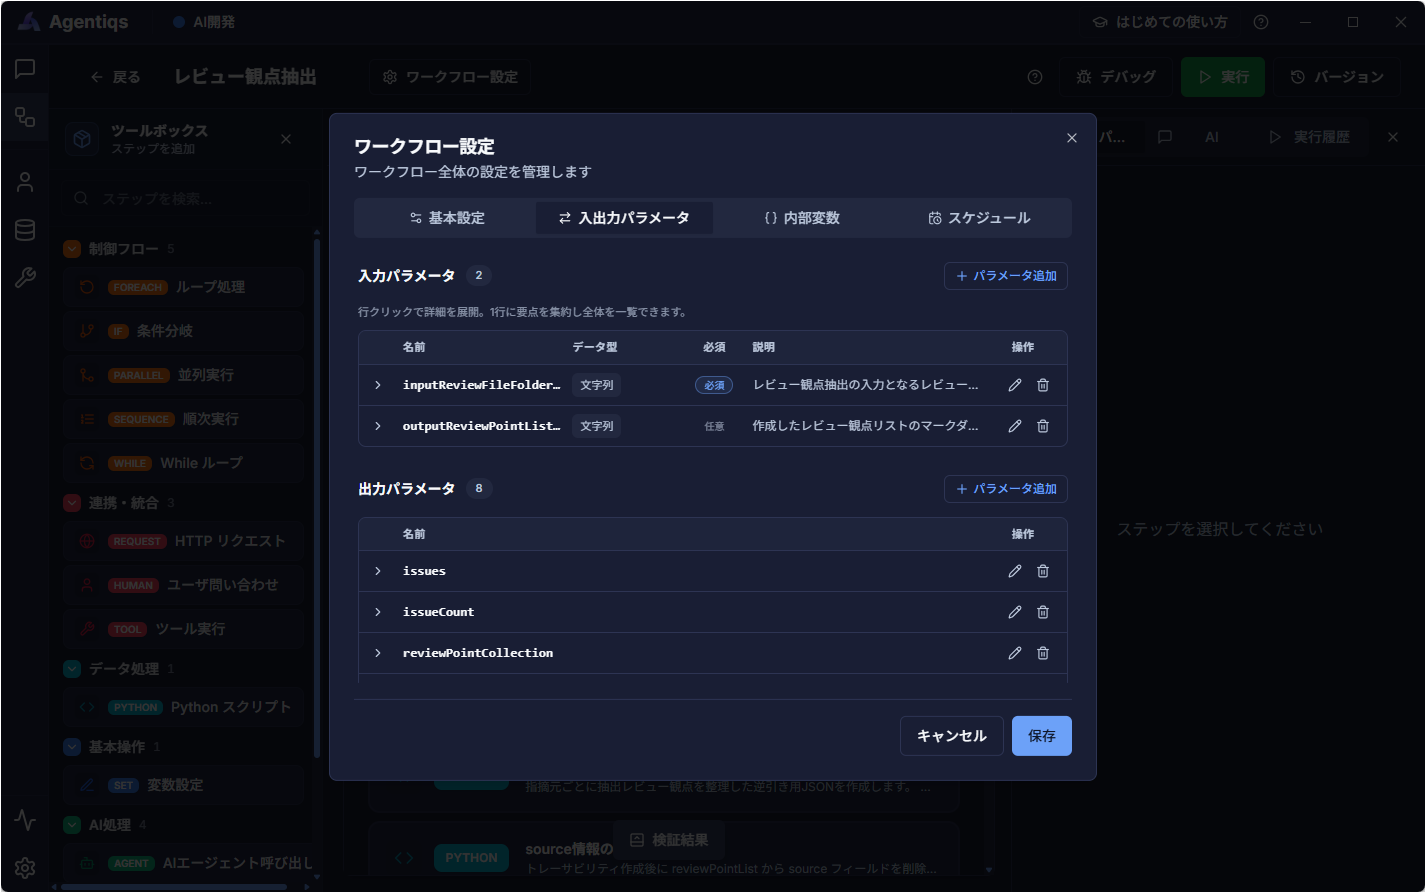 If you set default values, you can save the effort of entering them.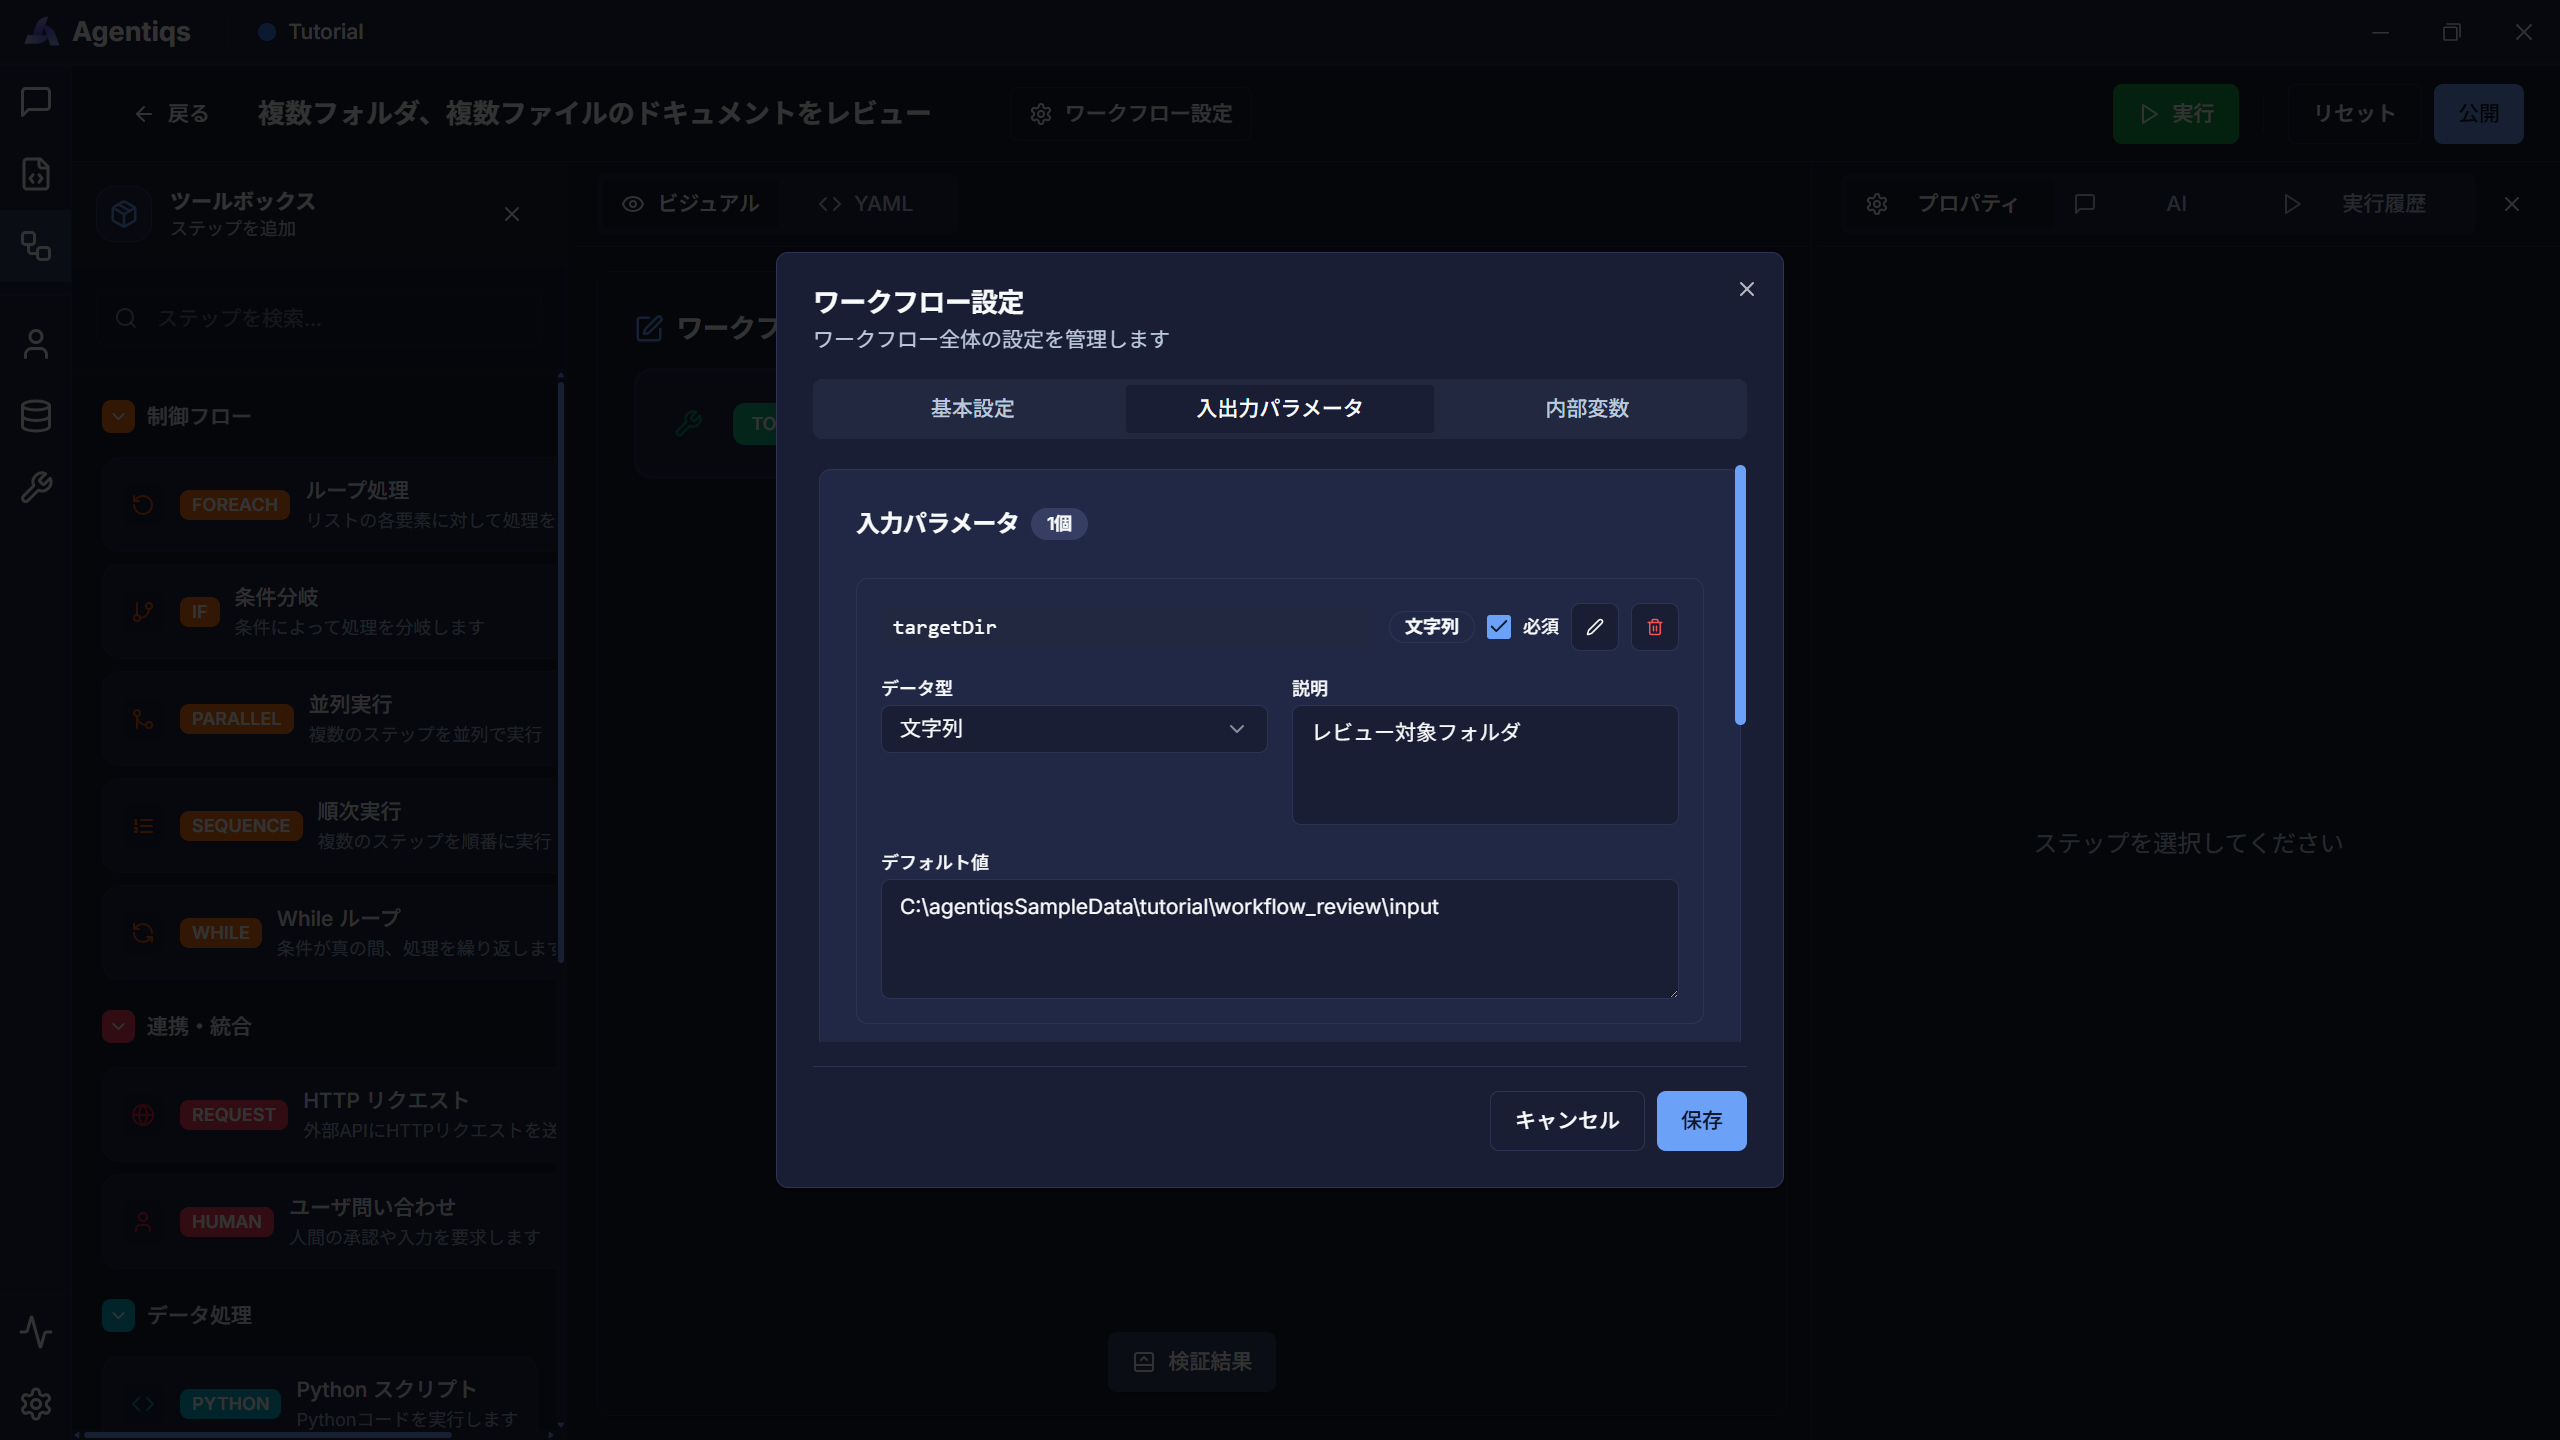
-
Internal Variables
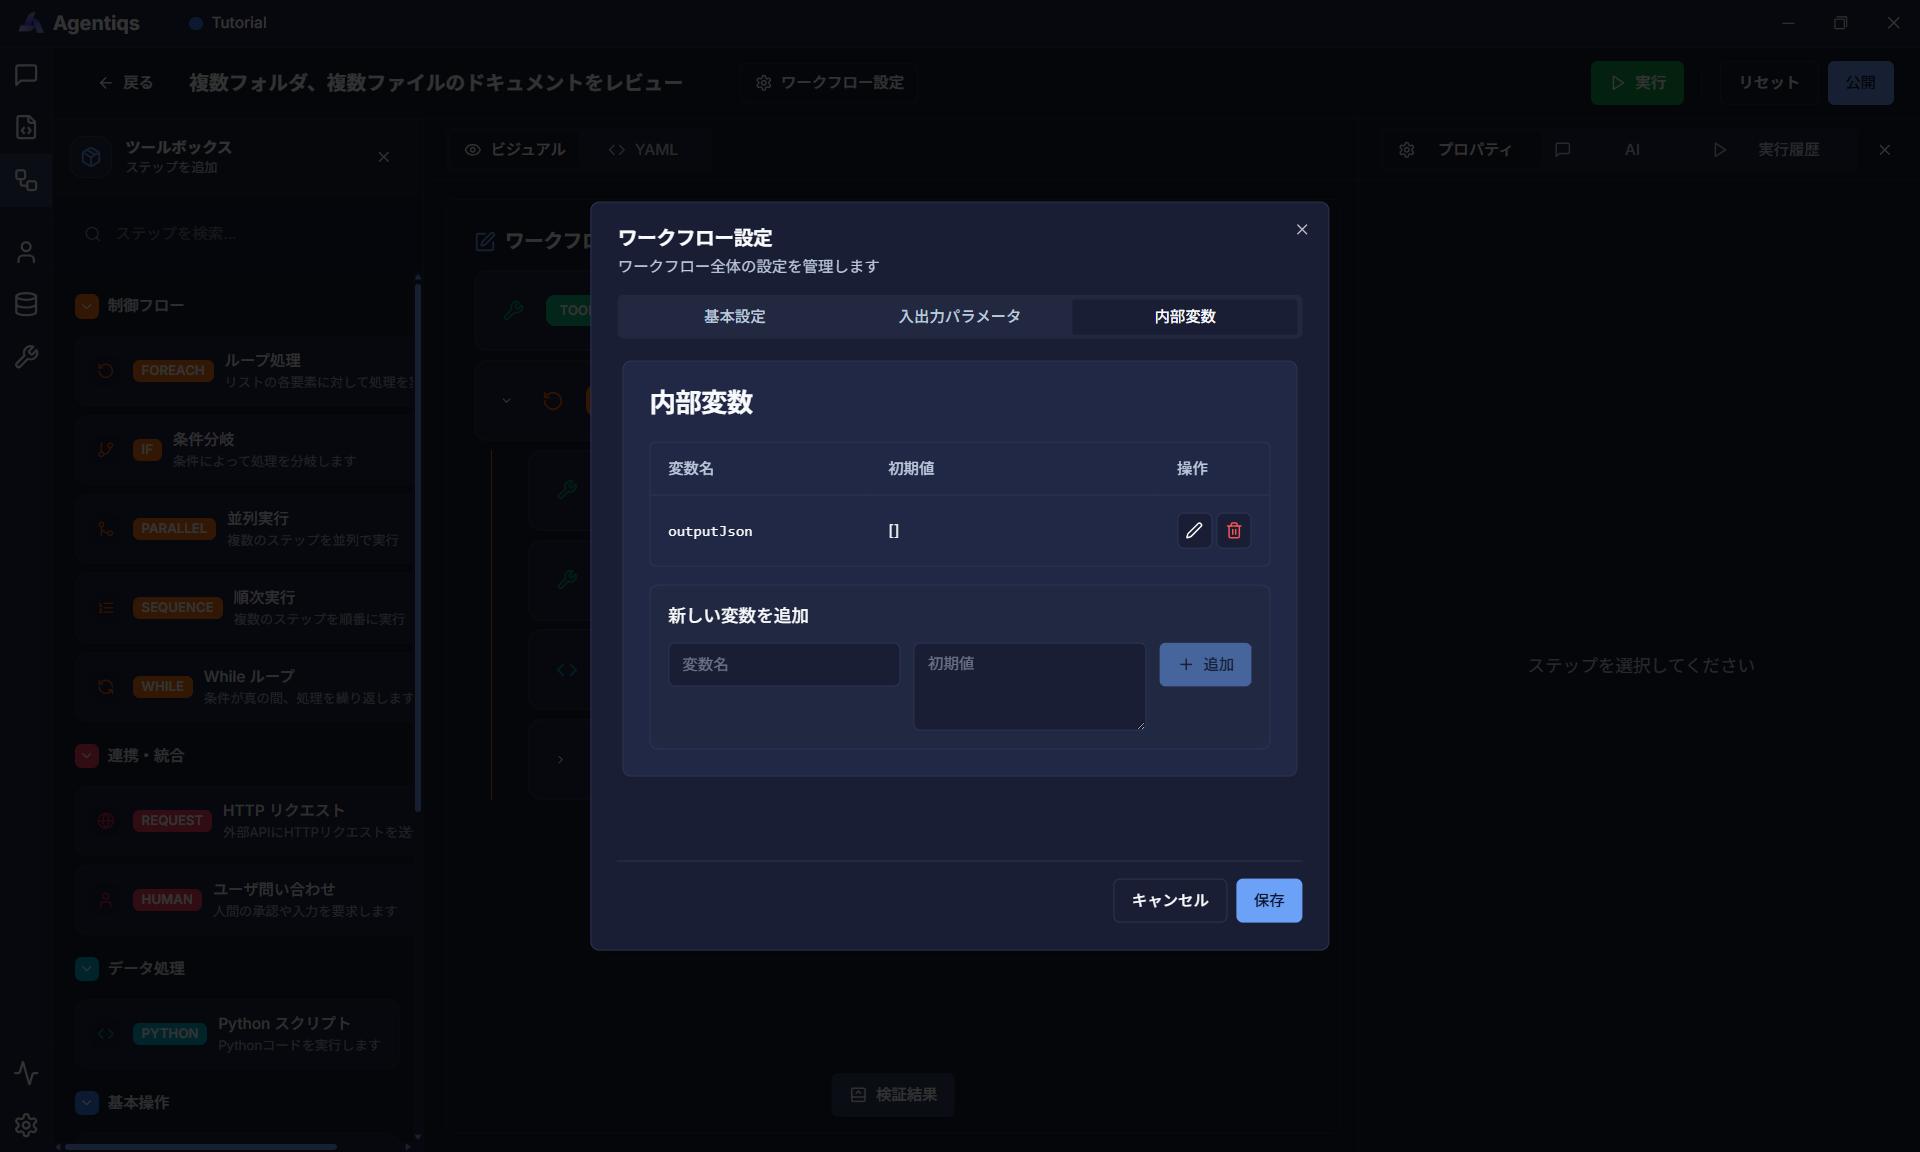 Defined internal variables
Click
{x}in each step's input field to display them as selectable options.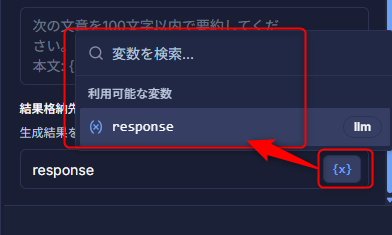
Saving and Restoring Workflow Versions
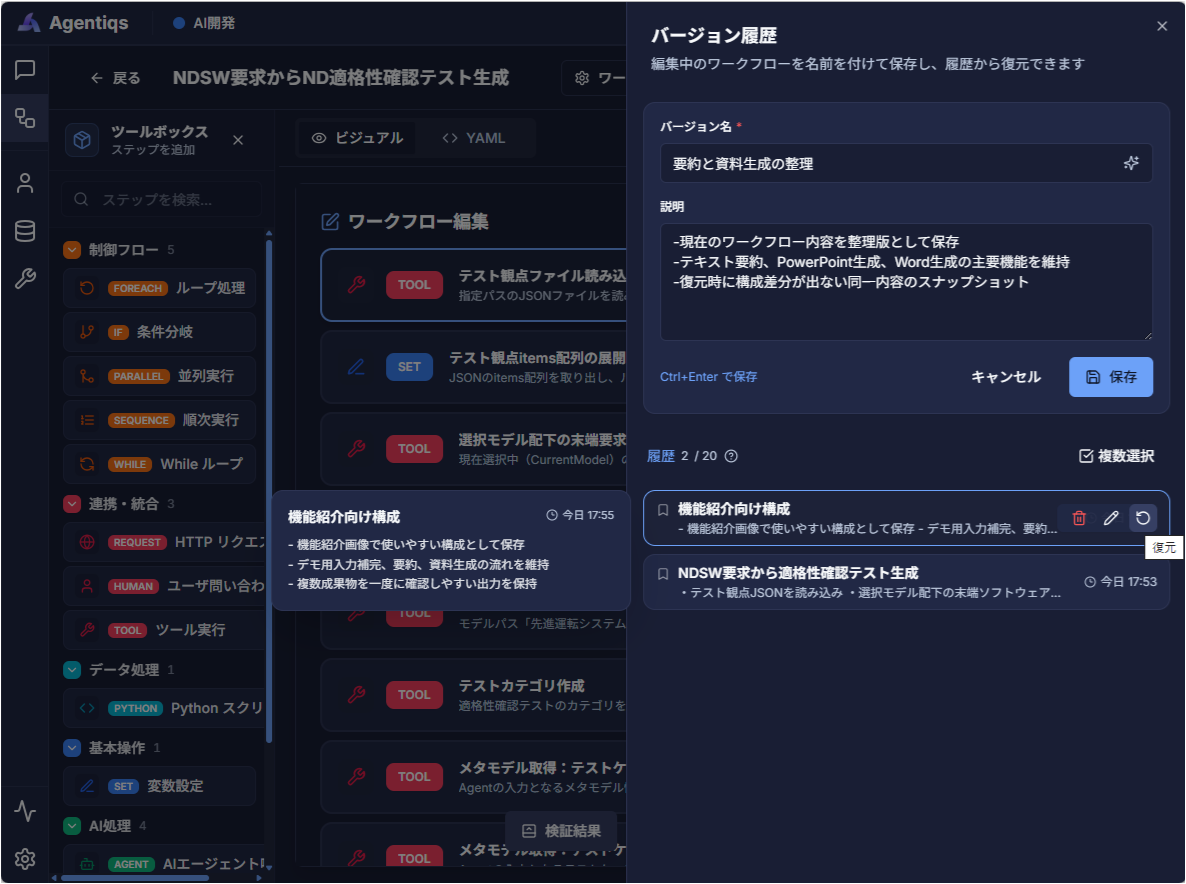
You can save workflow edits as versions and restore previous states as needed. Use this when you edit repeatedly in AI chat or when you want to preserve the state before making major changes.
Saving a Version
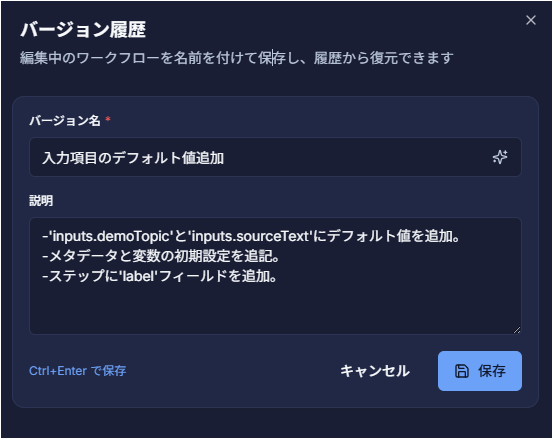
Click [Version] in the header of the workflow editing screen, then enter the version name and a description of the changes to save it.
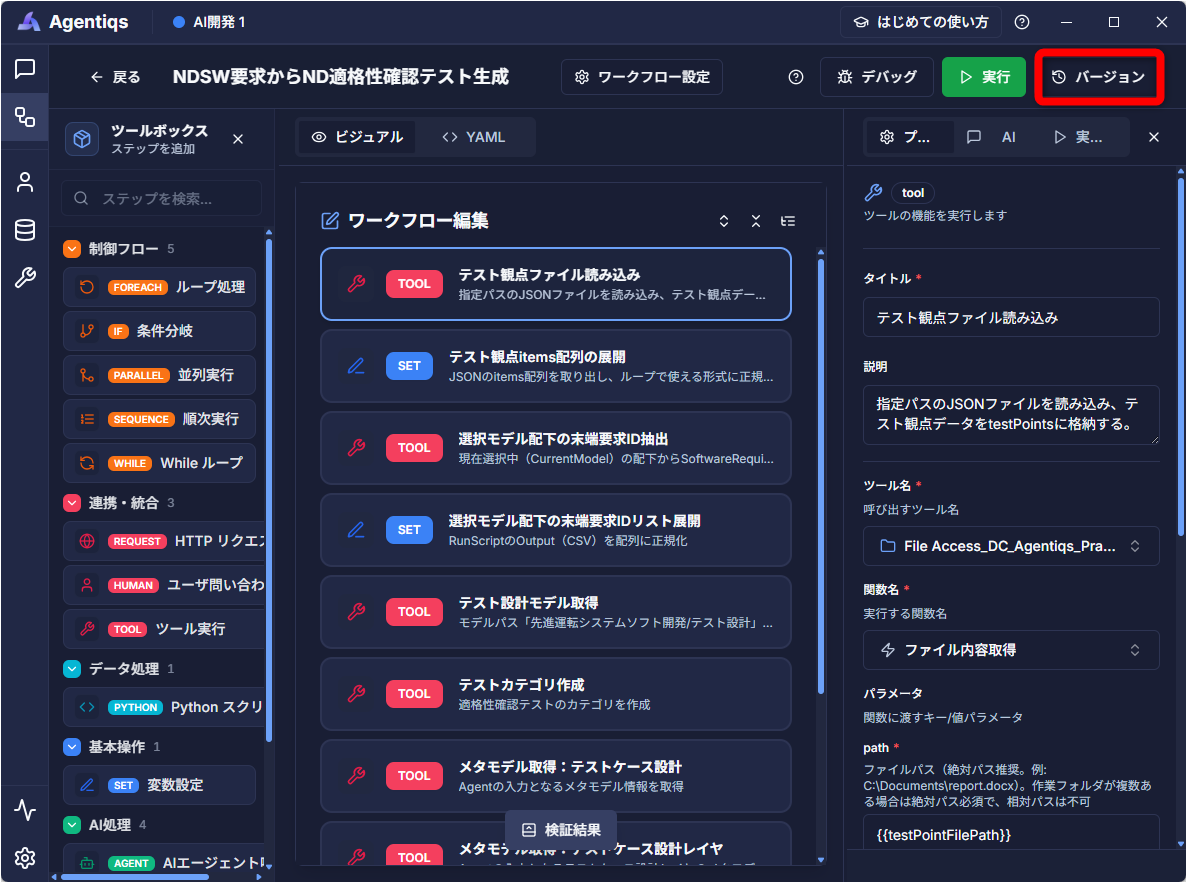
The following actions allow AI to read the most recent edit differences and suggest a version name and description that match the content:
- In the AI chat on the workflow editing screen, instruct it with "Save this as a version."
You can save the content you adjusted through dialogue as a milestone in your work. - Click the button on the right side of the version name input field.
Restoring a Version
If you want to return to a previous state, select the version you want to restore on the version management screen and run [Restore].
Notes on Version History
- You can save up to 20 versions per workflow. When the limit is reached, older history is automatically overwritten.
- Version history is not carried over in the following cases:
- When a workflow is duplicated or imported
- When a workflow is moved between a shared-mode workspace and a non-shared-mode workspace
Executing a Workflow
This section explains how to run an Agentiqs workflow.
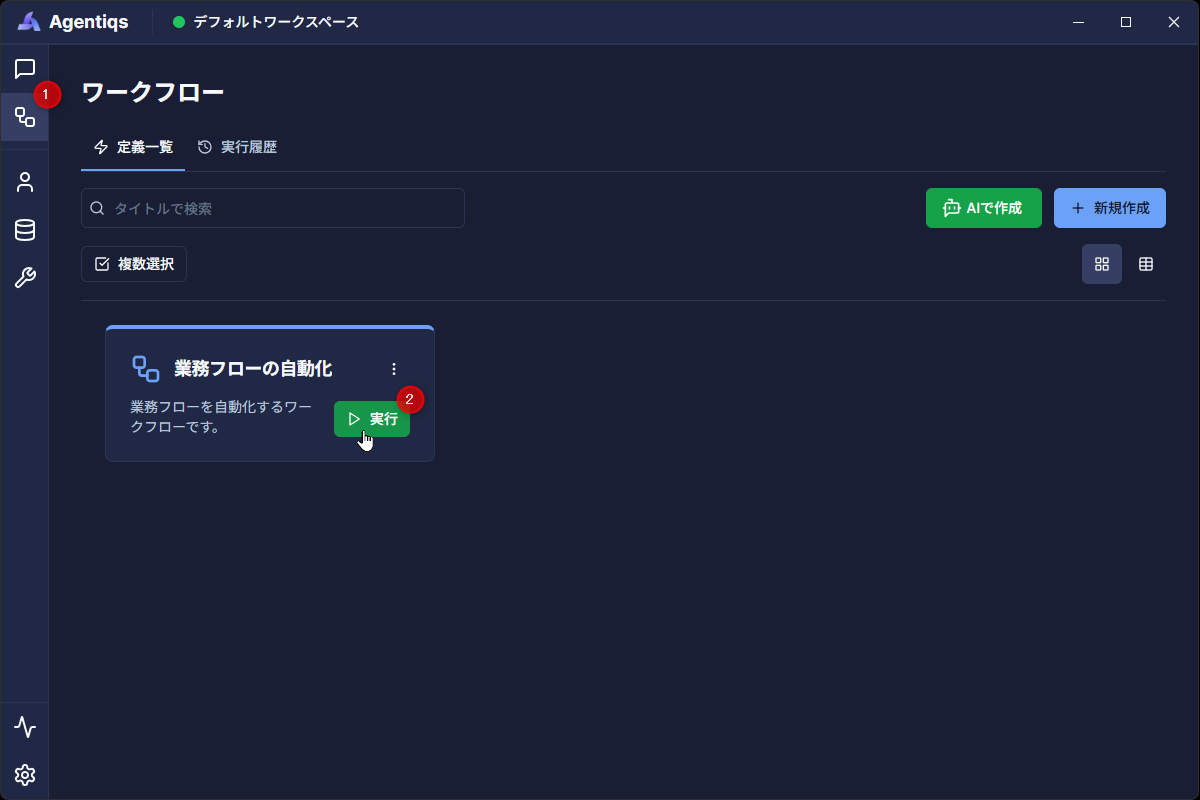
- Click [Workflow].
- A list of workflows will be displayed.
- Hover over the card of the workflow you want to run.
- The [Run] button will be displayed.
- Click the [Run] button.
- If input variables are defined, an input dialog is displayed before execution.
- The workflow switches to the [Execution History] tab and execution starts.
Viewing Execution History
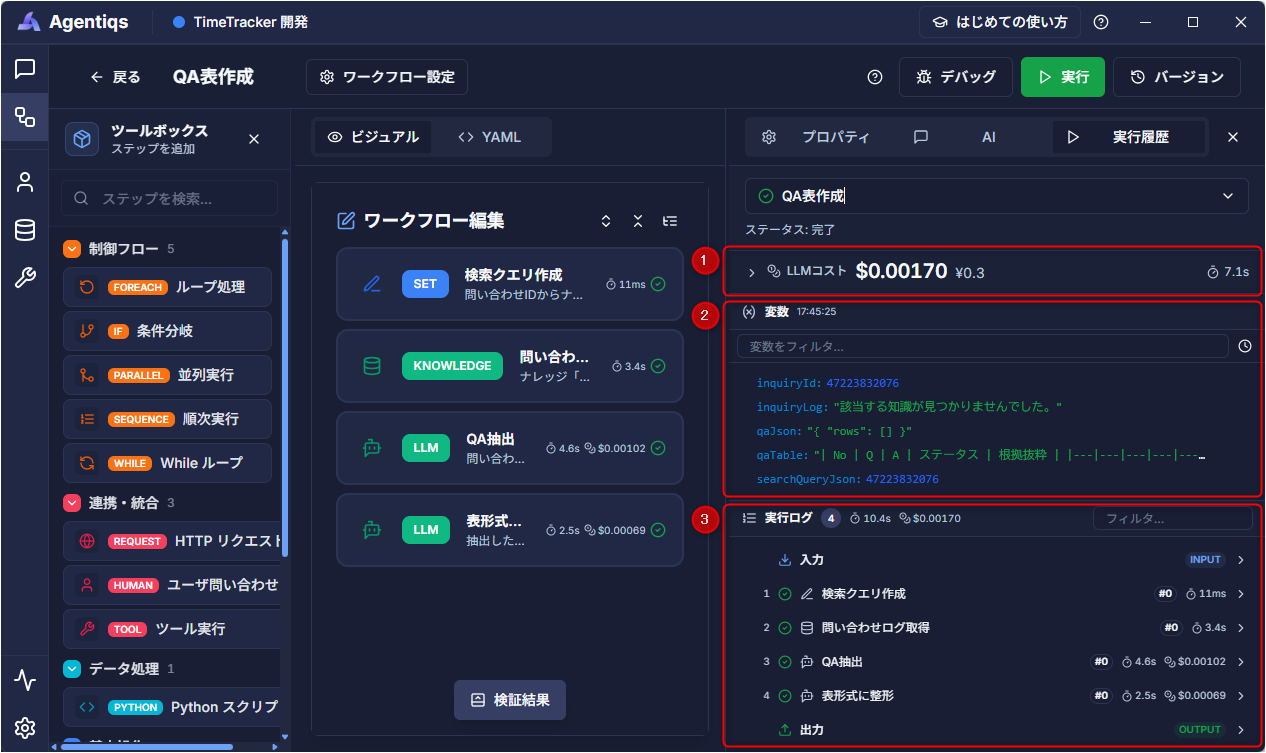
On the workflow editing screen, you can not only create workflows but also review execution results and debug them on the same screen. In execution history, you can check variable values and execution logs in one place, and for steps that use AI you can also see execution time and cost.
-
- Execution cost:
- You can check the total cost for the entire execution and the equivalent amount in Japanese yen.
- Clicking it displays a breakdown by step.
You can identify AI steps or model settings with higher costs and compare the execution results before and after changes.
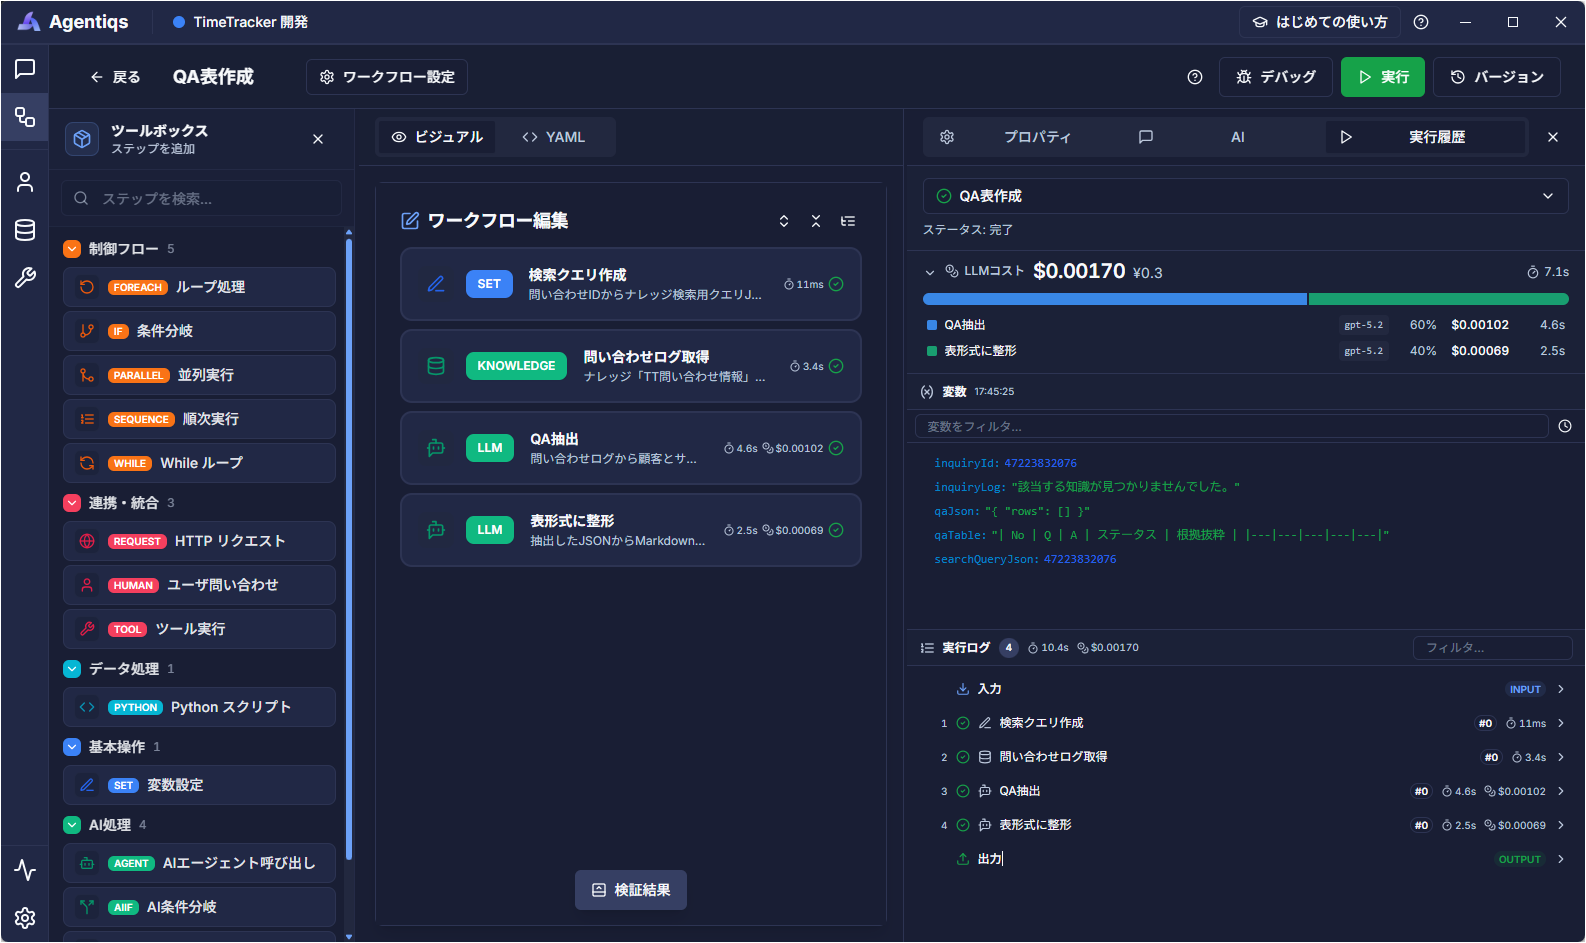 Cost display applies only to steps where usage is recorded.
 -
- Variable pane, 3. Execution log pane
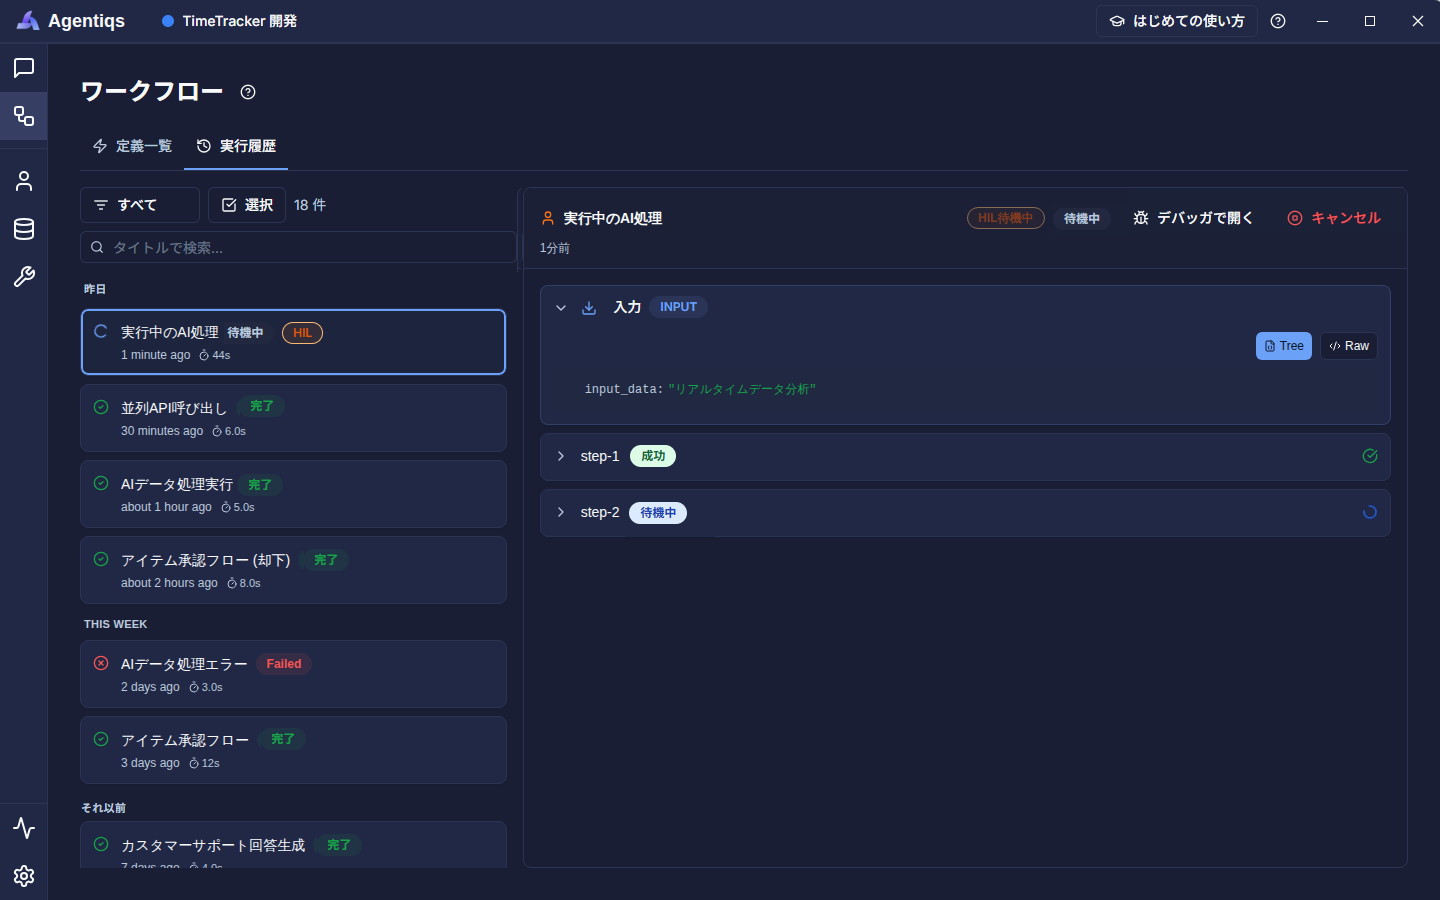
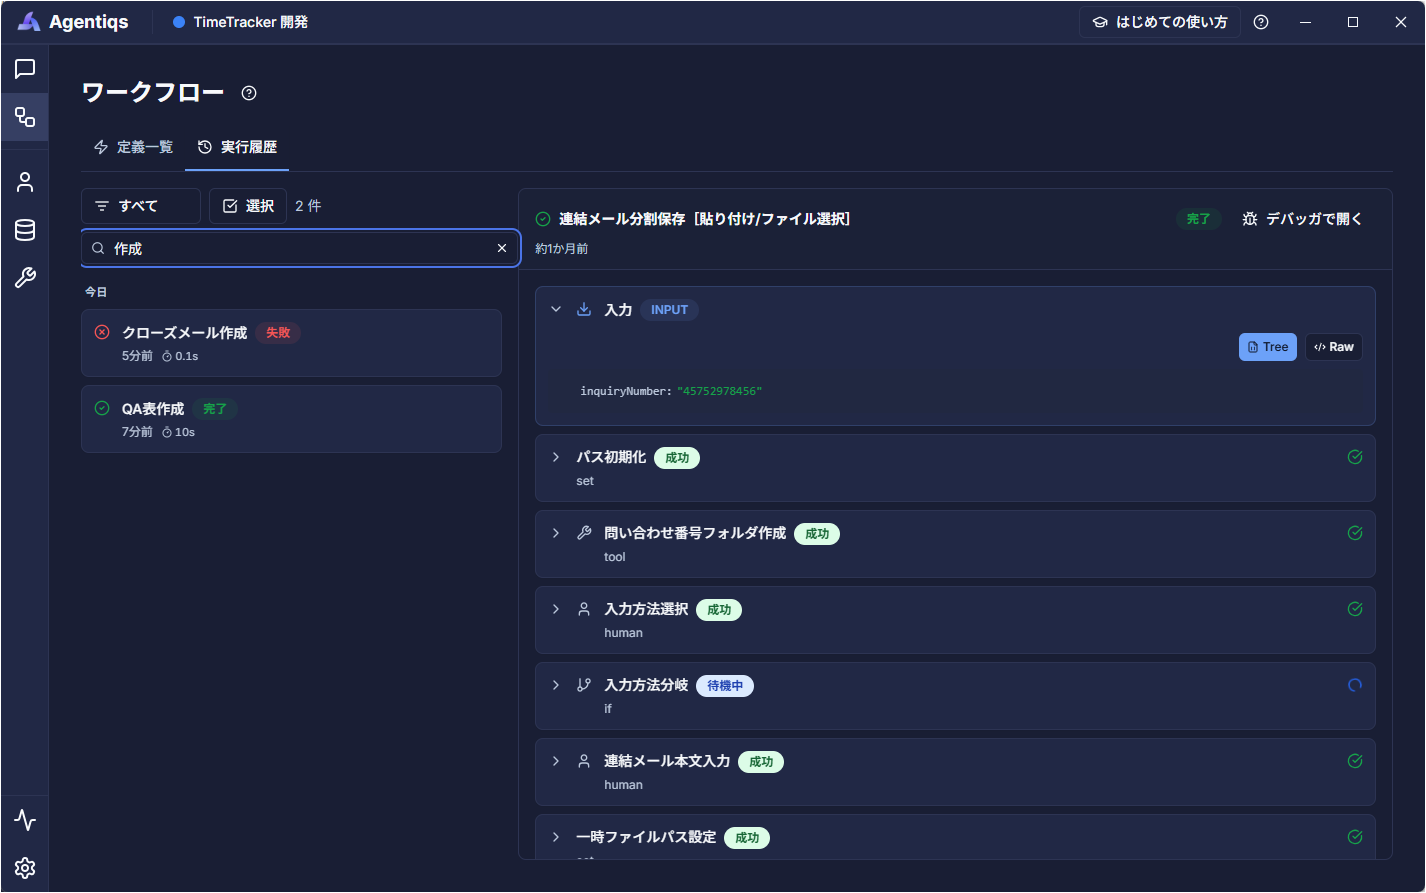
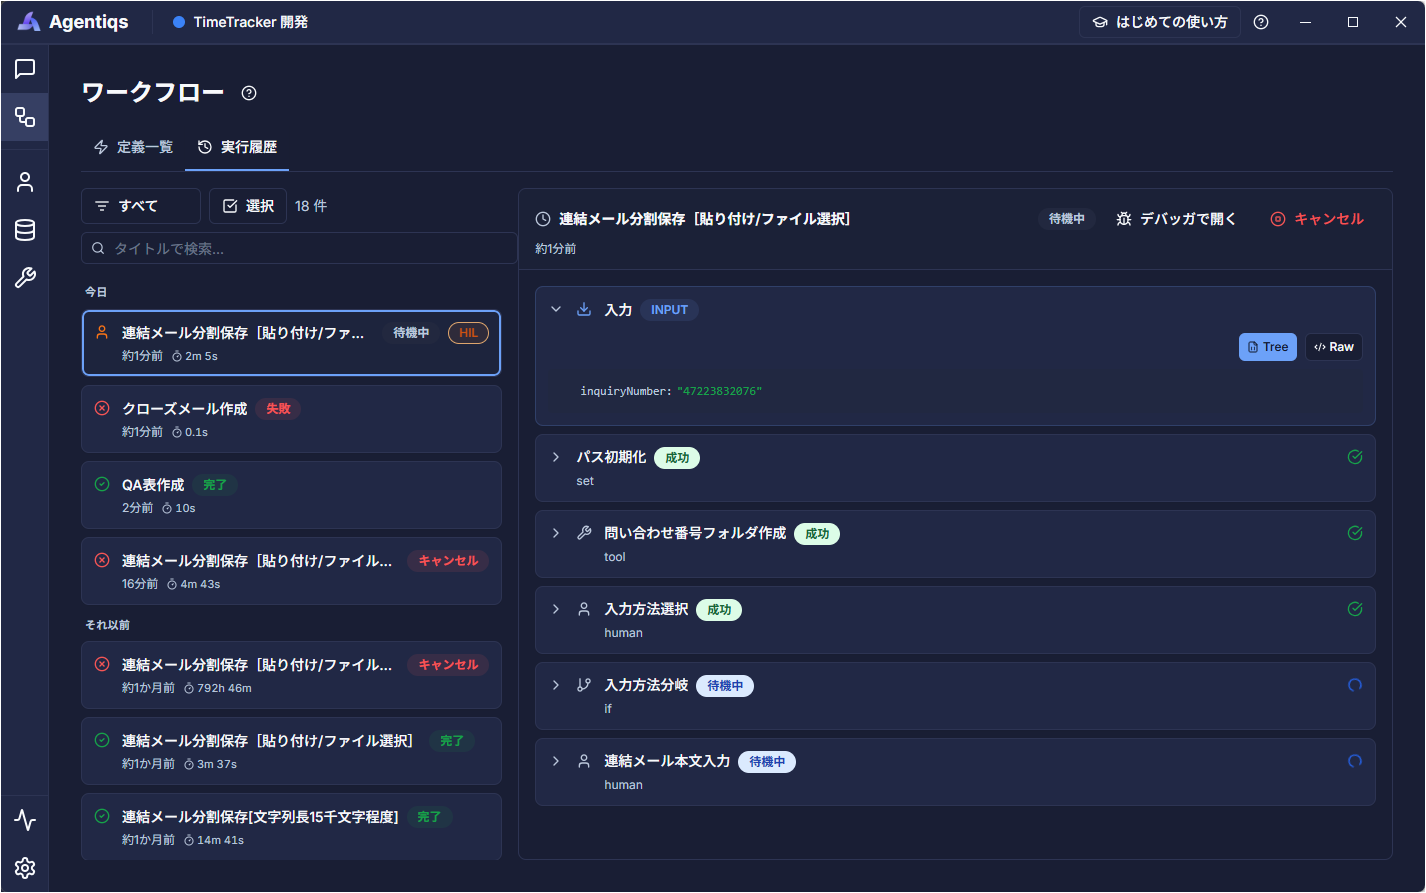
On the tab, you can review each execution's status, start time, elapsed time, trigger name, and schedule name together, as shown below.
- Execution date: Grouped by date for easier review
- Title search: Quickly narrow down the execution you want to check.
- Executions waiting for human review: A HIL badge is displayed.
- Variable pane, 3. Execution log pane
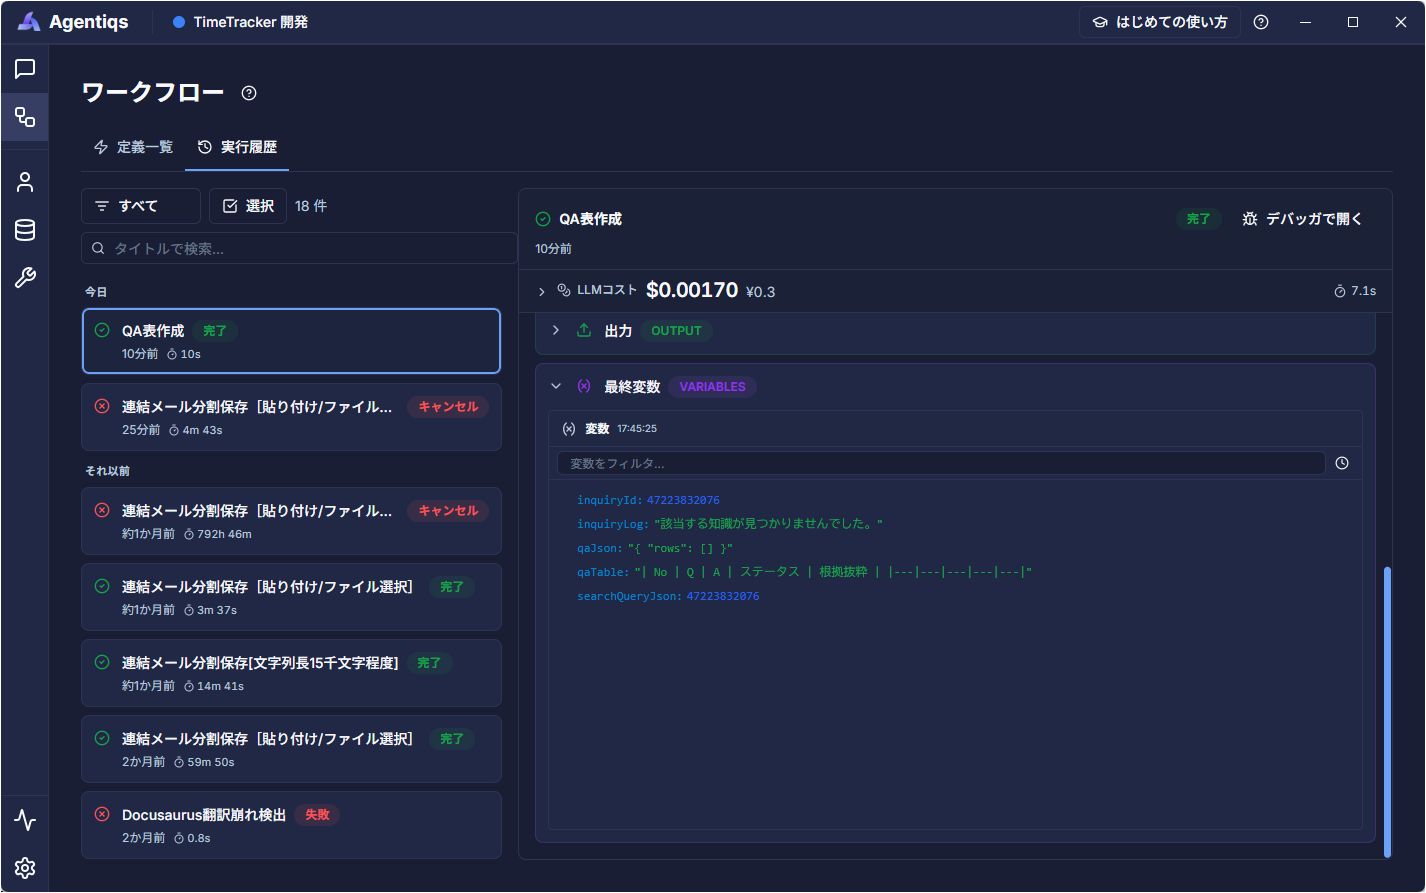
Viewing Variables in the Workflow After Completion
You can check variable values after completion. You can reference the contents at the time execution completed, including variables that were not explicitly output.
Running Automatically on a Schedule
Workflows that run repeatedly, such as periodic information gathering or aggregation, can be scheduled for automatic execution.
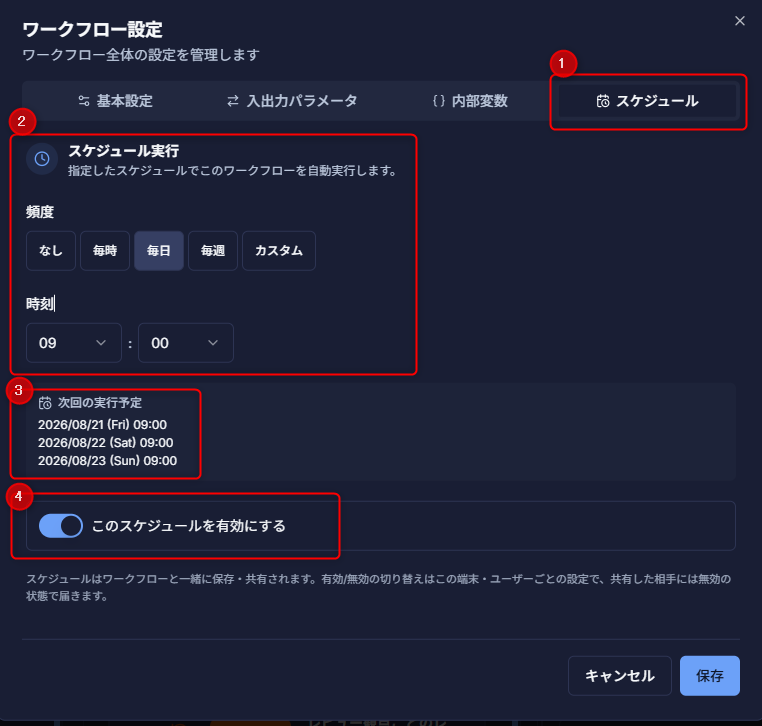
- Open the target workflow, then open [Schedule] in the workflow settings. (image ①)
- Add a schedule and configure the following. (image ②)
- Execution interval from [Hourly], [Daily], [Weekly], or [Custom]
- Execution time
Check the next scheduled execution shown on the screen. (image ③) - Enable the created schedule. (image ④)
- After automatic execution, check the results in notifications, unread indicators, or [Execution History].
- Automatic execution runs in the environment of the user who enabled the schedule.
- Schedules received from a shared workspace are disabled. Only the user responsible for execution should enable them.
Debugging the Workflow
If a workflow does not behave as expected, use debug mode to isolate the step where the problem occurs. You can pause execution at breakpoints and run the workflow step by step while checking or changing variable values.
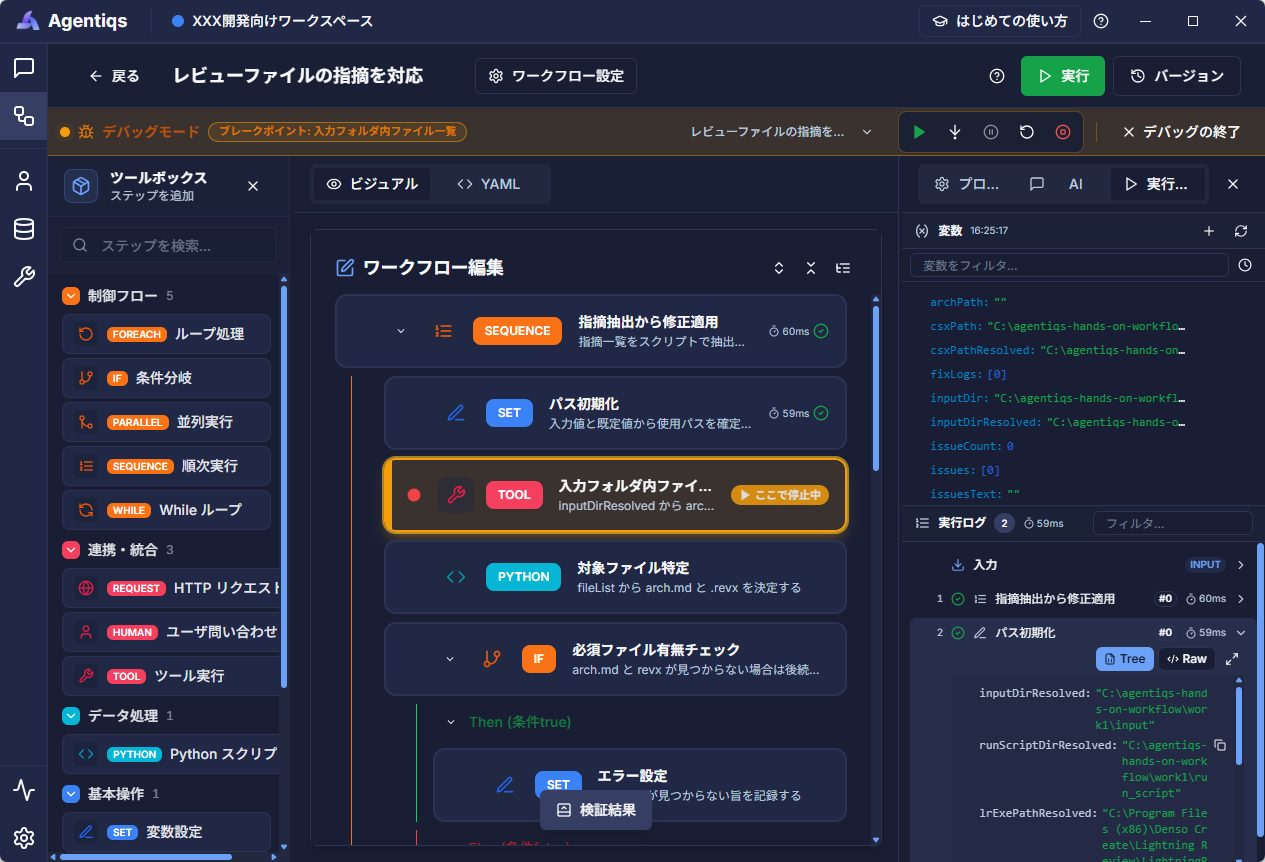
- Click the "Debug" button on the workflow editing screen.

- Set breakpoints on the steps where you want to stop before execution.
- Start a debug run.
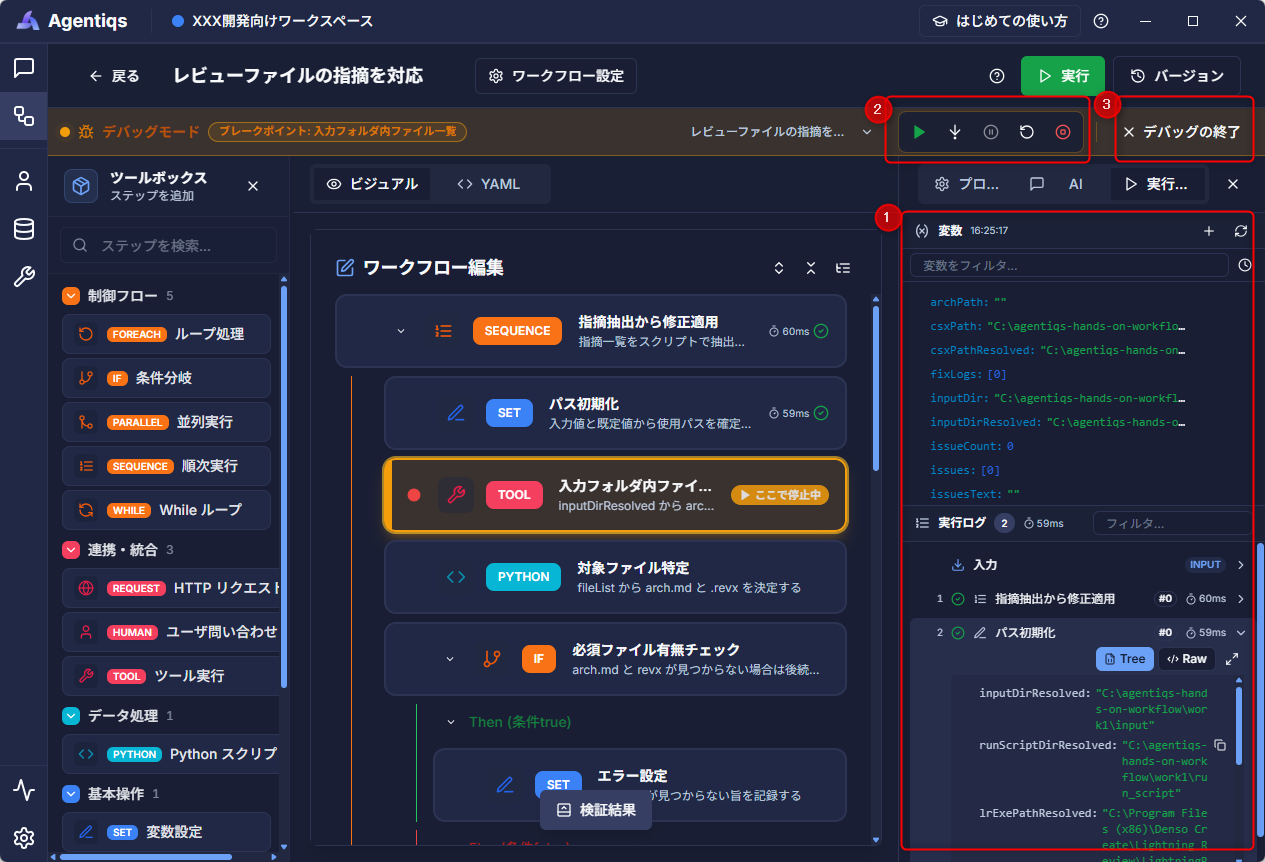
- When execution stops at a breakpoint, check the state.
-
- Check values in the variable pane and execution logs.
-
- Modify variables as needed, then select [Continue], [Step], [Rerun], or [Stop].
-
- To end debugging, click "End Debugging".
End the session while debugging is stopped.Even if you exit debug mode, the workflow continues running.
-
Reference: Parameters per Step
The configuration parameters for each step, especially tool execution, require consideration of the interface and tool implementation, so they are expected to be configured through interaction with AI.
See "Reference" for points to keep in mind when editing workflows.
Loop
Processes each item in a list.
Configuration Parameters
| Name | Required | Description |
|---|---|---|
| Iteration Target | Yes | Expression for the target to iterate over |
| Item Variable | Variable name that stores each item | |
| Parallelism | Degree of parallelism (sequential when set to 1) | |
| Maximum Executions | Maximum number of executions | |
| Iteration Method | Options: "List (simple list)", "Tree (hierarchical structure)" | |
| Child List Property Name | Property name of the child item list | |
| Variable Name for Parent Element | Variable name that stores the parent element | |
| Maximum Recursion Depth | Maximum recursion depth (unlimited if null) | |
| Hierarchy Traversal Method (Depth-first/Breadth-first) | Options: "DepthFirst (depth-first)", "BreadthFirst (breadth-first)" |
Conditional Branch
Branches processing based on conditions.
Configuration Parameters
| Name | Required | Description |
|---|---|---|
| Condition Expression | Yes | Expression evaluated as a boolean |
Parallel Execution
Runs multiple steps in parallel.
Configuration Parameters
| Name | Required | Description |
|---|---|---|
| Parallelism | Maximum number of processes to run simultaneously |
Sequential Execution
Runs multiple steps in order.
Configuration Parameters None
While Loop
Repeats processing while the condition is true.
Configuration Parameters
| Name | Required | Description |
|---|---|---|
| Condition Expression | Yes | Loop continuation condition (repeat while true) |
HTTP Request
Sends an HTTP request to an external API.
Configuration Parameters
| Name | Required | Description |
|---|---|---|
| Method | Yes | HTTP method |
| URL | Yes | Request destination URL |
| HTTP Headers | Dictionary of HTTP headers (JSON format) | |
| Body | Request body (JSON format) | |
| Store Result In | Dictionary of response destination variable names and values (JSON format) |
User Inquiry
Queries the user during workflow execution and uses the answers in subsequent steps.
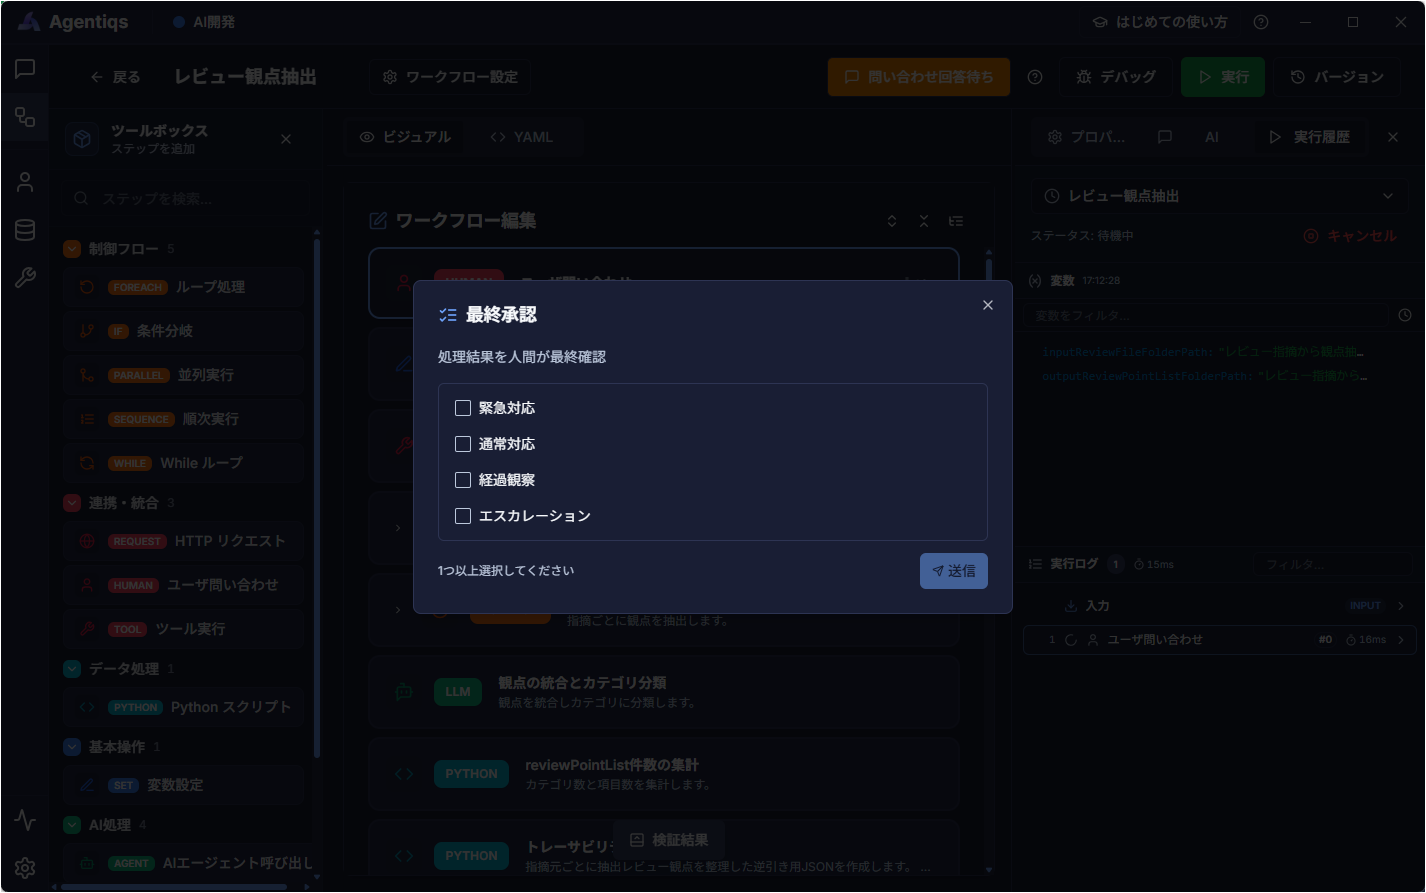
It supports approval, free text, single selection, and multiple selection.
Configuration Parameters
| Name | Required | Description |
|---|---|---|
| Inquiry Type | Yes | Options: "Approve (Reject, Approve)", "FreeText (Text Input)", "SingleSelect (Single Selection)", "MultiSelect (Multiple Selection)" (※) |
| Inquiry Title | Title displayed in the inquiry dialog | |
| Inquiry Description | Description displayed in the inquiry dialog | |
| Output Variable | Yes | Workflow variable name where the result is stored |
| Initial Value | Default value or expression used as the initial value |
※ About "Inquiry Type"
-
You can specify the options as a fixed enumeration or as an expression that references a workflow variable.
-
By using single selection or multiple selection to fix the response format, you can prevent conditional branch failures caused by variations in free-text input.
Python Script
Executes Python code.
Configuration Parameters
| Name | Required | Description |
|---|---|---|
| Python Code | Yes | Python code to execute |
| Timeout (seconds) | Execution timeout in seconds (1–3600; default is 1000 if unspecified) | |
| Success Flag Variable | Yes | Variable name that stores execution success (true/false). If specified, the workflow continues even if an error occurs. |
Set Variables
Sets values in variables.
Configuration Parameters
| Name | Required | Description |
|---|---|---|
| Assignment | Yes | Dictionary of variables and values to assign (JSON format) |
| Variable Set Method | Options: "Overwrite", "Add" |
Call AI Agent
Calls a registered AI agent by name.
Configuration Parameters
| Name | Required | Description |
|---|---|---|
| Agent Name | Yes | Name of the AI agent to call |
| AI Model Name | AI model (model ID) | |
| System Prompt | System prompt that gives the model its role | |
| User Message | Yes | User message sent to the agent |
| Store Result In | Variable name that stores the generated result |
AI Conditional Branch
Branches based on a condition judged by AI.
Configuration Parameters
| Name | Required | Description |
|---|---|---|
| AI Model Name | AI model (model ID) | |
| System Prompt | System prompt sent to the LLM. If not specified, the base system prompt is used. | |
| User Message | Yes | User message sent to the LLM |
Knowledge Search
Searches a registered knowledge base.
Configuration Parameters
| Name | Required | Description |
|---|---|---|
| Knowledge Name | Yes | Name of the knowledge base to search |
| Search Query | Yes | Query string used for the search |
| Maximum Results | Maximum number of results to retrieve (1–100) | |
| Store Result In | Variable name that stores the search results |
Call LLM
Runs a basic LLM generation.
Configuration Parameters
| Name | Required | Description |
|---|---|---|
| AI Model Name | AI model (model ID) | |
| System Prompt | System prompt that gives the model its role | |
| User Message | Yes | User message sent to the LLM |
| Store Result In | Variable name that stores the generated result |
Execute Tool
Runs a tool function.
Configuration Parameters
| Name | Required | Description |
|---|---|---|
| Tool Name | Yes | Name of the tool to call |
| Function Name | Yes | Name of the function to execute |
| Parameters | Key/value parameters passed to the function | |
| Store Result In | Variable name that stores the execution result | |
| Success Flag Variable | Variable name that stores execution success (true/false). If specified, the workflow continues even if an error occurs. |