Quick Start
This page explains the steps for first-time Agentiqs users, along with the quickest route to get started and experience its value in a short time.
Agentiqs is not just a tool for chatting with AI.
By combining knowledge, AI agents, workflows, and external tool integrations, you can use business files and development tools to support deliverable creation, reviews, and improvement activities.
If this is your first time using Agentiqs, we recommend first completing the basic setup and verifying operation through chat, then using the sample data to experience the full value of Agentiqs.
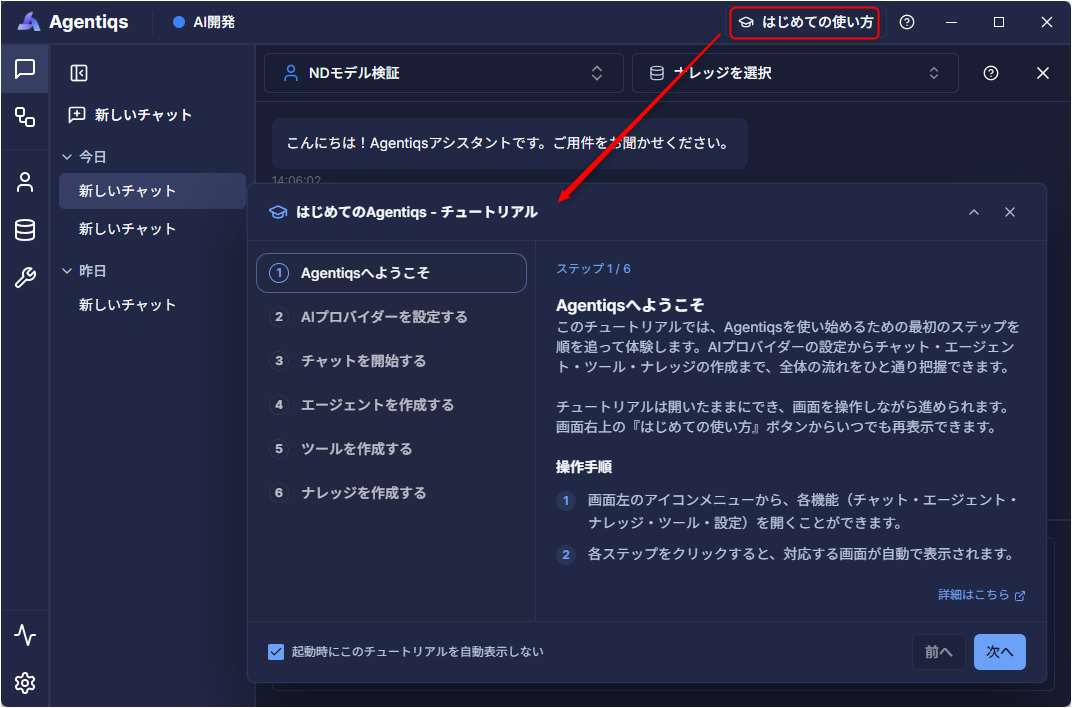
From the Help menu in the upper-right corner of the Agentiqs screen, you can open a tutorial dialog in the app that walks you through the same flow as this page.
This is useful when you want to follow along while keeping the chat open.
What you can learn on this page
On this page, you can review the following flow:
- Prepare the environment for using Agentiqs
- Verify operation by chatting with AI
- Handle business data using files and knowledge
- Experience Agentiqs through AI agents and workflows
- Move on to your own business files and development tool integrations
Things to check first
Before you begin, check which of the following applies to you.
| Usage status | First step |
|---|---|
| You configure the AI provider yourself | Start from "1. Set up the environment" |
| An administrator has provided a preconfigured environment | Start from "2. Chat with AI" |
| You want to verify Agentiqs' value in an evaluation version | After basic setup, go to "5. Experience the value of Agentiqs" |
| You want to try it with your own files | First verify with sample data, then go to "7. Try with your own business files" |
| You want to check integration with Next Design, Lightning Review, or TimeTracker | After basic operation checks, go to "8. Experience DENSO CREATE product integrations" |
Getting started with Agentiqs
The basic flow for getting started with Agentiqs is as follows.
- Prepare the environment
- Verify operation by chatting with AI
- Customize AI for your business
- Share settings and reuse them within the team
- Try it out with sample data
- Experience the value of Agentiqs
- Try it with your own business files and development tools
- Integrate DENSO CREATE products
1. Set up the environment
First, prepare the environment needed to use AI in Agentiqs.
If an administrator has already provided a configured environment, this step is not necessary.
In that case, proceed to "2. Chat with AI."
What to do
- Configure the AI provider
- Select the AI model to use
- Set the API key and connection information if needed
- Make the AI available from the chat screen
Next page
Completion criteria
This step is complete if you can confirm the following:
- An AI provider is registered
- You can select the AI model to use
- You can ask the AI questions from the chat screen
2. Chat with AI
Next, ask the AI questions in the chat screen and confirm that Agentiqs works properly.
What to do
- Start a new chat
- Ask the AI simple questions
- Switch models if needed
- Attach a file and ask the AI to summarize it
Example question to try first
Briefly explain what Agentiqs can do, for someone using it for the first time.
If you can attach files, also try the following:
Please summarize the content of the attached file from the following perspectives.

- Purpose
- Key points
- Unclear points
- What to check next
Next page
Completion criteria
This step is complete if you can confirm the following:
- You can receive a response from the AI
- You can select a model as needed
- You can attach a file and inspect its contents
3. Customize the AI
After you can do basic chat, customize the AI to match your work.
In Agentiqs, you can configure the purpose, role, reference information, and output format of an AI agent so you can use an agent suited to a specific task.
What to do
- Select an AI agent
- Review the system prompt
- Specify knowledge sources
- Specify tools to use if needed
- Configure the output format and response policy
Example usage to try first
You are a design review specialist.
Please check the attached design document from the following perspectives.

- Whether there are any ambiguous statements
- Whether terminology is used consistently
- Whether there are statements that are difficult to test
- Whether any prerequisites are missing
Next page
Completion criteria
This step is complete if you can confirm the following:
- You can select an AI agent
- You can change the AI role according to the objective
- You can specify knowledge and tools
4. Share settings
When using Agentiqs as a team, share the settings you have created.
By sharing AI agents, knowledge, and workflows, the entire team can use the same settings instead of each person working separately.
What to do
- Confirm which settings should be shared
- Use a shared workspace
- Make sure team members can use the same AI agents and workflows
Next page
Completion criteria
This step is complete if you can confirm the following:
- You understand how to share settings
- You have organized the settings the team will reuse
- You have confirmed the policy for using the shared workspace
5. Experience the value of Agentiqs
At this point, you are ready to start using Agentiqs.
However, chat and basic settings alone do not fully show the value of Agentiqs.
What makes Agentiqs stand out is that it combines business files, knowledge, AI agents, workflows, and external tool integrations so you can build AI into business processes.
For your first evaluation, we recommend using sample data to experience the following:
- Have AI read business documents
- Use knowledge to generate answers
- Perform reviews and analysis with specialized AI agents
- Standardize processes with workflows
- Export the results to Excel, Lightning Review, Next Design, and more
Recommended experience courses
| Purpose | Recommended course | Estimated time |
|---|---|---|
| Experience how Agentiqs differs from ordinary AI chat | Experience the value of Agentiqs | 90 min |
| Try it with your own files | Try it with your own business files | 90 min |
| Check integration with Next Design, Lightning Review, or TimeTracker | Experience DENSO CREATE product integrations | 90–120 min |
6. Use sample data
For the evaluation version or at an early stage of adoption, we recommend starting with sample data.
Sample data includes input files, knowledge, AI agents, and workflows, so you can quickly verify representative Agentiqs functions.
What you can verify with the sample data
- Document search using knowledge
- Generating meeting minutes and documents
- Generating test items from design documents
- Reviewing design documents based on review points
- Integration with Next Design
- Registering review findings in Lightning Review
- Automating processing with workflows
Next page
Completion criteria
This step is complete if you can confirm the following:
- You have placed the sample data
- You can import the sample settings
- You can execute the sample workflow
- You can check the output results
7. Try with your own business files
After you have confirmed the value of Agentiqs with sample data, try it with your own business files.
If you start with a large number of files or complex business flows, the validation scope can become too broad.
For the first attempt, keep the target small and narrow.
Recommended starting conditions
| Item | Recommendation |
|---|---|
| Theme | Focus on one theme |
| Input files | 1–3 files |
| Document volume | About 10–30 pages |
| Review viewpoints | 3–5 items |
| Output destination | Verification files |
| Workflow | Reuse an existing sample |
What to avoid at first
- Registering many files at once
- Combining materials from multiple departments or processes
- Targeting an entire unorganized folder
- Making large changes to the workflow from the start
- Directly updating production data or production tools
- Trying it without deciding on an evaluation theme
Next page
Try it with your own business files
8. Experience DENSO CREATE product integrations
If you use Next Design, Lightning Review, or TimeTracker, you can experience integration with Agentiqs.
With DENSO CREATE product integrations, you can confirm Agentiqs' value in supporting design, reviews, project management, and improvement activities across processes.
What you can experience
| Integration target | What you can experience |
|---|---|
| Next Design | Read design models, review them, generate test cases |
| Lightning Review | Register review findings extracted by AI and organize the details of findings |
| TimeTracker | Check effort and load data, and consider improvement actions |
Recommended approach
- First verify basic operations and sample data in Agentiqs
- Run a sample that uses Next Design or Lightning Review
- Check TimeTracker integration if needed
- Try it with your own design data and review records
Next page
Experience DENSO CREATE product integrations
Where to go next
Proceed to the next page based on your purpose.
| Situation | Next page |
|---|---|
| Basic setup is not yet complete | Set up the AI provider |
| You want to verify chat operations | Chat with AI |
| You want to use AI agents and knowledge | Customize the AI |
| You want to try sample data | Sample data |
| You want to experience the value of Agentiqs in a systematic way | Experience the value of Agentiqs |
| You want to try it with your own files | Try it with your own business files |
| You want to try DENSO CREATE product integrations | Experience DENSO CREATE product integrations |
| You want to build it out to match your business | How-to guide |
| You want to see details of tool integrations | Tools list |
For evaluation users
For evaluation users, we recommend first confirming that something works.
If you start with your own business data or complex workflows, setup and data organization can take time, and you may get stuck before you can confirm Agentiqs' value.
The recommended flow is as follows:
Basic setup
↓
Verify operation via chat
↓
Experience the value of Agentiqs with sample data
↓
Try it on a small scale with your own business files
↓
Consider full-scale business adoption
Start with one of the following courses:
- If you want to quickly understand Agentiqs' value: Experience the value of Agentiqs
- If you want to evaluate Agentiqs end to end: Agentiqs evaluation guide