Configure a Custom AI
This page explains how to customize Agentiqs AI for different use cases. By configuring knowledge and agents, you can make AI responses more accurate and practical.
Create Knowledge
Turn FAQs, user manuals, internal specifications, databases, and other materials into knowledge so the AI can reference them when answering.
The following steps show how to create knowledge in Agentiqs.
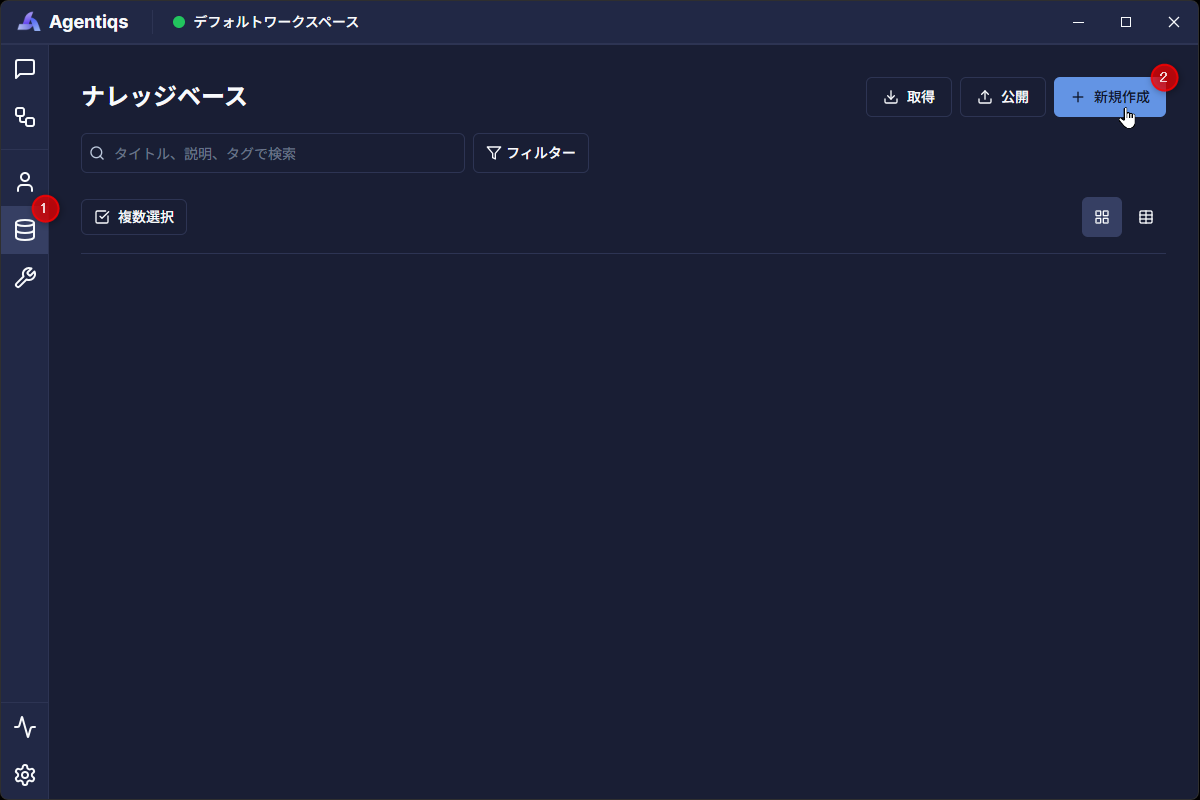
- Click [Knowledge] > [Create New].
- Knowledge is created and the settings screen opens.
- Enter the required items in the settings parameters, then click [Save].
- The knowledge settings are saved.
Basic Parameters
[Overview]
- Title: Set the knowledge title. Because it is used as a key when knowledge is used from chat, enter a title that matches the content.
- Description: Set the knowledge description. Because it is used as a key when knowledge is used from chat, enter a description that matches the content.
[Index] > [File Settings]
- Target file extensions: Specify the file types to convert into knowledge. If you specify extensions as a comma-separated list, only files with the matching extensions are included.
- Exclusion pattern: Specify files to ignore. Files and folders that match the glob rules you define are excluded from knowledge processing.
[Index] > [Search Settings]
- Search limit (items): Specify the maximum number of search results to display. (Default: 30)
- Relevance threshold: Specify the minimum relevance value for search results. Values of 0.7 or higher broaden the range of semantically similar results that are returned. (Default: 0.7)
[Data]
- Root directory: Even when the clone destination directory differs for each user, adjusting the root directory helps prevent data mismatches and makes index updates more likely to run correctly.
- Add data: Add data to convert into knowledge by selecting files or folders.
In list views, you can switch display modes, group by category, and pin items.
For details, see "Organize agent and other lists".
The following document formats can be ingested as knowledge (you can also filter by extension):
- Text files: .txt, .md, and others
- Office documents: .docx, .pptx, .xlsx
- PDF files
- Source code files (any language)
- Next Design projects: .nproj
Try creating and using knowledge manually. A detailed walkthrough of the creation process is provided in [How-to Guide] - [Use Knowledge]. This also helps promote knowledge adoption.
Information to ingest into knowledge
Information inside Office documents and PDFs
When you register Excel, PDF, Word, or PowerPoint files as knowledge, the following types of documents can be ingested.
| Elements inside a document | Ingestion result |
|---|---|
| Excel grid paper | Parses merged cells and many narrow columns, then converts them into text while preserving column relationships. |
| PDF tables drawn with ruled lines | Recognizes ruled-line areas as tables. |
| Office AutoShapes | Ingests the shapes and the text inside them. |
If search or answer quality in an existing knowledge base is not as expected, update the index and reanalyze the document.
Images inside documents
If you want the AI to read the contents of images included in documents as well, enable the setting for each knowledge base.
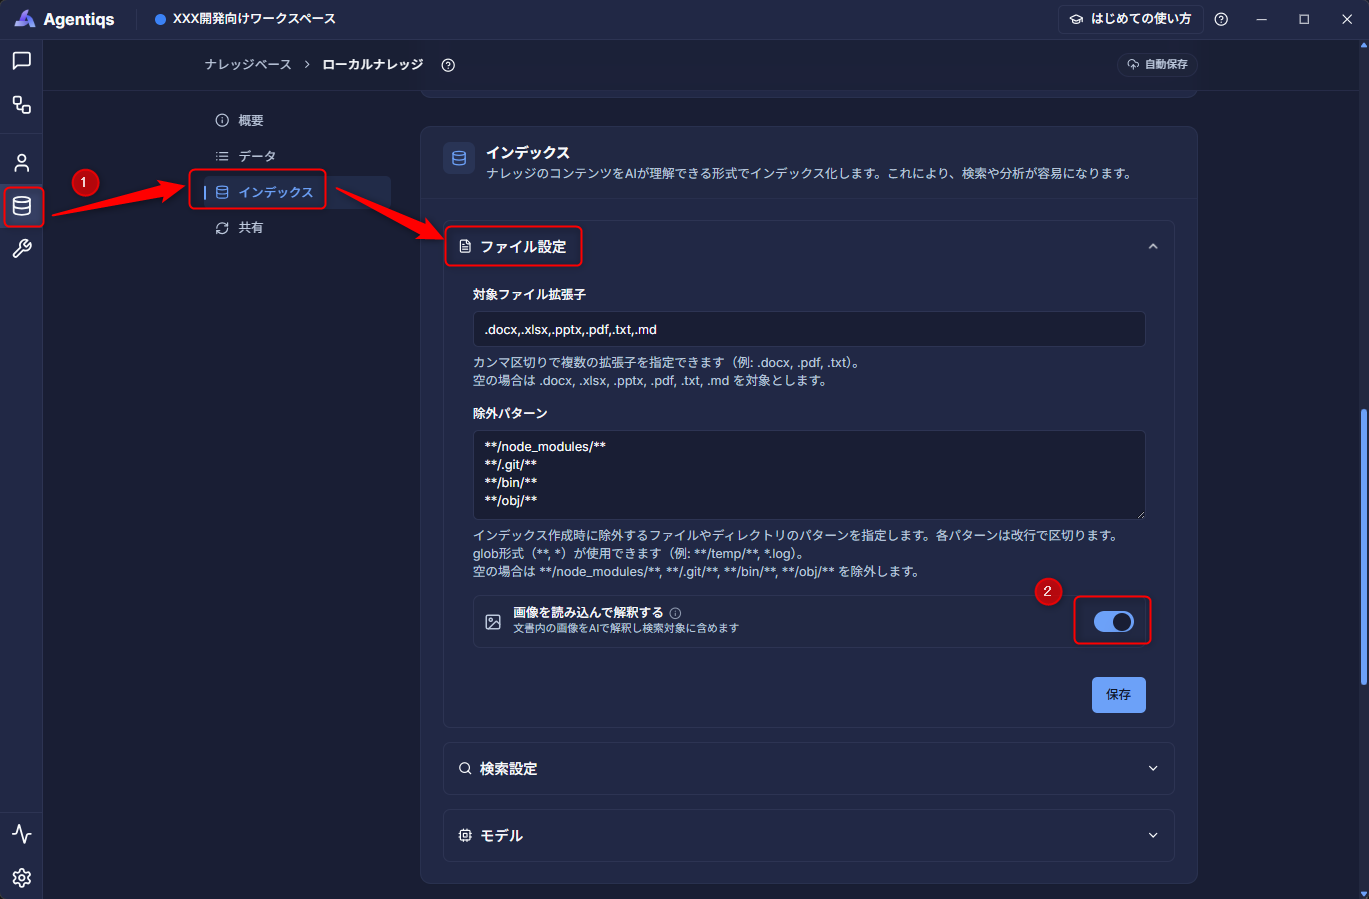
- Open the target local knowledge base.
- Open [Index] > [File Settings]. (Image 1)
- Turn on [Read and interpret images] and save. (Image 2)
- If you want to apply this to documents that are already registered, update the index.
- Make sure all target data is visible. Hidden sheets, rows, and columns are not ingested.
- When interpreting images inside documents, configure an AI provider that supports multimodal models.
Sequence Diagrams
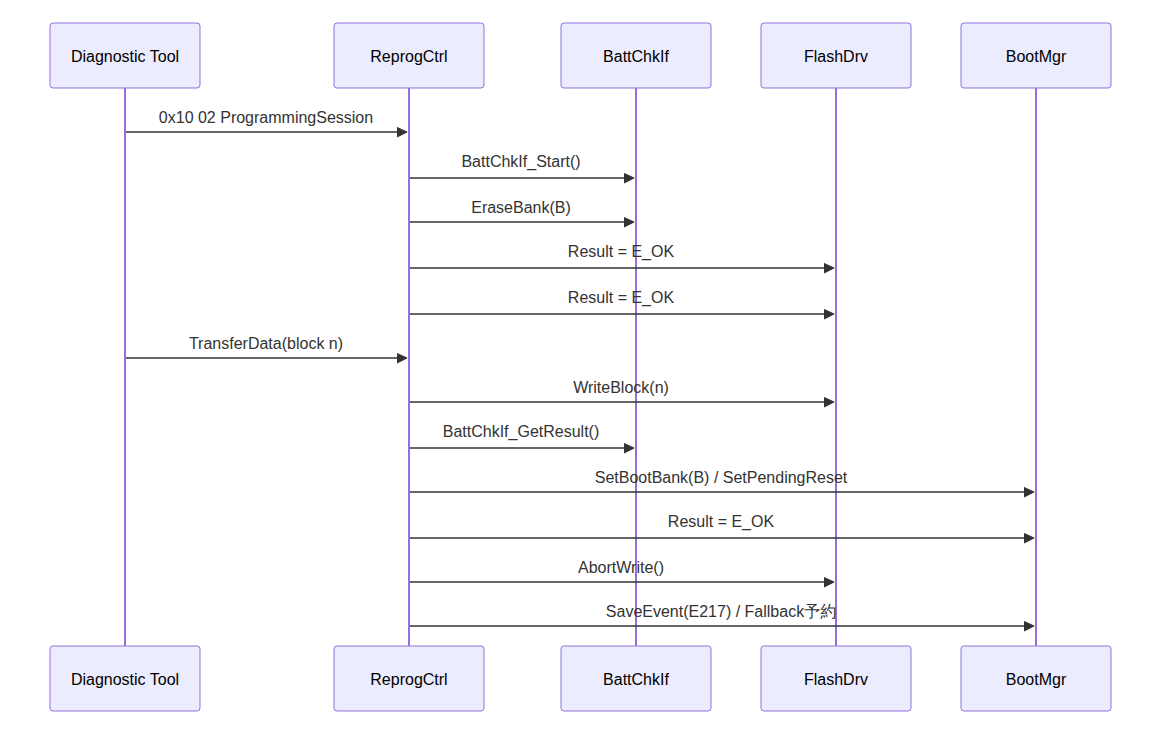
Sequence diagrams included in Office documents are converted into "PlantUML structured text" and interpreted by the AI agent.
- Diagrams drawn with AutoShapes, diagrams drawn with cell borders in graph-paper-style Excel sheets, and diagrams that combine both are all converted.
- No special steps are required; the conversion is applied automatically when the target document is registered as knowledge.
Notify users of the knowledge ingestion status
A badge indicating the knowledge settings and status is displayed.
| Normal state | Index update required | Error present |
|---|---|---|
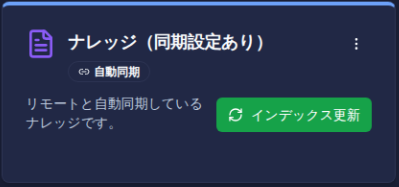 | 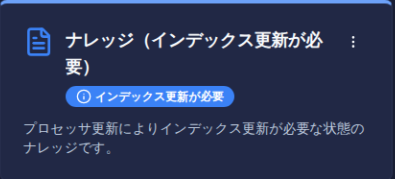 Only files that need updating are reanalyzed. | 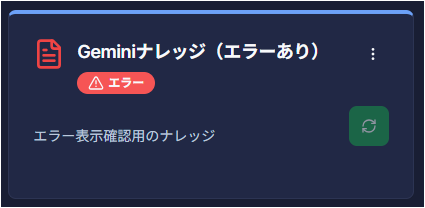 Please resolve the error first. |
Notes on using knowledge
-
About knowledge creation fees:
- AI model usage fees start when you select data to convert into knowledge in [Add Data].
- Fees vary depending on the AI model you use and the amount of data ingested.
- Approximate example: about 1 yen/MB (when using the AI model
text-embedding-ada-002)
- Approximate example: about 1 yen/MB (when using the AI model
- The AI model used is the one specified in "Select the search model for knowledge and chat history".
-
About index updates:
- If you replace specifications or other documents that have already been converted into knowledge with their latest versions, the changes may not be reflected in search results until you run [Index Update].
- AI model usage fees may also apply when updating the index.
Create an AI Agent
By predefining the role, tone, and the tools and knowledge to use, you can get consistent answers without having to fine-tune the prompt every time.
The following steps show how to create an AI agent in Agentiqs.
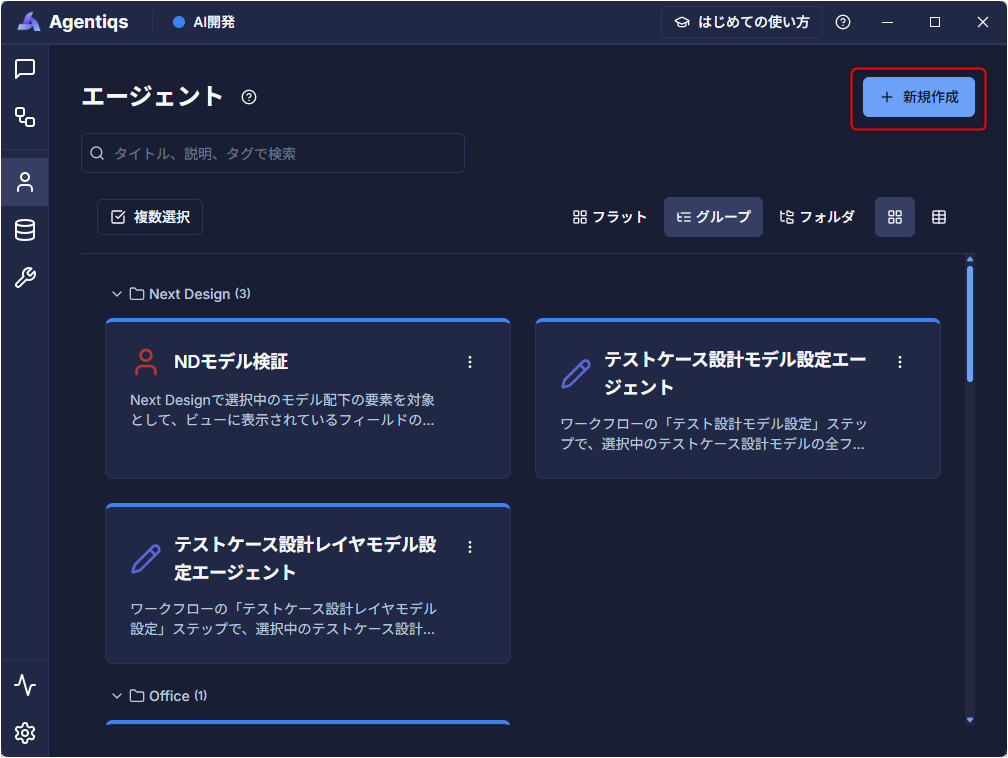
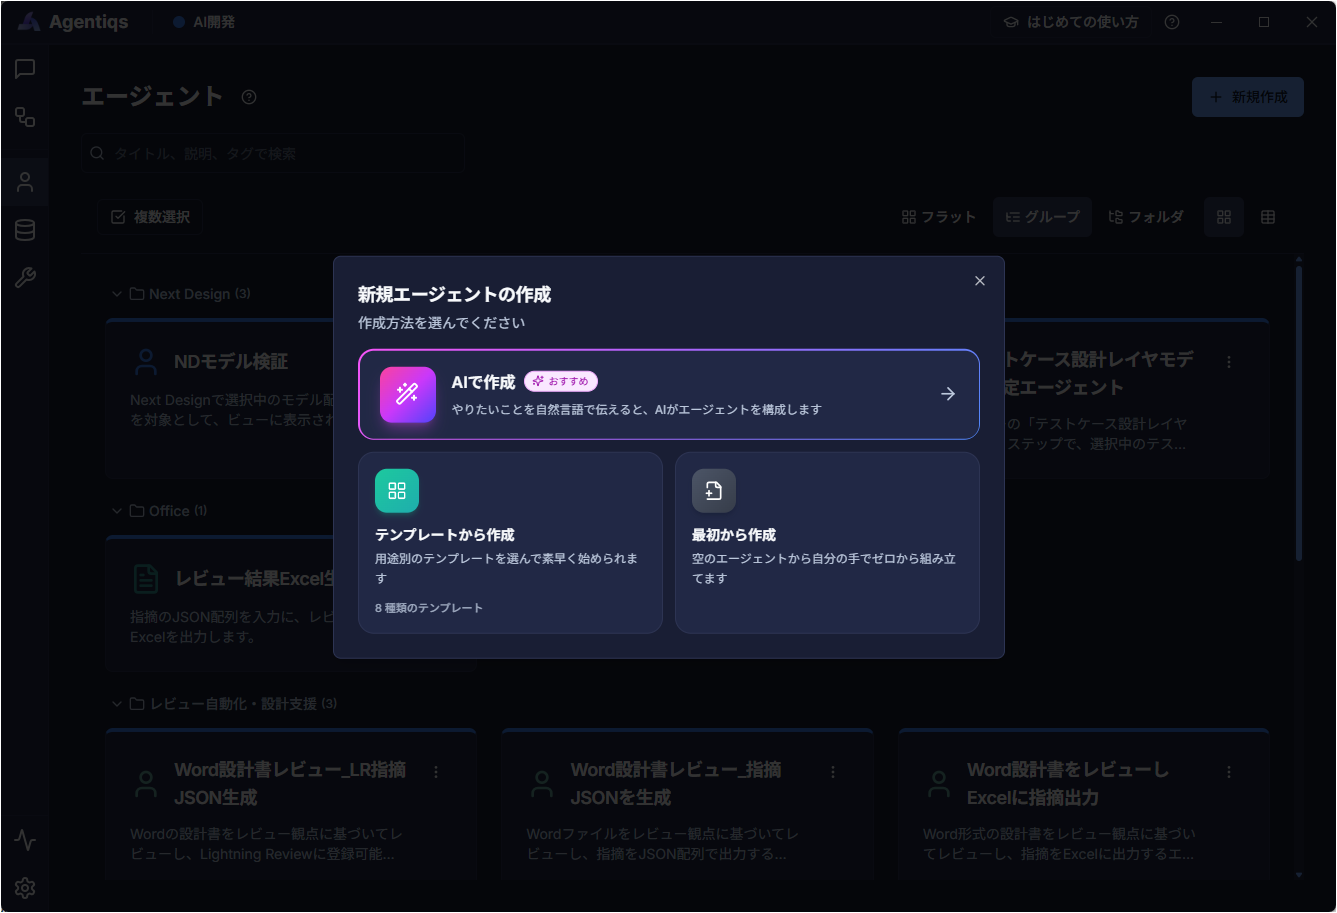
- Click [Agent] > [Create New].
- Creation method options are displayed.
- Select a creation method.
- [Create with AI]: Opens the screen where you enter what you want to build (see the next section for details).
- [Create from Gallery]: Displays the [Agent Gallery]. Select an agent to use as the base, and the agent settings screen appears.
- [Create from Scratch]: Creates an empty agent with no settings configured.
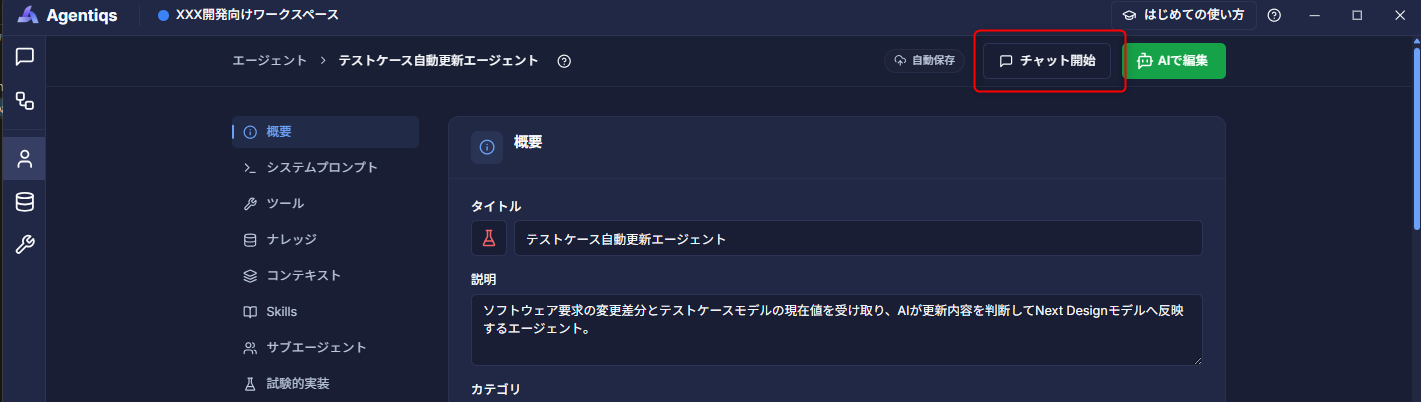
Click [Start Chat] to open the chat screen.
In the AI agent list, you can switch display modes, group by category, and pin items.
For details, see "Organize agent and other lists".
Create with AI
The following steps explain how to tell the AI what you want to build and have it generate an agent automatically.
- Enter a description of the agent you want to create as the initial prompt.
- Select the AI model to use.
- Click [Start Creation].
Creating AI agents manually deepens your understanding of the content and enables continuous improvement.
[How-to Guide] - [Create a Review-Focused AI Agent] provides a detailed walkthrough of the creation process.
The following benefits can be expected, so try creating one end to end.
- You can understand the content of AI-generated agents, preventing them from becoming black boxes.
- You can improve efficiency by splitting responsibilities, such as using AI for the overall structure and humans for the details.
Basic Settings
The key configuration values for setting up an AI agent are as follows.
System Prompt
- Instructions passed to the AI when chat starts.
- Defines the agent's role, response policy, and output format (for example, bullet lists or templates).
Knowledge
- Select the knowledge the agent should reference from the knowledge you have already created.
- When you select knowledge, [Use Knowledge] is automatically turned on.
- For how to create knowledge, see "Create Knowledge".
Tools
There are two main categories of settings.
System Tools
File Access / Command Execution
By enabling these features, the agent can use them from the working folder.
- For details about working folders, see "Set Up Work Folders".
- For details about each feature, see "File Access" and "Command Execution".
Image Generation
AI agents with image generation enabled can generate conceptual diagrams and visual mockups in chat.
Generated images are attached to the chat and can be downloaded.
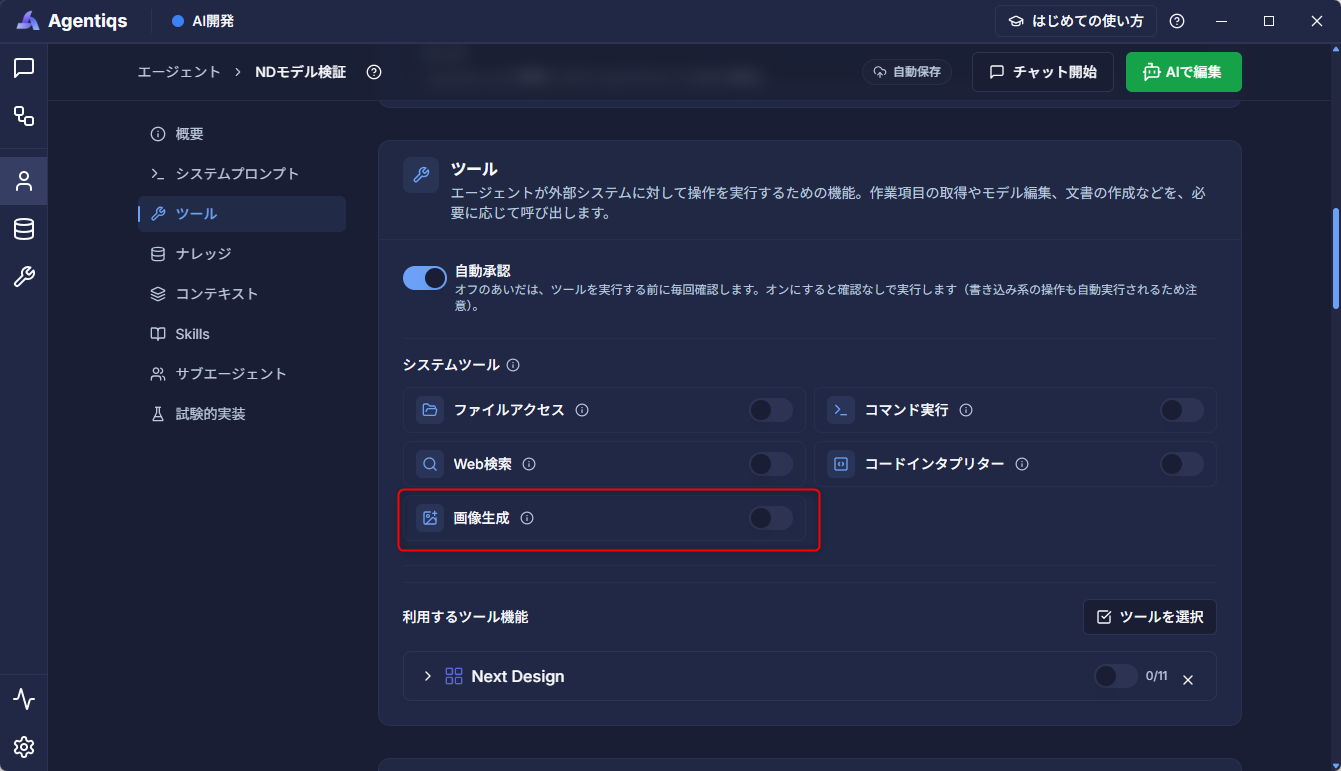
Set up an AI provider that can use an image generation model in advance. For how to configure the model, see "Provider Priority and Models by Purpose".
- Only one image is generated per request.
Web Search
Adds web search capabilities to the agent. The agent can converse based on information gathered from web search in addition to what the model has learned.
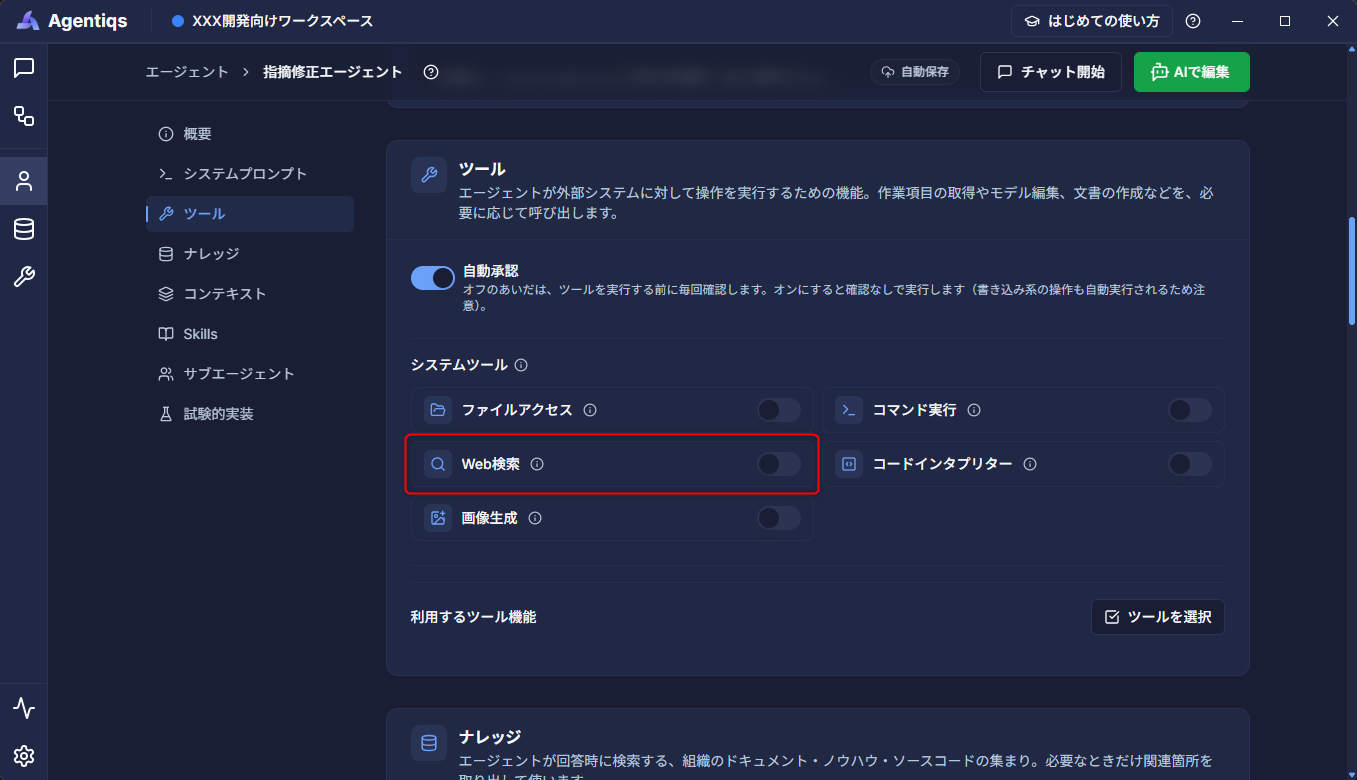
- Anthropic models (Claude) do not support web search. Please use a different model.
- Gemini has web search enabled by default, so it cannot be toggled on or off with this switch.
- Web search results are not shown in the chat tool call results. Check the text of the chat response itself.
Code Interpreter
Allows the agent to create the scripts needed to complete tasks and run them in a secure virtual environment.
Because it answers based on the script execution results, you get accurate and reliable results rather than inference alone.
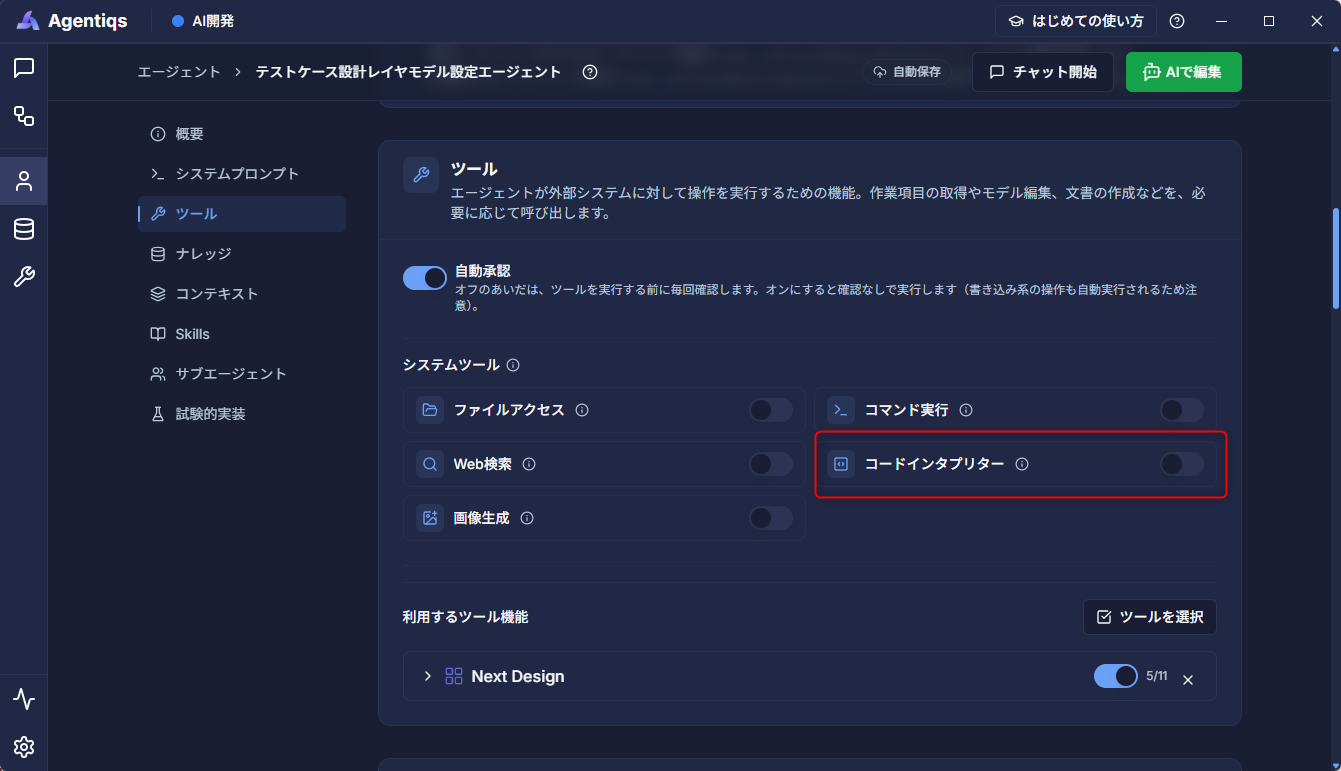
- Anthropic models (Claude) do not support the code interpreter. Please use a different model.
- The results of command execution are not shown in the chat tool call results. Check the text of the chat response itself.
- Because it runs separately from chat, the usage fee is billed separately from the amount used in chat.
For details, see the OpenAI pricing page.
Tools to Use
- Select the tools the agent can use from the tools you have already created.
- To create a new tool, see "Integrate with External Tools".
- When running tools from chat, you can configure whether confirmation (approval) is required before execution.
- When this is OFF, approval is requested every time a tool is executed, and the user must approve each execution.
Turn this OFF when you are dealing with high-impact operations such as file creation or updates, or when you want to review the AI's judgment before proceeding.
- When this is OFF, approval is requested every time a tool is executed, and the user must approve each execution.
Configure the agent's appearance
Setting the agent icon and color makes it easier to find the target agent in list views.
If you standardize the appearance by role, team, or use case, it becomes easier to distinguish multiple agents.
Open the target AI agent and select the icon and color you want to use from the details screen.
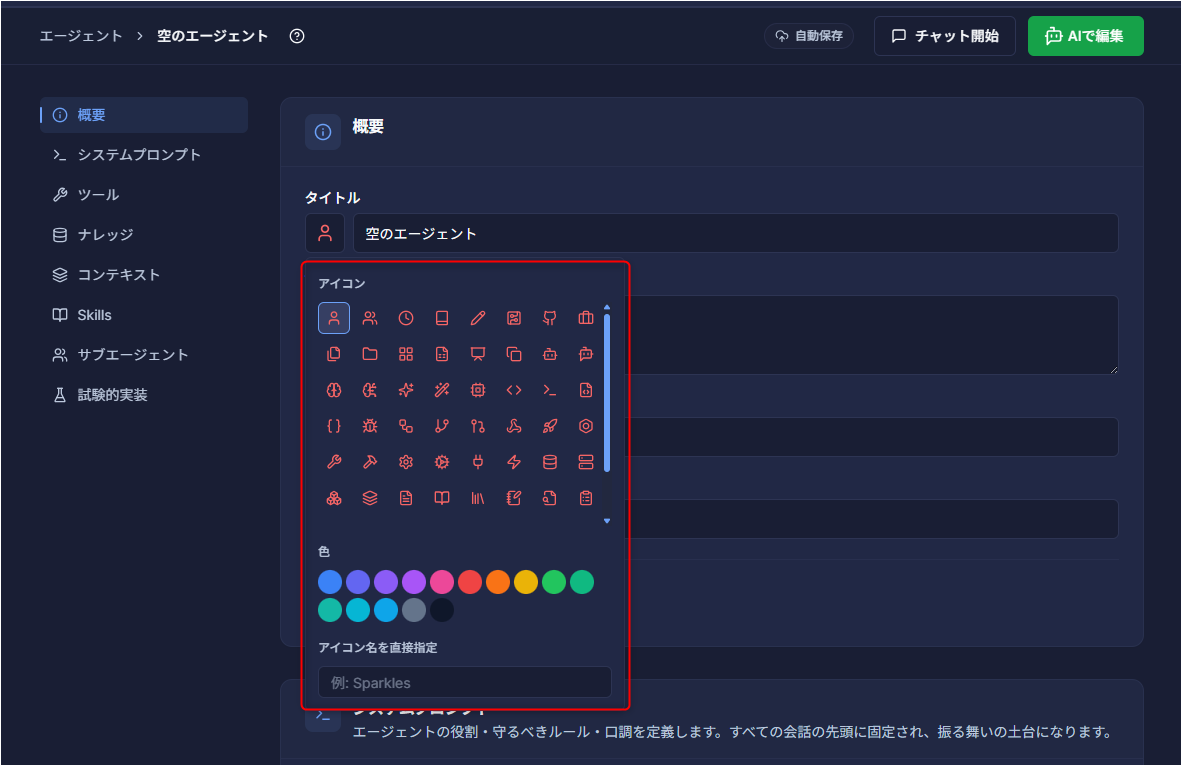
Tools and knowledge can also have icons and colors set in the same way.
If related agents, tools, and knowledge use the same color, it is easier to understand their relationships in list views.
Advanced Settings
Context
- A setting intended to inject dynamic information into the prompt before LLM interaction.
- At this stage, the default settings are expected to be used as-is.
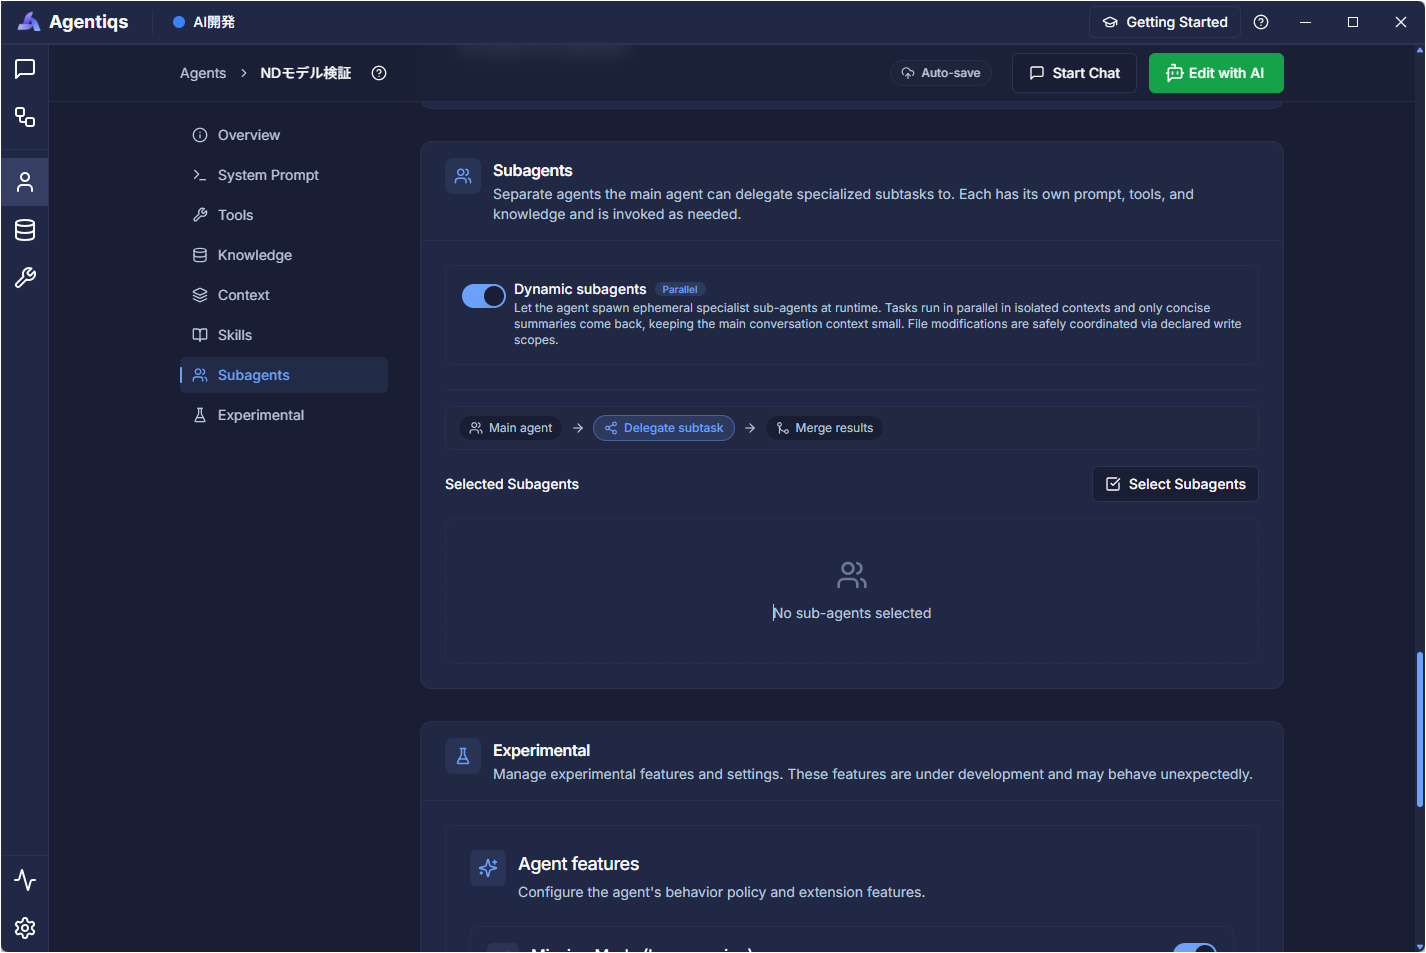
Subagents
- A setting for running LLM interactions that combine multiple agents.
This is useful when you need to combine a wide range of specialized knowledge. - If predictability and reproducibility of results are important, use the [Workflow] feature instead.
With dynamic subagents, the parent agent creates temporary specialist agents based on the request content during the conversation and delegates the work.
- This is useful when you want to investigate multiple perspectives independently or perform time-consuming processing in parallel.
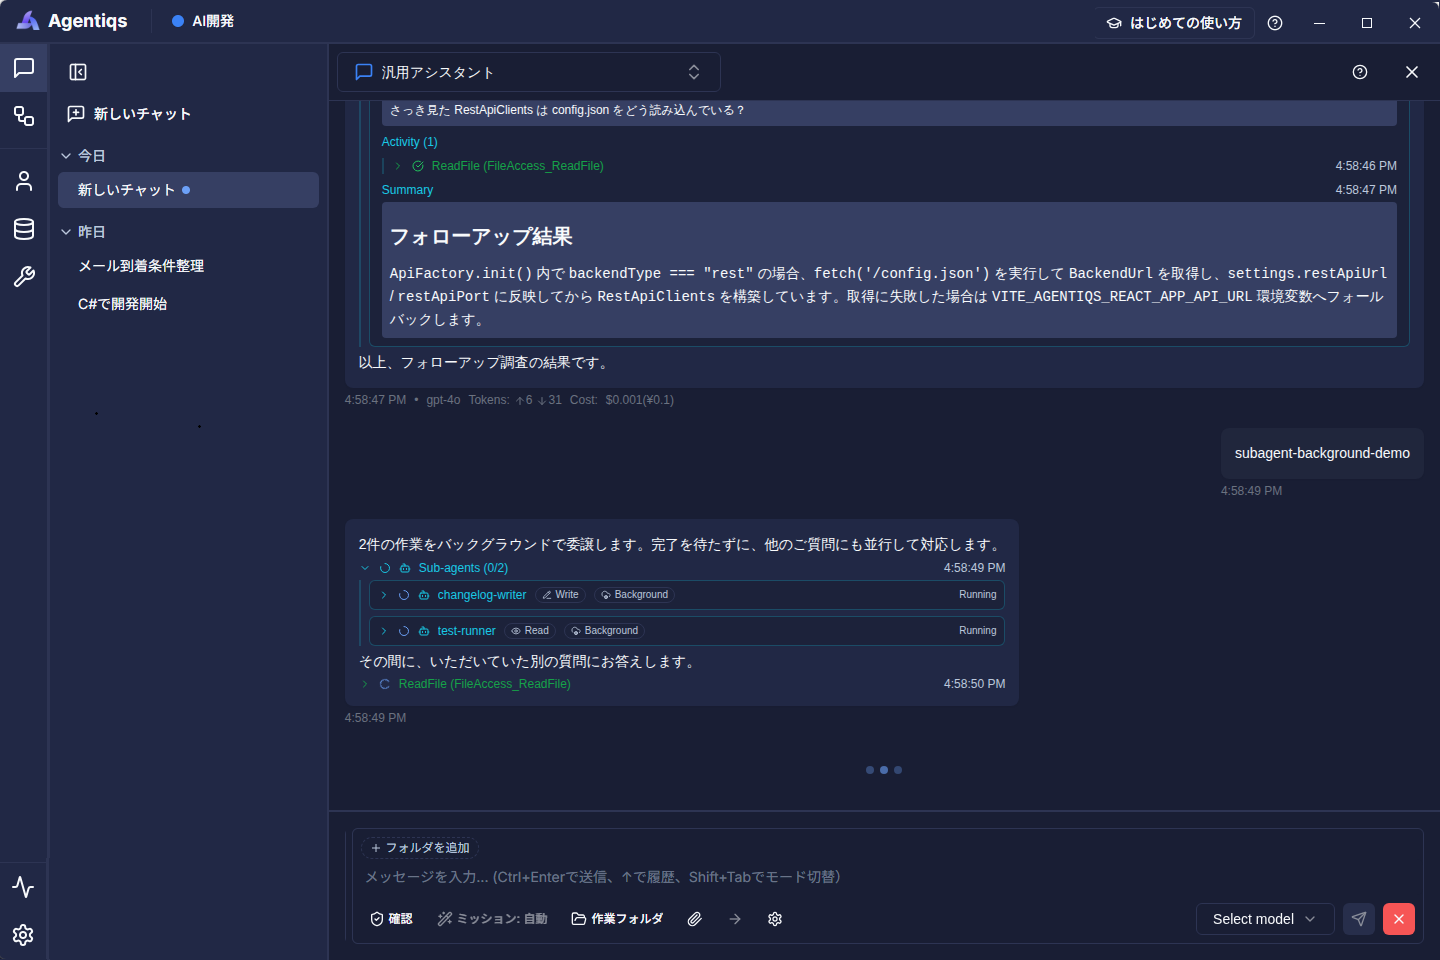
- Subagents run in parallel or in the background. The parent agent receives only a summary of the work, which helps reduce context consumption from long investigation results.
- You can check the progress of delegated work in chat, and the parent agent's responses make it easier to understand the final key points.
Setup and Execution
- Turn on [Dynamic Subagents] in the [Subagents] section.
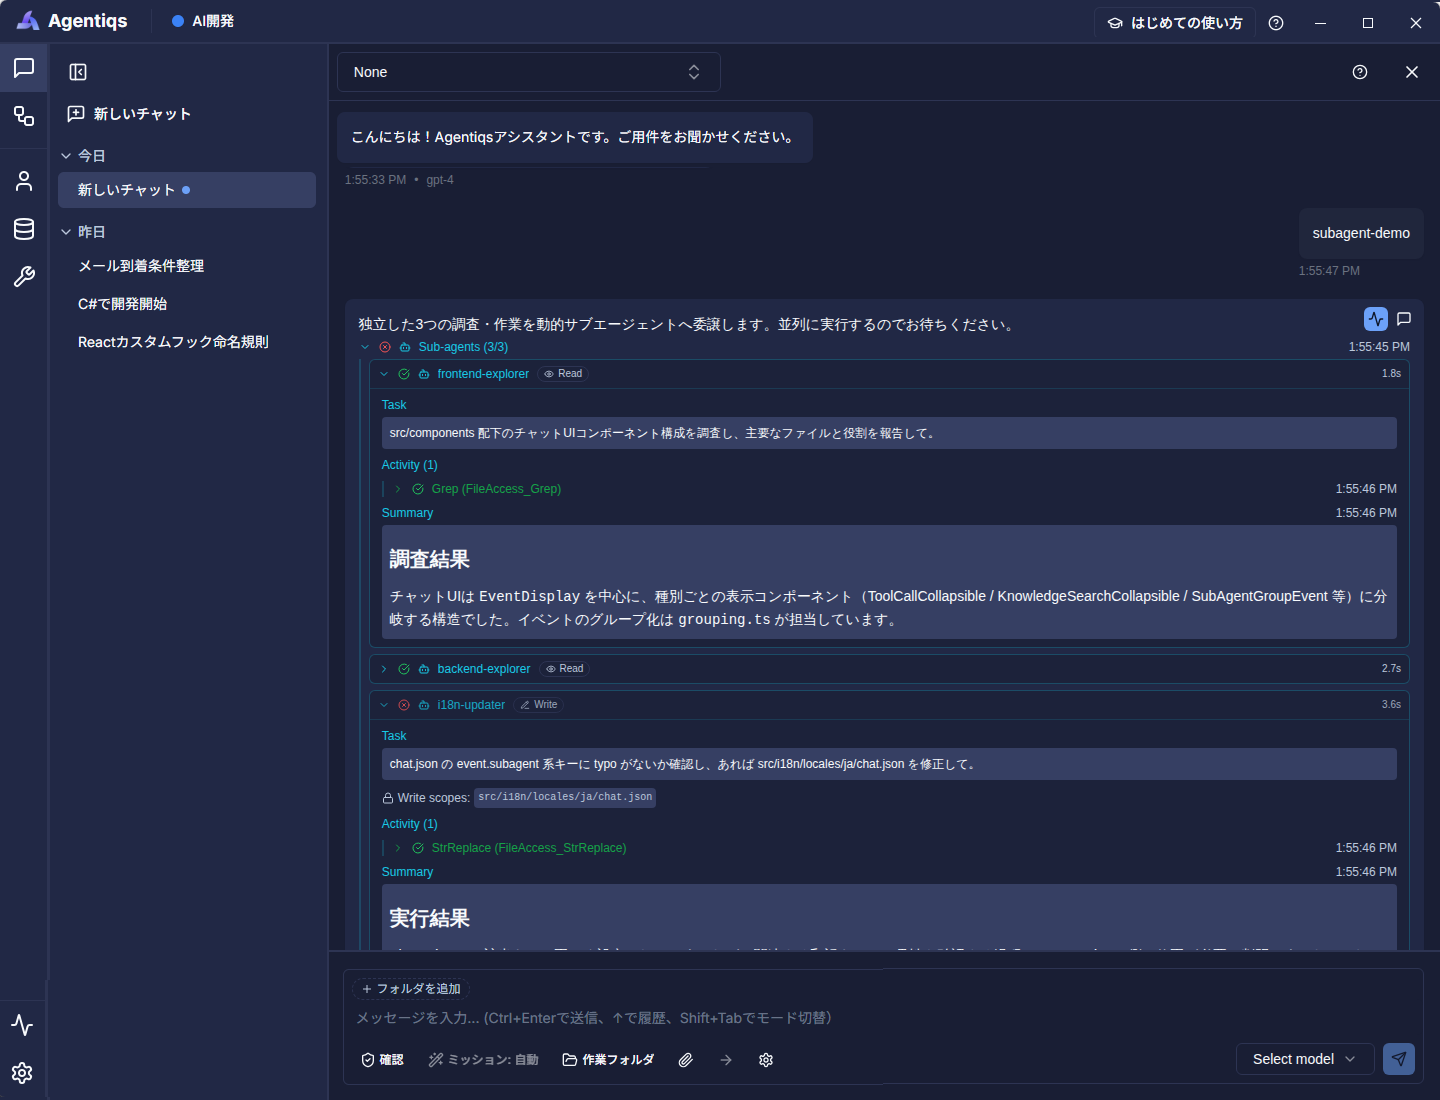
- In chat, request work that can be performed independently, such as "Investigate this from three different angles in parallel."
On the "Subagents (completed / total)" card shown in chat, you can check each task's name, mode (read/write), status, elapsed time, and the tools currently in use. Expanding the card lets you view the request details, tool execution history, and final summary.
While background execution is running, you can continue talking with the parent agent. When the subagents finish, the parent agent receives the results and reflects them in the conversation.
- Subagents are subject to the same approval rules and security policies as the parent agent. Even if automatic approval is enabled, restrictions imposed by security policies remain in effect.
- Read-only subagents cannot edit files. If you allow write access, limit the target folders to the minimum necessary.
- Clicking [Stop] in chat stops all subagents, including those running in the background.